


Graphics on the ARM
Another RISCWorld exclusive serialisation.
Understanding Vector graphics
Although most vector graphics software - and certainly Draw - is very easy to use, even by people who have no knowledge of how the applications work, some understanding of the fundamentals will help any user to get better results. It will also suggest all sorts of fascinating techniques and areas for fruitful experimentation.
This chapter considers some of those fundamentals. It does not purport to be a user manual for Draw since many of Draw's features are not covered, but it does describe the general features of vector graphics software, taking its examples so far as possible from Draw since all users of RISC OS have access to it and Draw ably exemplifies this kind of application. Where Draw is unusual, reference will be made to other applications as well.
Path objects
First, a little bit about terminology. Draw refers to vector graphics as path objects. This is to distinguish them from three other types of object (sprites, text lines and text areas) which it allows you to incorporate in your artwork. In this chapter we are concerned mainly with path objects and text objects. Path objects are so called because they follow the idealised version of the path taken by the pointer during the creation (and any subsequent editing) of the object. Paths may be open, that is they begin in one place and end elsewhere, or they may be closed, that is they end on the same point where they began and therefore form a continuous circuit as in a rectangle or an ellipse. They may be divided up into sub-paths by moves; a number of open or closed sub-paths may still constitute one path object as we shall see.
In common with most other packages Draw recognises three types of segment; straight lines (which Draw calls simply lines), curved lines (which Draw calls simply curves) and moves which represent a break in the line, moving the pointer elsewhere. Path objects can consist of a mixture of lines, curves and moves, but there are some restrictions on the use of moves. More on this later.
Segments and points
In geometry classes at school you may have been taught that a straight line is the shortest distance between two points. In vector graphics that is still true, but the two points are just as important as the line between them. Indeed there would be no line at all without the two points because it is the co-ordinates of these two points that are stored to mark the start and end positions of the line. All vector graphics by definition consist of vectors, often called segments, which may be straight lines, curved lines or moves that do not draw a line at all. All segments have a point at each end, and a point may be shared by two adjacent segments. The points at each end of a segment are sometimes called endpoints to distinguish them from another kind of point which we shall meet shortly.
Although the points themselves are invisible in the finished graphics, during drawing or editing they are normally represented on the screen as solid squares (some packages may use other shapes); the co-ordinate position is the centre of the square. A point may be displayed in a different colour to indicate that it is selected and therefore amenable to various editing operations. A selected point can be dragged (using ADJUST) to a new location with the pointer, this resulting of course in the repositioning of the segment(s) of which it is part. The co-ordinate data in the stack are updated automatically.
Lines
To draw straight lines is simple, although it varies in detail from package to package. In Draw you click on the uppermost icon in the toolbox - see Figure 2.1 - or choose Line in the Enter menu; the pointer changes to a cross-hairs; you now move it to where your first line is to start. Now click SELECT; this places your first endpoint and starts the line; the line is shown in red and is mobile. The start of the line remains on the point and its end follows the pointer as you move it around.
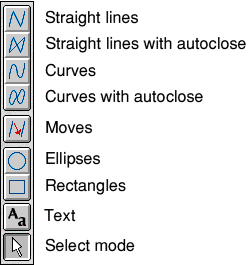
When the pointer is positioned where you want the line to end, click SELECT again. This creates the second endpoint and fixes your line which now changes to pale grey. It also provisionally starts a new line from that point; you can continue adding more lines, end to end, ad infinitum - subject, of course, to the availability of computer memory, but as each extra segment adds only 12 bytes to the data stack, you will probably have room for as many of them as you could wish!
Incidentally, pressing Delete will delete the last segment and pressing Delete again will delete the previous segment; if you keep on pressing Delete, eventually you will delete the point with which you began the object. Pressing Escape during object creation will cause the entire unfinished object to be lost. In RISC OS 3, pressing F8 will undo your last action; if your last action was the deletion of an object, F8 will restore it, provided the 'undo buffer' is big enough to hold its definition.
When you have finished your object, click ADJUST. This returns the pointer to its normal shape but leaves the object in an editable state with the lines shown in grey and the points in blue. When you click ADJUST on a point, you select it and it changes to red; you also select the segment which ends on that point and it too turns red. Clicking MENU provides a range of editing options available on the selected line or point; there is more on this later. You can move the selected point around by dragging it with ADJUST; for one pixel movement hold ADJUST on the point and press the arrowed cursor key for the direction in which you wish to move it.
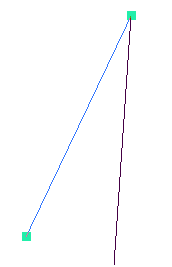
When you are satisfied that your points are correctly placed, click SELECT again. This finishes the object; all points disappear and the lines assume the thickness, colour and any other style attributes that you selected (more on these later). It also provisionally starts a new path object with the cross-hairs ready to position its first point. See Figure 2.2.
Curves
Curves are created in a similar way to lines. Click on the third-from-top icon in Draw's toolbox or select Curve in the Enter menu. When you click on ADJUST to indicate that you have finished placing points, you will notice two differences from lines: firstly the curves have automatically followed the smoothest possible route between the points and secondly that each curve has not two points, but four. It has an endpoint at each end just as a straight line has and these are shared with adjoining segments (if there are any). But it also has two control points, one near each end. These are shown in orange (they don't change colour) and are linked to the endpoints by a grey line which we shall call the link.
This curve system (known as the Bezier curve system) is widely used in graphics. A straight line, we reminded ourselves earlier, is the shortest distance between two points. A curved line could therefore be defined as a line between two points that does not take the shortest route. Indeed, the more curved you make it, the longer the distance you would travel if you followed it from one endpoint to the other. Bezier curves mathematically define curved lines in a very simple and economical manner; they only require the computer to store the coordinates of the two control points as well as the two endpoints.
While the object is editable, the control points can be dragged with ADJUST just as the endpoints can. Clicking ADJUST on a control point does not change its colour, but instead selects the endpoint to which it is linked. Incidentally whenever you drag an endpoint, you will find that any control points linked to it move an equal distance in the same direction. This is useful, since the overall shape of the line at that point is preserved.
There are two aspects of a control point's effect on the curvature of the curve to which it relates.
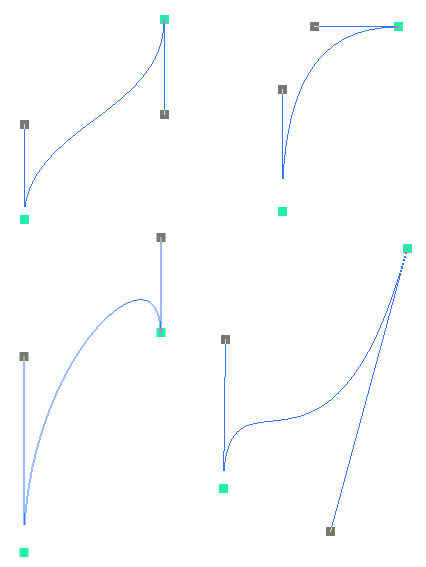
Firstly, it controls the direction in which the curve is heading at the endpoint. This it controls in the simplest possible manner: the link forms a tangent to the curve at the endpoint. In other words at the endpoint where the link meets the curve itself, they are pointing in precisely the same direction. See Figure 2.3.
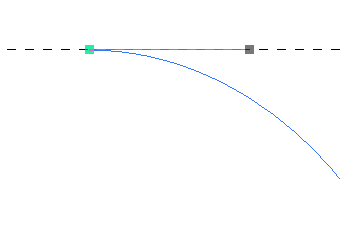
Secondly, the length of the link controls the length of the curve. Extend the link and you will extend the curve, so making it more tortuous; shorten the link and you will shorten the curve and thereby make it straighter There is an irony in this, since extending the link will reduce the tightness of die curve by giving it a greater distance in which to change direction; the curve will more gradually veer away from the direction of the link and towards its destination. If the link passes close enough to the other endpoint, the curve may even kink in order to take in the length that you have added. On the other hand, if you keep the link very short, the curve will bend very rapidly into whatever direction is needed to take it to the other endpoint. If all this seems complicated, don't worry. A brief 'play' and you will find that it becomes intuitive. See Figure 2.4.
Auto-close
The second and fourth icons in the toolbox produce more straight lines and curves respectively, with one difference - auto-close. The principal difference is that when you click on (or double-click SELECT) to indicate that you have finished plotting points, an extra line or curve will be drawn from your last endpoint to the first point in the path (or in the the last sub-path if your object has included any moves). This closes the path (or sub-path) and makes your object (or part of it) a continuous circuit. You can draw a triangle very quickly, for instance, by clicking on the second icon and then clicking select where you want the three angles and finally clicking on ADJUST.
Incidentally, the sixth and seventh icons in the toolbox are short-cuts for producing accurate ellipses (including circles) and rectangles (including squares) respectively. Both are plotted using just two points. For ellipses your first click locates the centre and your second is a corner of the boundary box, i.e. it represents both the horizontal and vertical limits of the object. For rectangles the two presses locate diametrically opposite corners of the figure. The objects produced are conventional closed-path objects with points and they can be edited in the normal way; they are identical to objects which you could have drawn point by point but which would probably have taken you rather longer.
Moves
Moves allow you to break off a path and resume it elsewhere. Click on the fifth icon from the top in the toolbox; move the pointer to the starting point of the next line or curve and click SELECT to place your point; you will find that Draw has automatically reselected lines or curves, whichever was previously in force. In the finished object there will be an apparent 'gap' in the path where you introduced the move; no line will appear. Sequences of lines and curves separated by moves are sometimes called sub-paths.
There are several restrictions on the use of moves:
- A path object cannot begin or end with a move, since either would be futile. Clicking on the move icon has no effect unless you are have one or more segments already laid down (you are in the middle of creating a path object). If having drawn a few segments you click on the move icon, place the pointer, click SELECT again to fix the end of the move and then click on ADJUST to finish your object, you will find that both the move and the last point have disappeared.
- One move cannot follow immediately after another; that would be futile as well. A number of seemingly extraordinary things happen when moves and auto-close are used together. You may even be tempted to think you have discovered a bug in Draw, but in fact there are good sound reasons behind all that Draw does; when you understand the rules, you can turn them to your advantage to create all manner of fascinating effects. The following four rules govern moves and auto-close.
- A move cannot form part of a closed path (such as a triangle, rectangle or an ellipse).
- If you click on the move icon while auto-close is selected, the auto-close routine will be applied to the segments you have just drawn, making them into a closed sub-path. However, the object itself remains open; you can move the pointer and resume drawing.
- If you select auto-close in an open-path object that includes one or more moves, the final segment will close to the start of the latest sub-path and not to the starting point of the object.
- If when editing a closed-path object you change a line or a curve to a move (most software does not allow this!) the result will be two closed paths separated by the move.
Multiple closed-path objects
If you bear these rules in mind, Draw's behaviour becomes predictable and very flexible. Applying rule 4 for instance, if you select auto-close lines and draw four points and then select move, auto-close will be applied immediately to the four points you have created and the path between them will be closed to form a quadrilateral, just as if you had clicked ADJUST instead of selecting move. The difference is that the object itself is not closed; you still have the cross-hairs pointer and when you next click SELECT you will start another closed path which is still part of the original object. You may continue ad infinitum, creating as many closed paths as you like (subject to memory availability!) all within one object, all linked (or should I say separated) by moves. Making all your closed paths part of one object in this way, instead of making each an independent path object, saves memory and storage space; it is also drawn more quickly.
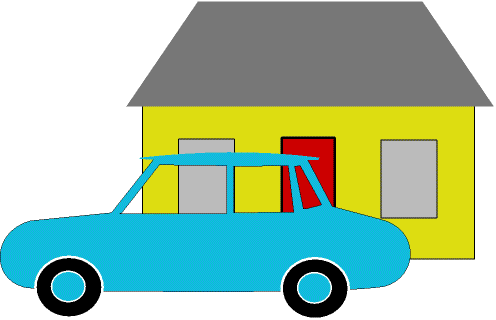
Of course one of these closed paths may overlap another. It may partially overlap it or it may be drawn entirely enclosed by it or enclosing another one, or both. Now this in itself is not particularly interesting unless you choose to give the object a fill colour (more on fill colours later). With Draw's default setting of the strangely named winding rule (more on this later too) the fill colour will not be applied in the overlapping area which will remain transparent. So, if one closed path totally encloses another (provided it is part of the same object) the inner path behaves as though it were a hole or window in the surrounding outline through which you can see any other objects that are behind. This is a very useful technique in creating animations or other special effects: you can put windows in a car or a house through which you can see what is inside or on the other side (see Figure 2.11).
The facility also makes alternating patterns such as chequerboards very quick and easy (Figure 2.5). They can be constructed as series of rectangular sub-paths that overlap each other; the fill colour (black) is applied only in areas covered by one but not two rectangles.
Moves in edits
Draw's editing facilities allow you to change a line or a curve in a finished path object to a move, provided of course that the segment concerned is not the first or last in the path or adjacent to an existing move - to comply with rules 1 and 2 above. Remarkably, as outlined in rule 6 above, you are allowed to change a line or a curve to a move even when it forms part of a closed path. Since by rule 3 a move cannot form part of a closed path, we are confronted by a paradox and indeed DrawPlus and Vector disallow such an edit. In fact Draw resolves the paradox in a thoroughly sensible if subtle manner. Nevertheless the results of this operation have confused experienced users: even the writers of Edition 2 of the Archimedes User Guide (page 114) failed to understand what was happening.
Try the following. Select auto-close line and create a rectangle; we'll name its four successive points A, B, C and D in the best geometry-class tradition (Figure 2.6 left). Click ADJUST on D; this selects point D and the line CD; click MENU. One of the options available to you on the editing menu (more on this menu later) is Change to move. Choose this option by clicking SELECT on it. The object changes and you now appear to have three lines meeting at point A: you have a new line CA as well as the original AB and DA (Figure 2.6 centre),

How can you have three lines meeting at one point? You can't; it's an illusion. What has happened is as follows. Draw behaves as though you selected move after placing point C and so it autocloses C to A, creating the new line CA. The move takes the pointer to the next point on the stack which is D. On the stack it finds the line DA which was drawn when you originally autoclosed the rectangle. It regards this as me next line in the object and draws it. But, remember rule 6 above: when you edit a move into a closed-path object, two closed path objects result. So it now adds a closing line back from A to D. Despite appearances you have two coincident lines between A and D! You can prove this by clicking on D to select the line AD.
Change it to a curve and drag a control point to separate the two coincident lines. If you drag point A, you will find that this is in fact a separate point from your original starting point A; it just happened to be positioned directly over it (Figure 2.6 right).
Editing path objects
Of course it goes without saying that you can use the toolbox (or the Enter menu) to switch between (straight) lines, curves and moves whenever you wish as you draw your object, subject to the restrictions concerning the use of moves outlined above. But you can also edit a finished path object, deleting or inserting segments and changing lines to curves and vice versa and either to moves (if appropriate.) after you have finished drawing it.
You enter editing mode automatically after you have clicked ADJUST to finish the object you are creating. You can also edit a finished object either by selecting the object (see later on Select mode) and clicking on the Edit option in the Select menu or by clicking on any of the line or curve icons in the toolbox and then clicking ADJUST over one of the points in the object you wish to edit. You cannot edit an object if it forms part of a group: you must ungroup it first (see later on the Select menu).
When an object is editable its lines and curves are displayed in pale grey, the endpoints in blue and control points in orange; a selected line appears in red and a selected endpoint in red. These colours may appear different if displayed against a coloured, i.e. non-white, background.
If a line appears to be invisible and is displayed in yellow when selected, then you have two lines coincident.
While the object is editable, you can select points by clicking ADJUST on them. You can move the selected point by dragging it with ADJUST or by pressing the arrowed cursor keys while pressing ADJUST. The line or curve which ends at that point is also selected. Obviously, if you select the starting point of an open-path object, no lines or curves will he selected. You will not be able to select or edit a move which ends on a closed sub-path.
While a point is selected, clicking menu will produce a menu of operations which may be applied to the point or segment selected. Some of the options will be greyed out. i e. not selectable. because they are not applicable.
Change to curve, Change to line, Change to move
At least one of these options will be greyed out since it would be pointless to change the selected segment to whatever kind of segment it already is. You will be unable to change the selected segment to a move if it is the first or last segment in the object or if it is adjacent to a move. If you change a line or curve to a move in a closed path, remember that you will end up with two closed sub-paths linked by the move.
Add point
This adds a new point half way along the selected segment, converting it to two segments of the same type (line or curve) as the original. You cannot add a point to a move since this would create two adjacent moves; you must change it to a line or a curve first. You can then change one of the daughter segments back to a move if you wish.
Delete segment
This deletes the selected segment and endpoint and joins the free segment on one side to the free point on the other. If the segment concerned is the last in the object and the previous segment was a move, then the move and its point are deleted as well.
Flatten join
This is only available in RISC OS 3 versions of Draw. It adjusts the two control points linked to the selected point so that they are exactly opposite each other: that is, the two tangents form a continuous smooth transition, 'flattening' the curve.
Open path
This is only available if the selected segment is part of a closed path. The closed path is opened at its starting point, whether or not this was the selected segment. You cannot open a closed path at any point except its starting point. This operation creates a new finishing point for the previously closed path, near the starting point.
Close path
This is only available if the selected segment is part of an open path. It is the reverse of the Open path option; it removes the final point of the path and ends it instead on the starting point. Unlike the auto-close option, it does not create a new segment to join the last point to the first.
Close path may be applied to an object consisting of a single curve, so that it curves round and ends on its starting point. Oddly, it may even be applied to an object consisting of a single (straight) line, producing a line having zero length that begins and ends on the same point.
Enter coordinate
This displays the current co-ordinates of the selected point and allows you to enter new co- ordinates. It also allows you to choose between Imperial and metric measurements (inches and centimetres). All values entered are rounded to the nearest multiple of 1/46,080 inch (or its metric equivalent), this being the length of the internal unit in which Draw works. We shall look at this unit in more detail and use Enter coordinate later in this chapter.
Snap to grid
In RISC OS 3 versions of Draw this facility, provided on the Select menu, is duplicated in the (path) Edit menu. It forces all points in the object on to the nearest grid points.
Styles
When you have finished editing your object, click SELECT anywhere in the Draw window to see how the finished object looks. The object is now redrawn in the chosen style.
Ultimately, each path object consists of a number of lines, curves and moves and a number of enclosed areas. Each object is allowed one set of style attributes. These are line width, line colour, fill colour, line pattern, join style, start cap style, end cap style and winding rule. So, if you have ever been tempted to think of a line as a fairly humble sort of beast, just a path between two points, now is the time to think again. In graphics even straight lines can become exceedingly complex. In Draw, whose vector graphics facilities are fairly basic, lines can have a mind-bogglingly vast range of properties, as evidenced in that it takes at least 108 bytes of data to describe a path object consisting of a straight line between two points.
Only one setting of each style may be used in each path object, so you cannot have some black lines and some red ones within the same object: nor can you have some lines 1 pt wide and some 4 pts wide. If you want to vary styles in this way you must create several separate path objects; you can always 'group' them afterwards so that they are treated as though they were one object.
Let's consider the styles of a line as exemplified in Draw. When any of the path object tools are selected, the new path object being created will be given the style settings currently set in the top half of the Style menu selected from the application's main menu. If you wish to change the style of an object that has already been finished, you must first select it (see later) and make your choice from the style menu while the object remains selected. Note that while an object is selected, the Style menu always indicates the styles currently in force in it; this may be useful if you have forgotten, say, the line thickness used in a certain object and now you wish to create another like it.
Line width
Firstly a line has a width. Since this is generally a comparatively small measurement it is expressed in points (pts). The width menu offers a choice of useful values and a writable field is provided allowing you to enter values not offered as standard. Fractions of pts are acceptable; remember that Draw converts all measurements to multiples of 1/640 pt, even though the width menu displays widths to two decimal places only. When an object is magnified, the width of its lines (if finite) as well as its co-ordinate values is multiplied by the magnification factor to keep the proportions consistent. You can check this for yourself by drawing a few lines with the width set to 0.25 pt and then selecting the object and magnifying it by 0.5. Leaving the object selected, the width menu will now show the value 0.12; line width itself has been subjected to the magnification process.
When a line has a finite width, it is assumed to be balanced evenly on either side of the infinitesimally wide path that links the co-ordinates of the two end points.
Thin lines
The first item in the width menu and the one that is selected by default happens to be the only exception to the rule concerning the magnification of line widths. It is simply listed as thin. In vector graphics a thin line has special properties. Its absolute width varies depending on the output device; it is always reproduced as the thinnest line which the output device, be it a screen or a printer, can handle. In other words, it is always one pixel wide, irrespective of the pixel size. The width of a thin line is not affected by zooming or magnification. If you zoom up from 1:1 to 8:1, the whole object will appear much bigger of course, but if composed of thin lines, they will appear the same width as they did at 1:1. And if you zoom out to 1:8, the thin lines will still be the same thickness even though the image of the object is much smaller.
This leads to several important practical considerations that you should bear in mind whenever you use thin lines.
Firstly, because their absolute width depends on the vagaries of the output device, beware of using visible thin lines as a part of any artwork that must be viewed at several different sizes. (They are fine in artwork when invisible, e.g. having no line colour, but used to bound an area of fill colour.) If the thin line itself is part of the detail, it will change the proportions of that detail when the graphics size is changed.
Secondly, the thin line that looks substantial enough on the screen (where it is 1/90 inch wide) may be almost invisible when reproduced on paper using a 600 dots per inch laser printer, where it is 1/600 inch wide. I once used some vector graphics clip art which incorporated an abundance of very fine detail and was horrified to find that in my printout all that intricate detail had disappeared! On investigation I found that the detail consisted of thin lines in white against a black background; in my laser printer the toner had simply 'filled in' the 1/600 inch wide gaps that the lines should have left. With the line width changed to 0.5 pt (4 pixels wide at 600 dpi) the printout was perfectly satisfactory.
On another occasion, before I appreciated the subtleties of thin lines, I designed a newsletter in Draw whose layout included some thin lines, this time black against the white background. I used the PostScript printer driver, sending the output to a disc file which was taken to a commercial printing shop for professional film setting. On the films that were returned my thin lines had vanished altogether! The film setter had a resolution of 1200 dots per inch and I imagine that the resulting 1/1200-inch-wide lines were just too thin to be seen, perhaps too thin even for the resolution of the film.
Ironically, just as a thin line can cause problems through its propensity to disappear (a function of the mechanics of the printing process), so thin lines are sometimes used to stop details from disappearing.
Try the following in Draw. Select the rectangle icon, set line colour to None but select a good bold fill colour like black, red or green. Now draw a rectangle that is at least an inch wide but only two or three pixels high on the screen (at 1:1), so it's short and wide. This rectangle represents an important detail in some graphics that are going to be displayed at various magnifications, some very small. So, let's see how it looks at 1/10 of its present size. Select it and magnify it by 0.1. You should find that it has disappeared altogether! This is not surprising when you consider that its new height to the nearest pixel is 0. Now magnify it by 10 to restore it to its original size. It will reappear, just as it was when you drew it. Select the line icon, set line width to thin and line colour the same as the fill colour used in the rectangle. Now draw a single line across the width of the rectangle, about half way up. Of course, when finished you won't see this line at all, since it blends into the rectangle behind it. Select both objects and group them and then magnify by 0.1 as before. This time a thin red object will be visible. It is in fact the thin line, being reproduced one pixel wide as Draw is bound always to do with thin lines. At least something is now visible to represent your important piece of detail at low magnifications. The thin line is said to have hinted your piece of detail. The Acorn outline font system employs hinting using thin lines in this way to ensure that parts of characters are always represented at even the smallest tvpesizes (provided of course that the font in use has been properly hinted).
Line colour
The line colour is, of course, the colour of the line itself. The line colour dialogue box in Draw allows you to enter a line colour that is 'None'. When this is selected the line itself will be transparent or invisible. It will still be there and can be edited in the normal way, including being changed to a 'proper' colour.
Why should anyone want an invisible line? There are in fact many reasons. Often the line will be required only as the boundary of a shape having a fill colour, for example a green rectangle. You could produce a green rectangle by making the line colour the same as the fill colour, but then you would also have to take the line width into consideration. Also, if you are creating a series of objects each having a different fill colour, every time you changed fill colour, you would need to change line colour as well. It is far easier to leave the line colour transparent. You may also find transparent line colours and fill colours useful if you are creating an animation with a package such as Tween. Tween produces animations from Draw files and one of its useful features is that it will produce intermediate frames from 'key' frames. But the key frames must contain the same objects in the same order in the stack; only their positions, sizes, proportions and colours may vary. So if you want an object suddenly to appear out of nowhere, one way is to make it initially transparent and at the required frame give it real colour. You can make it vanish again by the reverse process.
Some users find the colour dialogue boxes in Draw confusing, since they offer a choice of 16 colours plus transparent in any screen mode (even in the 256 colour modes). They also appear to offer a means of fine tuning the colours that are present, by dragging red, green and blue sliders as in the RISC OS palette, except that 256 levels of red, green and blue are accessible. And yet, when you try using those sliders in a 16-colour mode in RISC OS 2, no new colours are produced. (In RISC OS 3 some new colours do appear.) So what is happening?
You must for a moment return to the fundamental principles of vector graphics. In Chapter 1 the very second sentence I wrote about vector graphics is that its very nature makes it 'independent of screen mode or printer resolution'. The limitation to 16 or 256 colours is a function of the screen mode and therefore irrelevant in vector graphics. Just as Draw stores its co-ordinate data in units that are far too small for any practical output device to resolve, so it also stores its colour information in greater detail than much hardware can handle. In the data stack Draw stores each line colour (and each fill colour) using neither the Desktop nor the RISC OS colour systems but by allocating one complete byte to each of the primary colours red, green and blue, plus a transparency flag. In other words Draw supports full 24-bit colour giving you theoretically a choice of 256 x 256 x 256 = 16,777,216 different colours, plus the transparent option. So you can manipulate those sliders with confidence knowing that in the data stack the objects you create will be allocated whatever subtle shades you have specified. With most hardware, however. RISC OS is limited at present to a maximum of 256 colours and so, when reproducing objects having colours that do not correspond to any of those available in the current palette, it will substitute whatever colour in the current palette is the closest approximation.
RISC OS 3 represents an advance on RISC OS 2 in that it can use dither patterns (chequerboard- type patterns of pixels using two or three palette colours) as though they were palette colours. In this way Draw can simulate hundreds of colours in 16-colour modes and thousands of colours in 256-colour modes. Of course, if you are fortunate enough to own a video enhancer that implements 24-bit colour or a colour printer that handles true 24-bit colour, then you should be able to view your graphics creations in their full glory.
When selecting colours using Draw's colour dialogue boxes, you must remember to click on the OK icon or your selection will be ignored.
Fill colour
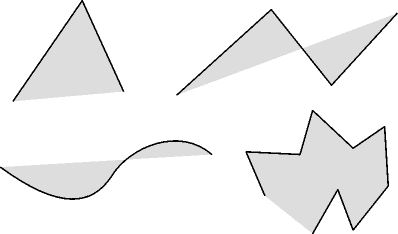
The fill colour is the colour enclosed by the object (but this is affected by the winding rule described later). Objects do not have to be closed paths for the fill colour to become visible, since a virtual line between the start point and end point delimits the filled area on an open- path object. Even an object consisting of a single straight line is allocated a fill colour, although it will not be seen since a single straight line does not enclose an area. Two straight lines or a single curve can enclose a Filled area; on the open side the colour fill will extend to a virtual straight line between the object's endpoints (see Figure 2.7).
The dialogue box is exactly similar to the line colour dialogue box, supporting 24-bit colour plus a transparency flag labelled 'None'. If the fill colour is transparent, the background colour or other objects behind the present one will of course be visible through the object.
Pattern
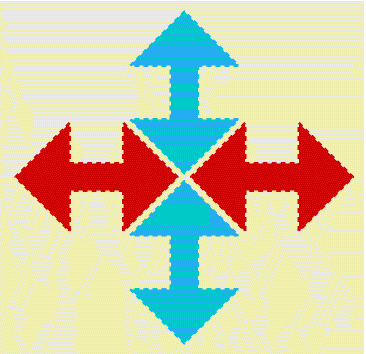
Beside normal solid lines, a line can have a pattern such as dotted, dashed, dot-and-dashed. These patterns are useful in graphic design for borders and edges, for example in coupons to be cut out. A less obvious use is exemplified in Figure 2.8 which is a reproduction of a traditional African pattern; giving the solid shapes dotted lines in the Fill colour simulates a jagged edge effect representing weaving.
Join
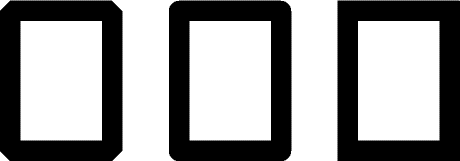
In vector graphics most segments form part of an object consisting of many such segments linked end to end with points shared between them. Usually a point marks the spot where there is an angle between the segments (if there were no angle there would probably be no reason for the point to exist). These angles are called joins and Draw offers a choice of three styles: mitred, round and bevelled, although it is only in segments that are more than a few pts wide that the differences become apparent (Figure 2.9).
Start cap, End cap
As was mentioned above, most segments in vector graphics are joined on to other segments; often objects consist of closed paths such as rectangles, triangles and ellipses. In these all segments are joined to other segments at both ends and there are no 'loose ends'. However, loose ends can and sometimes do occur and are called caps. They occur at the start and end of open-path objects and also at the starts and ends of sub-paths. Draw offers a choice of style for these. Draw distinguishes between the cap at the starting endpoint and that at the finishing endpoint, you may select a different style at each end, which is useful when drawing arrows, although the same choice of styles is offered for each. The difference between the butt and the square styles is simply that additional length is added to the square end (Figure 2.10). In the triangular caps you may specify the width and height; the units are the line width. As with joins, the effect of these styles will usually be apparent only if the lines have appreciable width.

Winding rule
This curiously named style causes much confusion, even amongst experienced graphics software users. The winding rule determines whether an enclosed area is filled with the currently selected fill colour or left transparent - in other words, it determines what is reckoned to he inside. (If the fill colour transparency flag is set, clearly the problem does not arise.) Winding rule is of interest where there is a loop in the boundary or in multiple-closed-path objects where one closed path is wholly or partly enclosed within another.
In Draw, as in most vector graphics software, there is a choice of two winding rules. The default is the 'even/odd' winding rule, which is probably the more useful of the two. Imagine that you have entered into the world of graphics that you are creating and that you propose to walk from outside the boundary of the object into the enclosed area whose fill colour - or lack of it - we are considering. According to the even/odd winding rule, the area is filled only if on your journey into it from outside the object you crossed an odd number of paths. If you crossed an even number of paths, the area is left transparent, ignoring any fill colour selected. So a hole in the centre of the object remains transparent. This may be useful when drawing buildings or vehicles having windows through which you can see other objects behind (Figure 2.11). Or when drawing letters of the alphabet which contain holes, such as '0' and 'b', but an island in that hole would be filled.
The other winding rule is called 'non-zero'. This rather suggests that if the number of paths enclosing the area is any other than zero, that area is filled, and when you use it, so it first appears to be. But it is a little more complicated than that (and this is where the 'winding' comes in). It all depends on the direction (clockwise or anticlockwise) in which you created those paths enclosing the area. If all were made in the same direction, the number of paths is added up; since it must always be greater than zero, the area is always filled. But if any were made in the opposite direction, you must subtract them from the number in the first direction. And if the number of paths in each direction is equal, they cancel out and the effective number is zero, so the area is not filled, but left transparent.
Operations on whole objects
So far we have considered the creation and editing of path objects in Draw. These are operations generally involving parts of objects such as points and individual segments. But there is also a wide range of operations that can be applied to whole objects or groups of objects. First you must enter Select mode by clicking on the lowest icon in the toolbox or by clicking on the entry Select in the main menu or by clicking on the entry Select all in the Select menu. When in select mode, you must select the object (or objects) concerned.
Selecting and deselecting objects
There are four ways an object can become selected:
- If you wish to select one object only, move the pointer over that object and click SELECT. Any objects that were previously selected will be deselected
- If you wish to select an additional object when one or more objects are already selected, move the pointer over the object concerned and click ADJUST. That object will now be selected in addition to those that were previously selected.
- If you wish to select all the objects in the drawing, click MENU, choose the Select menu and click on Select all.
- If you wish to select all the objects in a certain area of the drawing, move the pointer to a nearby position where it is not over any object, hold down SELECT and drag out a box. All objects overlapping the box when you release SELECT become selected. Any objects that were previously selected and which are wholly outside the box are deselected. Alternatively you may drag out your box with ADJUST. As before this will select all objects overlapping the box, but any other objects that were previously selected will remain selected.
Objects that have been selected are distinguished by the appearance around their edges of a dotted red boundary box having two 'handles' on its right-hand edge. The significance of these will be explained shortly.
Objects can be deselected in the following ways:
- To deselect just one object, move the pointer over it and click ADJUST. If other objects were previously selected, they will remain selected.
- Click SELECT over another object. That object becomes selected and all others are deselected.
- Click SELECT with the pointer not over any object. All objects are deselected.
- On the Select menu click on Clear. This deselects all objects.
- On the toolbox click on a different icon so that you leave Select mode. This deselects all objects.
If you have many objects overlapping it can sometimes be very difficult to select the particular object you want. A useful trick is to use the box method (4) to select all objects in the vicinity and then click ADJUST on all the unwanted objects to deselect them until only the one you wish to select remains selected. Sometimes you may have no option but to drag a collection of selected objects away from the rest of the drawing and pull them apart in order to reach and select the one needing attention.
So let us see what you can do to the objects you have selected.
Moving objects
You can move selected objects anywhere in the drawing. Place the pointer in the red dotted boundary box and hold down SELECT. The colour of the dotted boundary will change; moving the mouse will now drag the entire object; release SELECT when it is in the required position. If other objects are also selected, they too will be moved an equal distance in the same direction.
Scaling objects
You can scale selected objects, i.e. change their size. Move the pointer into the lower of the two handles on the right-hand edge of the dotted red boundary. Hold down SELECT and drag the object's bottom right-hand corner to its chosen new position. The top left-hand corner will remain in its original location so that the object's height and width are changed. If the object is a path object or a sprite, it can be inverted or mirror-imaged by dragging its bottom over its top or its right-hand edge over its left-hand edge. If other objects are selected, they too will be scaled in equal proportion. This operation is inevitably crude. It is fine where you wish to resize an object to exactly fit in a certain area. If you want to magnify an object by a precise factor, for example, if you want to double its height or reduce both height and width by a factor of exactly 5, you should use the magnification facility described below.
Rotating objects
You can rotate path objects. If you are using the version of Draw provided with RISC OS 3 you can also rotate text objects and sprites, but not text areas. Move the pointer into the upper of the two of handles on the right-hand edge of the dotted red boundary. When you drag this handle with SELECT, you will find that the selected object rotates as though it were pivoted at its mid-point. If other objects are selected, they too will be rotated through an equal angle.
This operation, like the last described, is inevitably imprecise. It is fine where you wish to rotate the object so that it points roughly in a certain direction. If you want to rotate an object through a precise angle, such as 60 degrees, you should use the Rotate menu option described below.
Saving selected objects
While one or more objects are selected, they may be saved to a file quite independently of the whole drawing. From the main menu choose Save and then Selection. The resulting file may be saved to disc or into another Draw window or on to the Draw icon to create a new window containing only the selection. It may also be saved into another compatible application such as a picture frame in a DTP package.
Changing object style
As mentioned earlier, while an object is selected, you can change its style characteristics if it is a path object or a text object. Changes selected from the Style menu, such as new line widths, line colours or fill colours, will be applied to all selected path objects.
The Select menu
The following operations are accessed from the Select sub-menu of the main menu. Some options may be unavailable and will be shown in pale grey type. If no objects are selected, normally only the top item, Select all, will be available.
Select all
This causes all objects in the drawing to become selected. It is useful if you wish to shift the entire contents of the drawing, perhaps if it was overlapping the printable area of the page. for example.
Clear
This causes all objects in the drawing to become deselected.
Copy
This creates a copy of each selected item, slightly offset from the original. After the operation, the copies are selected, not the originals. If you click on the menu with ADJUST, the menu will remain open allowing you to repeat the operation and build up large numbers of identical objects!
It is not widely known that the copy facility can be used to copy objects between windows. When the objects that you wish to copy have been selected in one window, move the pointer into the destination window and open the Select menu. Just the Select all and the Copy options will be available; clicking on Copy will copy the selected objects from the other window.
Note that the copied objects are fully independent of the original; subsequent edits to either are not reflected in the other. Some packages such as Vector offer another object copy facility called replication in which the copies are clones of the original and cannot be edited; if the original is edited, however, the changes are reflected in the copies. Draw does not offer replication.
Delete
This removes all selected objects from the drawing and is the only way of erasing unwanted objects. After Select all. of course, it deletes all objects, leaving you with an empty window. No warning is given, so use this facility with care. In RISC OS 3 the Undo option (F8) will restore accidentally deleted objects, provided the undo buffer is large enough to contain their definitions.
Front
This moves selected objects to the top of the stack, i.e. to the front of the drawing so that they obscure any other objects which they overlap.
Back
This moves selected objects to the bottom of the stack, i.e. to the back of the drawing so that they are obscured by any other objects which they overlap.
Group
This is only available if more than one object is selected. It groups the selected objects so that they are subsequently treated as though they were one object with a common boundary box. It is a useful means of ensuring that groups of objects stay together.
In the grouping operation the group is always moved to the top of the stack, that is, to the front of the drawing. If you wish the group to stay at some depth in the stack, you must subsequently select all the objects that need to be in front of the group and apply the Front option.
Ungroup
This reverses the effect of the last described operation, separating a previously grouped object into its constituent objects. In RISC OS 2 it is only available if a single grouped object is selected. In RISC OS 3 any number of selected groups may be ungrouped simultaneously. The ungrouped objects retain their places in the stack
Edit
If a single path object is selected, the option enters edit mode so that the object can be edited, e.g. its points and control points become visible and can be adjusted. It is useful if you have had difficulty in entering Edit mode from Enter mode. In RISC OS 3 you are subsequently returned to select mode with the edited object selected.
If you are using the version of Draw supplied with RISC OS 3, you can also edit the contents of a single text object. A dialogue box will appear containing the wording of the text object (reproduced in the system font). You can move the caret using the cursor keys and delete or insert characters at any point. Pressing Return will close the dialogue box and the contents of the text object will be updated.
Snap to grid
This only applies if the grid is displayed and grid lock is active (select the Grid menu from the main menu). In RISC OS 2 it forces each point in the selected path objects to snap on to their nearest grid points, providing a useful means of ensuring that vertical and horizontal lines are true. In RISC OS 3 it forces the bottom left-hand corner of the object's boundary box on to its nearest grid point, moving the object as a whole but leaving the relative positions of the points in the object unaffected. The identically named option in the Edit menu forces points on to the nearest grid points.
Justify
This only applies to groups of objects. It provides a means whereby the constituent object-s in each group can he neatly aligned. Horizontal alignment is by left-hand edges, right-hand edges or centre line. Vertical justification is by top edge, bottom edge or centre line.
The following five items are only present in the Select menu in the version of Draw supplied with RISC OS 2. In versions supplied with RISC OS 3 they are in a separate menu, the Transform menu, accessed from Draw's main menu.
Rotate
This rotates the selected objects through a specified number of degrees anticlockwise. For clockwise rotation insert a minus sign before the figure or subtract the required angle from 360. Objects rotate about their mid-point. This option allows more precise rotation than dragging the upper handle on the right-hand side of a selected object's boundary box. Text objects and sprites can only be rotated if you are using RISC OS 3.
X scale, Y scale
These options scale the selected object(s) by an exact figure rather than the inexact amount obtained by dragging the lower handle. The figure is in proportion to the current size, so entering 2.0 will double that dimension and entering 0.5 will halve it. The X-scale relates to the horizontal axis and the Y-scale to the vertical. Line thickness is unaffected.
Line scale
This scales the line width in the selected path objects. Scaling is relative to current line width and thin lines are unaffected.
Magnify
This combines X scale, Y scale and Line scale into one operation, the same magnification factor being applied to all co-ordinates and finite line widths.
If you are using RISC OS 3 you also have the following three items available from the Select menu.
Interpolate, Grade
To use either of these facilities you must have two similar path objects selected and grouped. They must be similar in that they have the same number of points and segments and the same sequence of segment types. Both operations create a number of new objects having characteristics intermediate between the two 'parent' objects. The new objects have their size, shape, orientation, location, line width, width and height of triangle start and end caps, line colours and fill colours intermediate between those of the two parent objects. See Figure 2.12.
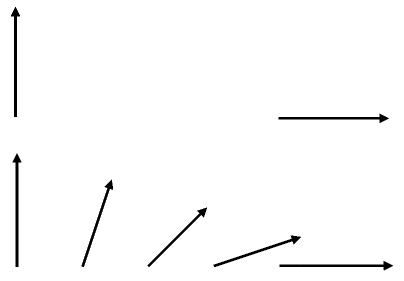
In practice the only difference between Interpolate and Grade is that Interpolate produces one extra object and this lacks a fill colour, although this will only become apparent when working with closed paths having fill colours. In the Interpolate option, the number that you enter is the number of interpolations or gradations required, i.e. one less than the total of objects with which you wish to finish. See Figure 2.13.
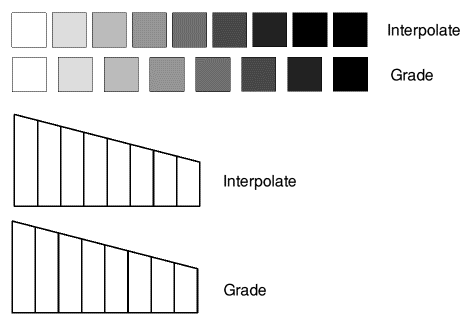
These features can be used (with some limitations) to perform 'inbetweening' in animations, that is the creation of intermediate frames. They can also be used to create three-dimensional graphs and highly intricate patterns and to add graded colour fills to drawings: you copy the object to be filled, reduce its size, change its fill colour and use the grade facility.
Figure 2.14 gives an example. If you have an early A5000 machine which incorporates version 0.76 of Draw, you should beware of a bug in the Interpolate/Grade routines. If the parent objects include open paths or sub-paths, each interpolated object is drawn twice, the two drawings exactly overlaying each other, new lines being drawn to join one of the new objects to the next in the series on one side and the other new object to the next object on the other side. Probably this bug will not cause much trouble, since the facility is more useful when applied to closed paths and closed sub-paths and with these Grading and Interpolation proceed correctly.
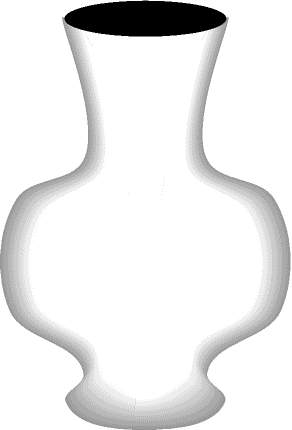
During the interpolation/grading process, however, the closed paths are opened, albeit, imperceptibly. Although this is quite normal in this type of operation, it has a consequence that becomes apparent if you should subsequently decide to isolate the original parent objects, edit them and then repeat the interpolation/grading process. Unless you remember to close their paths first, the bug will come into action and give messy results.
Convert to Path
This is only available if one or more text objects is selected. Although there is no immediate difference in the appearance of the object, except that the anti-aliasing disappears, it has been converted to a group of path objects, each character being a separate path object. 'This conversion is not reversible and the former text object can no longer be edited as a text object. Text that has been converted to vector graphics in this way is, however, suitable for various operations that cannot be applied to text. For instance, the characters can be separated and moved about individually; they can be given separate line and fill colours and their line thickness can be edited. This kind of font manipulation is considered in more detail in Chapter 4.
Sprite objects
Sprites (pixel graphics) can be imported into Draw windows where they form sprite objects. They cannot be created or edited in Draw, those are the functions of its companion application Paint (see Chapter 8). But they can be moved, scaled and flipped about either axis in the same way as path objects. In RISC OS 3, hut not RISC OS 2, they can also be rotated.
Text handling
Although this book is primarily concerned with graphics, most drawings incorporate text as labels and titles. Draw recognises two totally different types of object which handle text: text objects and text areas, sometimes called text column objects. They have little in common except that they both display text using the installed font manager and fonts.
Text areas are really beyond the scope of this book. The text is prepared in a separate text editor such as Edit and dragged into the Draw window; embedded commands in the text file allow changes of style and format wherever required. Indeed it offers many of the facilities of desktop publishing, but without the convenience. The process and the commands are described briefly in application manuals and in more detail in my book Budget DTP on the Acorn Archimedes, Dabs Press, 1992.
Text Objects
Text objects, in contrast, are ideal for providing titling, labels and annotations in graphics. A text object consists of a single line of text, uniform in style. It is created using the text entry facility in Draw, either by clicking on the Text icon in the toolbox or by selecting the Text option in the Entry menu.
Position the pointer where you want your text to start and click SELECT; the pointer changes to a caret. If necessary you can reposition the caret by moving the pointer elsewhere and clicking SELECT again. You can now enter text at the keyboard. As you type, the characters appear on the screen at the position of the caret which moves to the right (just as it does in Edit and DTP applications). No editing facilities are provided apart from the Delete key.
To finish your text object press Return or click SELECT. If you press Return the caret moves to a new position below the start of the object you have just finished. This is useful if you need to build a column of neatly aligned text entries. If you click SELECT, the caret moves to the current pointer position. Beware! If you press Escape while creating a text object, your unfinished text object is lost irretrievably. You also lose an unfinished text object if you click on the Select icon in RISC OS 2, but not in RISC OS 3.
Text object styles
At any time while entering text you can change any aspect of its style. Click MENU and select Style. The lower half of the style menu applies to text objects and offers you a choice of font name, font size, font height, text colour and background colour. Any text you have already typed will be rewritten in the new style.
Font name
This leads to a menu of available fonts, the first item always being system font, the font normally used by the computer in, for instance, directory displays. This is followed by an alphabetical list of the outline fonts present in the Fonts directory when Draw was started up. Draw version 0.44 (supplied with RISC OS 2) can only handle a maximum of 63 outline fonts; if your Fonts directory contains more than this, only the first 63 (in alphabetical order) will be displayed.
Font size
This font size is actually the font width. The menu offers the following font sizes: 8, 10. 12. 14 and 20 pt. A writable icon allows you to enter any other size you may wish and is by default set to 6.40 pt. Fractional point sizes are permitted; the outline font manager rounds fractional sizes to the nearest 1/16 pt. If you enter a value in the writable icon, you must still click on it to select it.
Font height
The font height menu is the same as the font size menu but the default size is 12.80 pt. This is because the default font, the system font, is normally used with its height set to double its width, giving it the proportions with which we are most familiar from mode 0, 12 and 15 screens. Whenever you choose a font size, the font height is automatically set to the same value. If you wish to use a font at a height different from its width, you must subsequently amend the height value. This allows you to enter text that is extended (wider than natural) or condensed (narrower than natural).
Text colour, Background colour
These call up colour selection boxes which are like the line colour and fill colour boxes already described in every respect. The text background colour is white by default. If you are creating a text object over a background having a different colour, such as a graphic with red as its fill colour, you should set the text background colour to correspond with this background. This is for the purpose of anti-aliasing (for which see Chapter 3). If you omit to do this, on the screen the characters will appear to have faint white outlines. This faint outline, however, does not appear in printouts, since anti-aliasing is not applied in printouts.
As with path objects, you cannot mix styles in one text object, so you cannot have some words in italics and some in Roman. To create such a line of mixed-style text you must either use a text area or use two or more text objects, which can be moved carefully together and then grouped and justified.
Editing text objects
If you have RISC OS 2, you will be unable to change the wording in a finished text object. So, if you spot a mistake, you can only correct it by deleting the entire text object and creating a new one. If you have RISC OS 3, you can edit the wording by selecting the object and choosing the Edit option from the Select menu. A separate writable field appears in which you edit the text using the cursor keys. When you press Return the contents of the path object are updated.
Text objects can be subjected to most of the operations on whole objects outlined above. They can be moved and scaled; when you scale a text object the width and height of the constituent characters are automatically adjusted to fill the new outline. You can easily create very condensed (narrow) or expanded (wide) characters in this way. This makes text objects very useful in titles since they can be scaled to fill the space available. Text objects can be rotated if you have RISC OS 3.
If you re-load a previously saved Draw file in which a text object uses a font that has subsequently been deleted from Fonts, the affected text object will be displayed in the system font.
Internal, print, screen and pointer resolution
As we have seen in this chapter, vector graphics consist of lines and shapes plotted on the monitor screen or on the printer's 'virtual screen' from co-ordinate data stored in the data stack. The very high precision of this data is one factor which makes vector graphics so useful.
You may wonder why we should be so concerned about precision in computer graphics, when, as Figure 1.2 revealed, much of it represents compromise. This is because vector graphics is not usually an end in itself but a means to an end. You may use it simply to create pretty pictures on your monitor screen if you wish, but most often it forms a part of some serious task in industry or commerce. Accurate measurement is crucial in most of the everyday applications of vector graphics. You may be producing an engineering drawing for a vital component in the aerospace industry, or you may be laying out a display advertisement to fill a page in a glossy magazine. In either of those applications the size of the finished artwork is critical. Note that measurements in graphics always relate to the size of the final printout (assuming that the printout scale setting, if any is provided, is 100%) and not that of the monitor display. This is, of course, because the size of the monitor display is affected by the monitor type and adjustment and also the setting of the zoom facility. (With a 14-inch monitor in mode 20 at a zoom factor of 1:1 the screen display is generally about 20% larger than life.)
While it is true that vector graphics are plotted on the monitor screen using the screen co-ordinate system, the software itself is not confined to the OS units. Most applications use 'internal units' in the stack to store die dimensions of the objects in the artwork. The user, however, is able to enter measurements in more familiar units such as inches or centimetres, the computer converting these to the application's internal units whenever necessary and, of course, converting these in mm to OS units when plotting. All these conversions are 'transparent', that is, as a user you need not be aware that they are happening. Indeed, internal units are only mentioned here because they determine the limit of resolution of the graphics, the shortest line that can be drawn or the narrowest line width, and this in turn affects the software's versatility.
The resolution of the software's internal data normally far exceeds that of any practical output device (the monitor, plotter or printer). As was mentioned in Chapter 1 Draw uses an internal resolution of 1/46,080 (=0.000 021 701 389) inch. Why this seemingly strange figure? Two factors make this a particularly convenient unit for computer graphics. Firstly, in the most commonly used screen modes (12, 15, 20 and 21) the pixels are nominally 1/90 inch wide, there are 640 such pixels across the screen and 1280 OS units across the screen, making each OS unit nominally equal to 1/180 inch. Now 1/46,080 = 1/180 x 1/256, So, to convert internal units to screen co-ordinates, the computer must divide by 256; this is one of the easiest and fastest calculations for a 32-bit microprocessor, simply a right shift of 8 bits! And speed is critical since this division must he performed numerous times in plotting each line. Secondly, very small measurements in graphics commonly use the point (pt), a unit which originated in the print industry; 1 pt is commonly taken as equal to 1/72 inch. And 1/46,080 inch is a convenient fraction of 1 pt: it is 1/640 pt, i.e. 1/640 x 1/72 inch. This is useful when working with font sizes and line widths which are normally measured in pts.
A consequence of this very high internal resolution is that there is always a dramatic loss of accuracy at the interfaces with the outside world. For example, in Draw on a page 8 inches wide, there are theoretically 368,640 positions across the page at which you could place an object. However, a 300 dots per inch printer recognises only 2400 such positions across the page and even professional filmsetting equipment capable of 2400 dots per inch would offer only 19,200 positions across the page. So, whenever artwork is printed, there is a process of approximation in which a spread of internal co-ordinate values is rounded to the nearest available location on die output device.
The monitor display involves an even greater degree of approximation. In modes 12, 15, 20 and 21 each of the 640 pixels across the screen represents (at a zoom of 1:1) 512 possible different locations along the horizontal axis in Draw.
Now because RISC OS is a WIMP (windows, icons, menus and pointer) environment, the number of pixels per inch on the screen is even more significant than you might at first suppose. Although you may consider the screen as primarily an output device, the one which gives you your first glimpse of the stunning graphics you are creating, it is also an integral part of the graphics input system. Most drawing operations take place at the pointer. And no matter how carefully you manipulate the mouse or trackerball or whatever other graphical input device you favour, the pointer's resolution is limited to whole pixels. This must be so since it, like everything else in the screen display, is composed of pixels. So the screen resolution of 90 dots per inch is also, by definition, the resolution of the pointer, your drawing device.
You can check this very simply if you wish. Start up Draw with a fresh window and draw one or two random lines. Ensure that the zoom is at its default setting of 1:1. Click adjust on one of the points; this will select it, i.e. turn it red. Now click MENU and move right on the item, Enter coordinate'. A dialogue box will appear displaying the current co-ordinates of the selected point as stored in the data stack. Typical figures might be x=1.688 889 and y=1.133 333 (inches)-see Figure 2.16. Make a note of the co- ordinate values and close the dialogue box by clicking on the OK icon. Now, let's move that point one pixel up the screen. The easiest way to do this is to hold down adjust and press the arrowed cursor-up key; you will see the screen update with the point one pixel higher than before. Now check those co-ordinates again; you should find that y is now 0.011 111 greater than previously. So you moved the point a total of 0.011 111 inches up its y axis, i.e. one pixel = 1/90 inch.
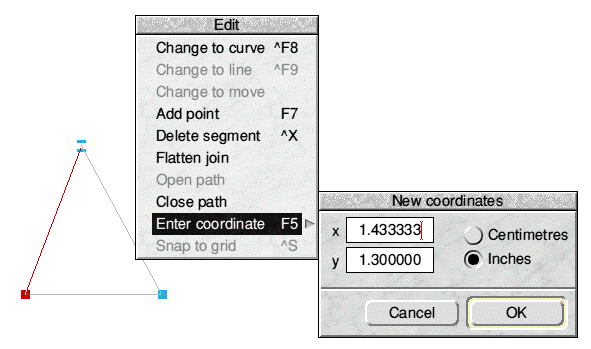
If you wish, you can repeat the experiment dragging the point by very carefully manipulating your mouse or trackerball until the screen updates. But the result will be exactly the same. You may indeed find that you cannot get such small moves from your mouse. If so, you should use the Configure application to set your mouse to its slowest or second-slowest speed; this is really essential for graphics work. Since the pointer only offers a means of accessing one in every 512 locations (along one axis), how can you make use of the software's very fine precision? There are several ways:
- The zoom facility in most applications allows you to enlarge the screen display. In Draw the maximum enlargement is 8:1 but many graphics packages allow greater enlargements (.e.g. Vector allows up to 20:1). Zooming only affects the screen display; it does not affect the data in the stack describing the artwork. It is therefore a fundamentally different operation from magnification which changes the size, i.e. the co-ordinate data stored in the stack, of objects in the artwork.
Zooming in not only allows you to see more detail, but also gives you greater precision than at a scale of 1:1. If you repeat the demonstration described earlier, this time using a zoom setting of 8:1, you will get very different results. A one pixel move upwards from y=1.133 333 now takes you to 1.134 722, a move of just 0.001 389 inch. This is, as we should expect, 1/720 inch, i.e. 1/8 of 1/90 inch. - If the zoom facility is not sufficiently precise, you may consider temporarily magnifying the object on which you are working. The magnification facility, as explained in the previous chapter, multiplies all co-ordinates and line thicknesses by the chosen magnification factor; it therefore changes the size of the object concerned. So when you have finished work on the magnified object, you must remember to restore it to its original size.
Obviously magnifying by, say, 100 will allow you to work on the object with 100 times the precision that was previously available. So in Draw with the zoom on 8:1 and the object magnified by 100 each pixel of pointer movement which previously represented 0.001 389 inch ought to become 0.000 014 inch when the object is subsequently magnified by 0.01 to restore it to its original size. In practice, however, this would exceed the limits of resolution; the final co-ordinate values would therefore be rounded to the nearest multiple of 1/46.080 inch, - The Enter coordinate dialogue box in Draw: as- its name suggests, allows you to enter co-ordinates as raw data from the keyboard. You can place a caret in the field and edit it as you wish. Indeed you can enter as many significant figures as you wish, hut Draw will always round off your entry to the nearest multiple of 1/46,080 inch (or its metric equivalent). So, if you enter a co-ordinate value as 3.14159265 inch, don't be surprised if you subsequently discover that it has become 3.141590 inch.
- For most purposes you will probably not need anywhere near as fine a resolution as 1/46,080 inch. Probably what is more important for you is that lines are properly straight, equal distances are consistent and items are neatly aligned. For this reason most packages provide a grid. The grid is a rectangular or triangular pattern of accurately positioned dots which may be optionally reproduced on the screen but which is not reproduced in printouts. It can be used for measurement or location purposes as you draw. The isometric (triangular) pattern is helpful in producing perspective-free representations of three-dimensional objects. Most importantly, a grid lock facility forces any points, i.e starts and ends of lines, that you draw on to the nearest grid point. In Draw the grid interval can be any specified Imperial or metric measurement. For example, the Cir-Kit set of electronic circuit diagram symbols is designed for use in Draw on a l/16 inch grid and this makes it possible to create circuit diagrams very rapidly indeed, since the symbols automatically centre themselves neatly over the conductors. Clearly, when objects are locked on to a grid in this way, the Enter coordinate facility will confirm that the points are always correctly positioned, especially if the grid units are a convenient multiple of 1/46.080 inch.
RISCWorld