

Impression to HTML
Dave Holden explains how to use our RISCWorld HTML converter
Creating a Mappings file
In the previous section we loaded and examined a pre-existing Mappings file. If, like me, you tend to use variations on a few standard layouts for your documents this is a good way of working. However, at some point you will need to create a Mappings file from scratch.
Scanning the TextStory
Open the Mappings window and drag a TextStory saved (with Styles) from Impression. Once again I'll use the TextStory of this manual as an example.
The window will clear any previous definitions and, after Imp-HTML has scanned the file looking for all Style definitions, the Styles section should look like this.

On the left are shown all the Styles that Imp-HTML found. You will see that there's one more than appeared in the previous example, Contents. This is because the Style was present in the original document but I didn't bother to include in in the Mappings file as it is only used in a part of the document that is not going to be converted to HTML, namely the contents.
By default all Styles are 'selected' for inclusion in the Mappings file (it's easier to re-load and remove a Style you've included by mistake than add one you've forgotten to tick) and the 'p' switch is set.
The 'Effects' at the top left are set to the defaults. You can enter different codes if you wish Later I shall explain how you can set the defaults for Effects.
Note that the program will recognise the standard Impression styles 'Main Heading' and 'Sub-Heading' and automatically set the 'NC' and 'I' buttons for these styles since it assumes that if these styles are present you will be using them for this purpose.
Setting the Styles
This is done as previously described. One thing to note is that if you select H1 or H2 (such as for the Main Heading) you will see than 'none' and 'NC' also become selected. Similarly if you choose H4 for something (such as Sub Heading) you will see that 'none' and 'I' are automatically set. This is because these options are included as part of the definitions for these items. This doesn't have to be the case, of course, as you will see later.
Saving the file
Saving is done by just clicking on 'Save'. A default filename of 'NewFile' will have been placed in the filename icon when you start a new Mappings file, and you would normally alter this first. You should also remember to 'un-tick' any Styles that won't have HTML equivalents first.
If you now click on the menu icon you should see your new file listed.
Style 'culling'
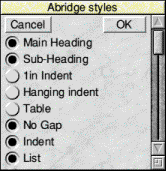
The Mapping window can accommodate 17 Styles to map to HTML tags. This would normally be more than enough, since you wouldn't often create more than 17 distinctive Styles in an Impression document. However, it is possible, especially where you have a number of variations on the base Style with different rulers, etc., or where your standard document layout includes a lot of Styles, only some of which are used in the document to be converted.
If there are more than 17 Styles in a document then when you drag the TextStory to Imp-HTML it will open a window showing all the Styles in the TextStory.

Select the Styles you want to use and leave the ones that either aren't used in the document or which cannot be given any meaningful 'translation' into HTML unselected, then click on 'OK'. The selected Styles will be transferred to the Mapping window, the Abridge Styles window will close and you can proceed exactly as previously described.
Dave Holden