


Virtualise
Introduction and Tutorial
Introduction
This file provides a relatively straightforward introduction to using the Virtualise system to provide virtual memory for existing applications. A reference guide to all aspects of the program are included in the "FrontEnd" chapter.
If this is the first time that it has been used then it is first necessary to install the software as described in the next section, otherwise skip to the section entitled "Starting the Front End"
It is assumed that you know how to use the mouse and windows environment on your computer. If this is not the case then please read the Welcome guide which came with your computer before continuing.
Installing the Software
Virtualise is suitable for use on all versions of RISC OS from 3.5 to 4.39 (RISC OS Adjust). Virtualise is not suitable for use on RISC OS 6, or 32bit versions of RISC OS.
RISC OS 3.5
Before the program will run it is necessary to merge the supplied !System folder (in the RISCOS350 directory) with the one on your RiscPC's hard disc. See the text file called "Important" for the instructions on how to do this.
Harddisc Installation
The application may be installed on the computer's hard disc in the standard RISC OS manner by simply dragging the "!Virtualis" icon to a suitable directory viewer. The floppy disc must be initialised before attempting to install onto a hard disc.
Starting the Front End
The front-end supports interactive help; use Acorn's !Help to obtain information about the item under the mouse pointer. After a brief delay the application icon will appear on the icon-bar.
Configuring Virtual Memory
Click ADJUST on the !Virtualis icon on the icon-bar. This will open the "Virtualise configuration window". The most important settings are the three numbers at the top of the window which control memory usage of the virtual memory system:
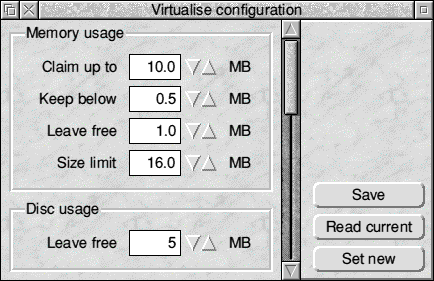
- Claim up to:
The amount of real memory to use. Larger values (up to the total memory in the computer) speed up most programs that use virtual memory by reducing the number of disc accesses required. - Leave free:
The minimum amount of memory to leave free. When memory is required for another task the virtual memory system will attempt to change its usage to ensure that the specified amount is left unused. - Size limit:
Many programs do not specify a maximum size for dynamic areas they create. In such cases the operating system normally sets the maximum size to be the same as the amount of memory in the computer. If virtual memory is going to be used this becomes very restrictive since the maximum size can not be extended after the area has been created. This option allows a different maximum size of be used.
Note that these values can only be specified to the nearest 0.1MB. The other options within the window are described in the "FrontEnd" file.
To ensure that these values are used the next time !Virtualis is started click SELECT on the "Save icon" at the bottom of the window. Then click SELECT on the "Set new" icon at the bottom of the window to use the values shown.
Enabling Virtual Memory for an Application
Click SELECT on the !Virtualis icon to open a window listing all of the dynamic areas in the computer. There is quite a lot of information in the window, but for now only the names of the dynamic areas down the left-hand side are important. All of the values are explained in the "FrontEnd" file.
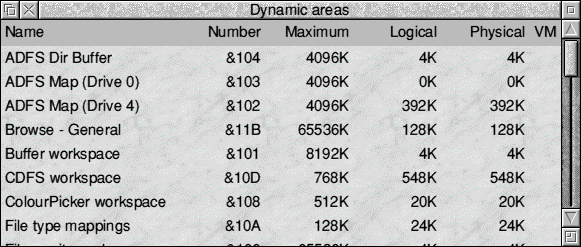
Click on the toggle size icon in the top-right-hand corner to expand the window to its full size.
Next load (in the usual way) the application which you wish to use virtual memory with, e.g. !ChangeFSI which is supplied with the computer. Find the entries for the dynamic areas created by the application you have started, and select them by clicking SELECT on the first one, and ADJUST for each subsequent dynamic area.
If you are using !ChangeFSI then the relevant areas are only created when a file is loaded. Drag a file to the !ChangeFSI icon, and after the window has opened there will be a "ChangeFSI sprite" dynamic area created.
When all of the required dynamic areas have been selected click MENU within the window. From the menu that appears select the "Virtualise" option to enable virtual memory. If an error box is produced then it may not be possible to enable virtual memory for one or more of the selected areas. If all goes well, a tick will appear in the right-hand column of the table for the selected areas.
That is all that is required to use virtual memory. However, for some applications it is even easier; see the "Products" file for more details.
Modifying an Application to use Virtual Memory by default
To remove the need to enable virtual memory for an application by hand every time it is used it is possible to modify the application to use virtual memory automatically. A backup copy should be made of the application before doing this.
Ensure that the required dynamic areas are selected within the list window, and drag the application to modify from its directory viewer into the list window. This will open the "Modify application" window. Click on "Enable virtual memory by default" and adjust the "Size limit" to the required maximum dynamic area size. Finally click on OK to perform the modify the application. The change will take effect the next time the application is run.
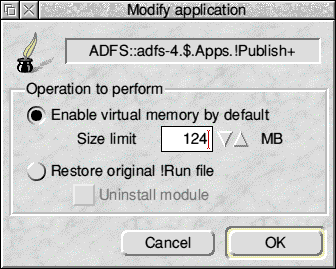
Note that modifying an application also installs the module into the computer's boot sequence so that it is loaded every time the computer is started or reset.
To remove the modification drag the application icon into the list window again, and select the "Restore original !Run file option". This will only take effect after the computer has next been reset. It is also possible to choose whether the module should be removed from the boot sequence by selecting the "Uninstall module option".
Quitting the front end
When it is no longer required the front-end can be quit by selecting the "Quit" option from the icon-bar menu. This does not affect the module which provides the virtual memory, so it is safe to do this even if virtual memory is being used by another application.
Other Features
This tutorial has only skimmed the surface of what the Virtualise system can do. For more details please consult the further chapters in this manual.
RISCWorld