


Illusionist
Another RISCWorld exclusive...
Tutorial
The discs supplied contain various Vector files for you to render and experiment with. You can try adding to them or modifying them. Don't forget to see if there are labels used because if there are then you can select objects and move then easily. You can also merge files together and the labels are copied across too. This chapter contains step by step tutorials for you to try. It is best if you have already read the manual but if you are keen to start then you can try these tutorials first.
The Golden chalice
This tutorial describes how to create a golden chalice:
- Click Clear all on icon bar menu
- Load the sweep file Chalice then go to the sweep window to see its outline.
- Change Misc.Objt sides to 20.
- Go to the Materials window, and using the sliders select 255 red; 180 green; 0 blue; no environment or map is used. You should also have Metal and Single F selected and you need to click on Normal to change it to Smoothed.
- Click Add object.Sweep objt keeping the plant cursor on the red target cross.
- Now select a suitable screen mode and click Draw picture.
- Hey presto! A golden chalice.
If the chalice seems a little small then scale it up with all scale directions ticked.
Alternatively, you can delete the points then recreate the object with a large grid size, say 1500.
Try rotating the chalice so that it is lying down, or even adding a table for it to stand on ! You might even like to try designing your own chalice as a sweep object.
Nuts to you !
This tutorial describes how to generate an Acorn, in fact it is the Acorn logo. It is easiest to create the top of the acorn first. It does not matter how many Object sides are used but obviously the greater the number the smoother the result. You want all objects to be double faced so you must click on Edit.Material.Single F to change it to Double F.
- Click on Clear all in the icon bar menu and reset Object sides to 10.
- Click on Add object.Hemisphere to add a hemisphere to the scene
- Press Ctrl L to bring up the label menu and give it a label by pressing MENU and entering a name in the New label box. Call it Top.
- Go to the Misc menu, de-select the Scale NS and Scale WE items - this allows you to squash the top of the nut into the right shape.
- Click twice on the Scale icon in the Toolbox to change the shape.
- De-select the points by clicking on the Selector icon with ADJUST.
- Next we must create the bottom of the acorn. Position the cursor so that the small white circle is just touching the base of the hemisphere.
- Add another hemisphere and give this a new label called Bottom.
- Go to the Misc.Rot Degrees menu and change the figure there to 180 - this allows you to rotate the new hemisphere completely upside down.
- Go to the Rotate WE icon and click once - you will see the hemisphere flip and form the bottom of the nut. Press Space to update the designer panes.
- De-select the points as in item 6.
- Now to create the small tube that forms the stem joining the bottom of the acorn and the tail together. Move the cursor to just below the bottom of the acorn and add a Tube by clicking on Add object.Tube and give this a label called Stem.
- Go to the Misc menu and make sure the all scale options are selected.
- Now click seven times with ADJUST on the Scale icon to reduce the tube to a reasonable size so it does not look out of proportion.
- De-select Scale NS and Scale WE in the Misc menu and click three times on the Scale icon with SELECT. Press Space to update the design panes. You now need to create the tail of the acorn. This is done using a Sweep object.
- De-select all points as in item 6 and position the cursor immediately below the stem.
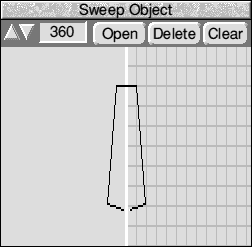
- Go to the Sweep designer and create a sweep similar to that shown below and give it a label called Tail. Place the Sweep using Edit.Add object.Sweep objt
- Change the Misc.Rot degrees figure to 90 degrees.
- Click once on the Rotate WE icon in the Toolbox with SELECT.
- Click ADJUST once on the Rotate UD icon to rotate the Tail so it is facing the right way. Click in the Preview pane to confirm this.
- De-select Scale NS and Scale UD and click on the Scale icon twice to scale the Tail in the West/East direction.
- Using the Edit.Material window SELECT full green with no blue or red. Select Metal and click on Update.
- Now click on Render.Draw picture to see the results. The results will not be perfect but if you experiment with different shades of green, different light positions and different surface types you will see the range of effects that are possible.
You may need to juggle some of the positions of the objects to achieve the right effect and this is best done using the labels to select the relevant object. A sample picture and vector file of this tutorial, using 20 object sides, is provided on the discs.
RISCWorld