



Using ArtWorks to Create a Kaleidoscope
Richard Ashbery
Introduction
My last article described how a user could create some attractive kaleidoscope patterns by following a simple step-by-step approach using Photodesk. A similar result is obtainable with Martin Würthner's superb program........ ArtWorks. But first I want to go over the main difficulties you may have encountered with the Photodesk method.
Illustrations Incorrectly Rendered
Figures 2, 4 and 8 were rendered with missing sprites. Please refer to Addendum at the end of this article showing the correctly rendered diagrams.
200x200 Segment
Those of you who followed the tutorial realise that to get the new 400x400 canvas to be filled accurately requires careful cutting-out of the segment. If this is not done correctly then the effect can be spoilt by having an unwanted thin white border around sides of the finished kaleidoscope. The key is the diagonal line and its edge. The filled-line-segment tool that is used to create the cutting-line becomes wider as the magnification is increased. Always use the edge denoted by the dashed line to make the diagonal cut as shown in the illustration - figure 1.

Fig 1 200x200 Segment
The Diagonal Cutting Line
The magic wand tool is used to "cut-out" the template. The requirement here is to ensure that any image abutting the diagonal ideally contains colours as dark as possible. Selecting the area becomes more fiddly if the colour is very light and may leave white diagonal lines where the segments are joined. Try and ensure that the magic-wand level setting is greater than 40. The segment shown in figure 2 would be ideal. Level settings of 50-70 would be required for this black diagonal edge.

Fig 2
-------------------------------------------------------------------
Creating the Kaleidoscope in ArtWorks
A similar effect can be achieved by creating the segment in ArtWorks bearing in mind that the jpeg used to fill it is kept as small as possible. Large jpegs result in massive file sizes and slows rendering particularly on a RiscPC. My personal preference is to fill the segment with a vector file (Draw or another AW graphic) rather than a jpeg. Transparency will be used to achieve the additive effect and results in a slightly softer rendering. In practice if the original segments are varied and colourful the results can be excellent. The segment is much easier to create in a vector package. So lets make a start. Choose and set aside a couple of jpeg images.
Create the Segment
- Open a window by clicking on the ArtWorks iconbar icon and click over it to display the tools and information and colour bar.
- Display the 'Grid' and 'Lock-to-grid' (figure 3). Each of the main divisions are 10mm apart by default.
- Select the Line tool.
- Follow the instructions given in figure 4 to draw a triangular segment.
- By default the segment will be filled with the colour black. Click on colour none in the colour bar as shown (figure 5).
- Save a copy of this segment to use as a template for the next kaleidoscope.
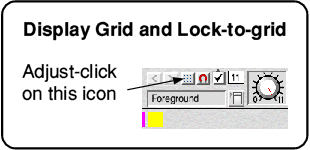
Fig 3 Displaying the grid

Fig 4 Drawing the segment

Fig 5 Colour bar indicating the colour - None
Filling the Segment with a JPEG
ArtWorks has a rather neat way of clipping an image to an object.
- Switch off the grid.
- Drag first jpeg over the segment and place behind it (CTRL-B). Refer to figure 6.
- Use the Scale tool to resize the image and re-position so that it just covers the segment.
- Click on the segment and set its outline colour to 'None' (adjust-click on the None icon on the colour bar - figure 5.
- Copy the segment to the clipboard (CTRL-C).
- Bring the image forward by clicking on it and pressing CTRL-F.
- Press CTRL-Shift-K to apply the 'ClipView' to the segment. Refer to illustration in figure 6.
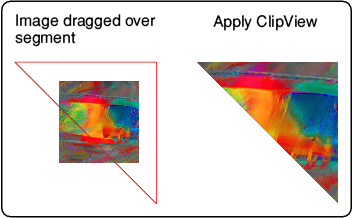
Fig 6 Image, Segment and Applying ClipView
Cloning and Mirroring to Produce a Twin-segment
- Use the Selector tool (top left-hand-tool) to select the segment if not already selected.
- Follow procedure in figure 7 to add the next segment.
- Providing the procedure has been carried out correctly there should now be two segments side-by-side.
- Select and group the two segments..... CTRL-A, CTRL-G in preparation for the next procedure.
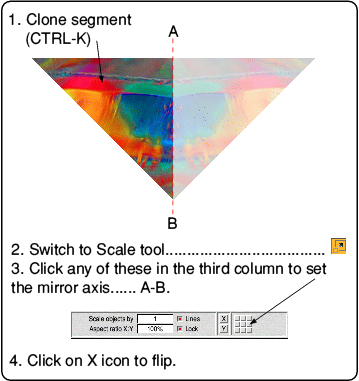
Fig 7 Building the twin segments
Creating the Quad Segments
- Perform the steps in figure 8 to produce the quad segments.
- Select and group the four segments..... CTRL-A, CTRL-G.
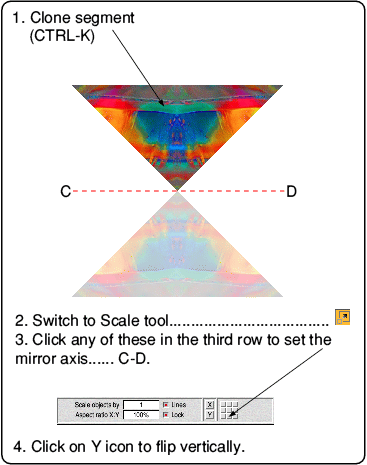
Fig 8 Creating the quad segments
Using the Rotate Tool to Create the First Kaleidoscope
- Clone the four segments.
- Click on Rotate tool.......................................................................................

- Type 90 in place of 0 in the writable icon next to Rotate by.
- Hit Return key. Figure 9 (first image) shows the completed example.
- Hit CTRL-A, CTRL-G prior to saving to a filer window.
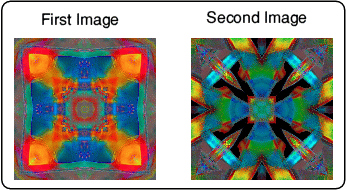
Fig 9 Finished Kaleidoscopes
Using the Other Image for Another Kaleidoscope
Repeat the whole procedure above with the next image in a new ArtWorks document from the section...... "Filling the Segment with a JPEG".
Mixing the Two Images
The only way two images can be mixed in ArtWorks is to overlay a transparency of the second image over the first.
- In a new document paste in the first image.
- Paste in the second image.
- Make sure they are perfectly aligned with each other.
- Click on the top image and apply a 50% default Transparency mix using the Crystal tool by following figure 10.
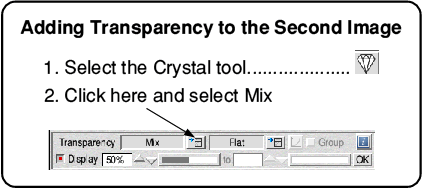
Fig 10 Adding transparency
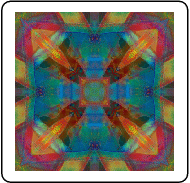
Fig 11 Result of overlaying the two images
Example Kaleidoscope
Original vector drawings from.......... Bitfolio, Edition 7 CDROM
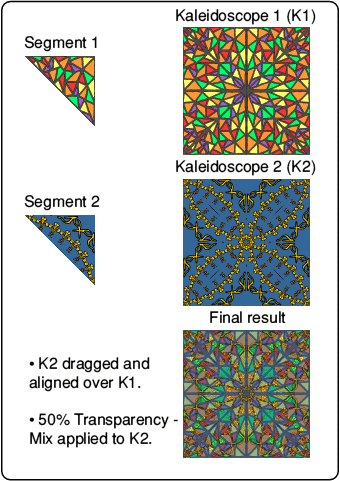
Fig 12 Kaleidoscopes Using Vector Graphic Images
| Photodesk versus ArtWorks | |
|---|---|
| Requires practice to get the best out of it | Easy due to simple GUI |
| Excellent merge options in layers | Transparency only |
| No loss of colour | Colour loss due to transparency |
| Effective on colour jpegs | Effective on vector drawings |
Addendum (previous article only)
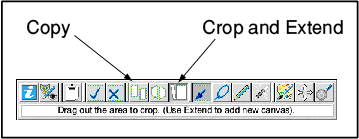
Fig 2 Photodesk's Cutting Mode
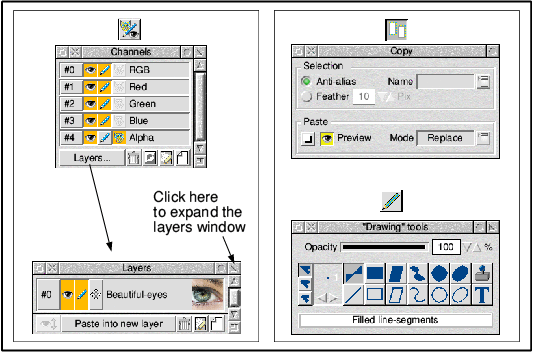
Fig 4 Layers, Copy and Drawing tools windows with associated icons
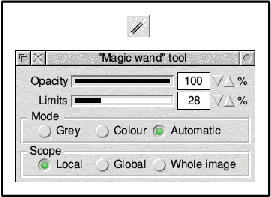
Fig 8 Magic-wand tool window
Future Articles
ArtWorks is my preferred drawing package and in the next article I want to illustrate how by making use of a few tools a user can create some simple, punchy and striking artwork. From time to time I will use Photodesk to embellish the final picture. My usual step-by-step approach means the tutorial can be tackled by a varied range of abilities. See you in a couple of months time.
Richard Ashbury