



Creating Planets (with RISC OS)
Richard Ashbery
Introduction
Recent scientific discoveries indicate that two of our closet planets have outer rings of bright blue. The rings of Uranus and Saturn contain tiny dust particles that scatter and reflect blue light. This provided a stimulus for my interpretation of the picture you see here.
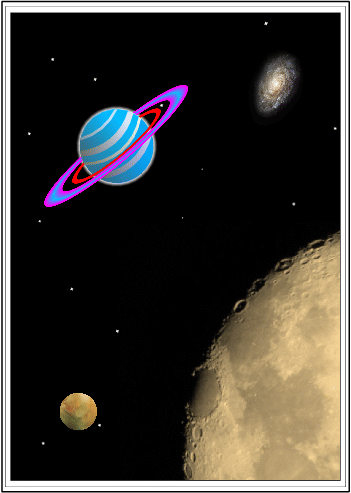
Fig 1 Complete picture
Software
ArtWorks, with its ability to create bands in a circle (figure 2), seemed the obvious choice. This feature rich package provides the user with the tools necessary to produce a picture with some degree of realism. The main difficulty is designing the ringed planet and this is what my article explains.

Fig 2
Summary of Main Techniques Used to Create the Blue Planet
- Intersect (planet segments).
- Graduated fill (appearance of depth).
- Object blending (rings).
The Intersect Tool
This ingenious tool was used to create the blue planet. It takes a little practice to get the best out of it but once mastered some remarkable artistic creations are possible. The example below will be illustrated in colour for clarity.
Before starting decide how many colour bands are required (the example below uses 4 separate bands apart from the main blue crescent which forms the base layer).
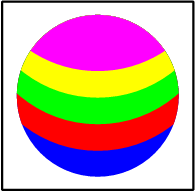
Fig 3 Coloured bands created with the aid of the Intersect tool
Preparation
- With the grid-lock on, draw a circle and colour it blue. Click "Adjust button" over the colour 'None'.
- Clone it, (CTRL-K), twice.
- Colour the second 'clone' red.
- Resize it by 1.5.
- Drag the red cloned circle vertically upwards sufficiently far enough to display the blue cloned circle beneath (ensure a blue crescent shape can be seen).
- Now clone the red circle and colour it green. Drag it out of the immediate area - say T.L.H.C. of page.
- Clone the green circle and colour it yellow. Drag it to the T.R.H.C. of page.
- Clone the yellow circle, colour it violet and drag to any clear area of the page (hint - if page starts to become cluttered then it really doesn't matter if the large circles overlap).
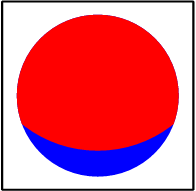
Fig 4 Apply "Intersect"
Performing the Intersect
- Click on the large red circle.
- "Adjust-click" on the original blue (but cloned circle) and press CTRL-W. The result will be as shown in illustration....... figure 4.
- Now click on the blue part of the circle and clone it. Observe the complete circle becomes blue but is now in the wrong position in the layer stack - we need it behind all other objects in the layer stack. To achieve this click on the special arrow icon..........................................................................................................

- Drag the next colour circle (green) over the partial red one, (ensuring that the lower part of the red circle is visible).
- "Adjust-click" on the blue circle and press CTRL-W.
- Repeat step 3 - 5 for the yellow and violet circles.
By applying more subtle colouring the procedure can be used to draw the planet illustrated in figure 2.
Making the planet stand out 
By adding a linear gradient across each coloured band should give the planet a more 3-dimensional feel when added to the final picture. The linear-fill gradient tool is used here to create this effect starting from say.....70% black on the left hand side to the selected band colour.
Linking the Planet to the Background 
Dropping the completed planet object over a black background produces an unrealistic effect. A more subtle approach was used to ensure the colours integrate seamlessly into the background - my method being to use the blend tool to create a group of concentric circles from white to black around the planet circumference. The blend tool is described in the next section.

Fig 5 Planet with outer band enables it to blend with background
Creating the Planetary Rings
Only the outer ring needs describing in detail and consists simply of a dual blend between three ellipses. The procedure is as follows:
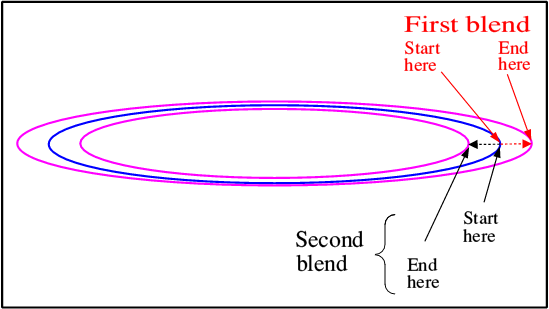
Fig 6 Creating the rings
- Drag out 3 ellipses and colour them as shown above (figure 6).
- Clone (CTRL-K) the middle blue one.
- Starting with the middle blue ellipse and the outer one perform a 20-point blend between them (illustrated by arrow).
- Move the blended objects to the bottom layer.
- Now perform a 20-point blend between the previously cloned middle ellipse and the inner one (second blend).
- When happy with the blend increase the number of points to give a smooth rendition (figure 7). The number of points is dependent on what you do with the picture - web illustration requires 20-100 steps whereas printing requires double that. Moire patterns will be evident if only a small number are used and will spoil the final picture.
- After grouping, applying a default transparency "mix" can also enhance the ring by muting the colours and highlighting the middle ellipse.
- Create additional rings as required. Ensure all rings are grouped.

Fig 7 Result of blending
Object Alignment
Select the objects (planet and rings) and use ArtWorks alignment tool (CTRL-F9) to centre align them as shown in figure 8.
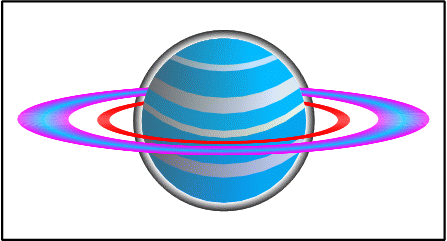
Fig 8 Aligning objects
Hiding the Furthest Rings Behind the Planet
It is important that the far rings disappear behind the planet. I will leave the reader to decide how this is achieved (hint - it's a bit like fitting a cloned 'cap' of the planet to itself and ensuring that it resides on the top layer stack to hide the far rings). Group all objects and drag to a prepared 'black canvas' and rotate accordingly.
Other Objects
- As with many astronomical scenes a dark background is best.
- The stars are simply created with white dots and various sized 4-8 point stellated polygons.
- Other planetary bodies easily obtained from astronomical web sites can be dragged into the picture to complete it.
- Photodesk users can use the extremely effective tint facility to colour-tint any astronomical objects (e.g. moon in monochrome) with no loss of detail before dragging them into the picture.
Finally
Those who have attempted the tutorial will immediately see what an excellent user interface ArtWorks presents to even a beginner. Regular users will already be aware how easy the program makes it to create quite complex graphic images.
See you in two months time with some more simple ArtWorks projects.
Further Addendum to Article 1
My first article (CDROM magazine - October 2007 - Volume 8, Issue 3) demonstrated how Photodesk could be used to create simple kaleidoscopes. I was very enthusiastic about a new version (Photodesk, version 3.08) released and sold by CJE - because the programmer (Niklaus Weiss) had re-written the selection routines to run significantly faster on the Iyonix. There is no doubt that the selection process is noticeably faster but sadly I have to report that the software reliability is extremely poor compared to its predecessor. My recommendation is to stay with version 3.06 for the moment. There are some work-arounds to speed up selections/drags and I may discuss these in future articles.
Richard Ashbury