

DFS Discs
A BBC disc image tool
!DFSdiscs was originally written as a simple tool to write BBC DFS games disc images obtained from sites like Stairway to Hell. These are supplied as either SSD (Single Sided Disc) or DSD (Double Sided Disc) disc image files. This is ideal for emulators but what if you want to use them on a 'real' BBC computer?
In the past it was possible to use various PC programs to write the image to a floppy disc. However the disc controllers used on all modern PCs can't use Single Density discs (SD, RLL encoding), only Double Density (DD, MFM encoding). Of course, if you've got a 1770 double density disc filing system on you BBC then you could use DD discs, but there's no real standard DD format for the BBC. Since third party suppliers started selling DD disc upgrades years before Acorn switched there are various systems, some using 16 sectors per track (320K per disc) and some 18 (360K per disc). This is why the only truly universal disc format understood by the whole BBC 'family' of computers is SD, either 40 track (100K) or 80 track (200K)
Luckily the Acorn 32 bit computers do use floppy disc controllers which can read and write SD discs, so some time ago I wrote a couple of rather crude programs to convert between these image files and 'real' BBC discs. These were sufficient for my purposes but not really suitable for release, so now I have written !DFSdiscs, which is a rather more sophisticated version of these. It allows you to write .SSD or .DSD disc images to real floppy discs and to create .SSD or .DSD disc image files from actual discs so you can use your old BBC programs in an emulator.
The program itself is, theoretically, 32 bit compatible, but for all practical purposes it can only be used on 26 bit machines. This is because the A9 doesn't have a floppy drive and the floppy controller on the Iyonix doesn't seem to be able to use single density discs.
The main window
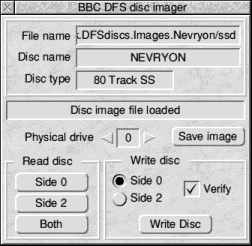
Double-click on the program icon and it will install itself on the iconbar in the usual way. If you click SELECT on this icon the window shown below will open.

This picture shows the window with a disc image file loaded. The upper four fields give information about the image file so with no file loaded they will be blank.
At the top is the filename of the image file. If the image was read from a 'real' floppy this will be blank. Below this is the disc name. If the image file is double sided then this will be the name of the primary side of the disc, Drive 0 in BBC terms. Below this is shown the disc type. In this case it's '80 Track SS' where 'SS' means Single Sided and 'DS' means Double Sided.
Below this is an icon which tells you what's happening. In the above picture it says 'Disc image file loaded', which is pretty self-explanatory.
Next there's an icon labelled 'Physical drive' with a couple of bump icons. This is the disc drive that will be used for read and write operations. Most Acorn computers will only have one drive, so it will show '0' and the bump icons will do nothing. However, if you're a real BBC computer enthusiast you might have a 5.25" floppy drive attached as well (tip - the A5000 is brilliant for this) and the bump icons will then let you choose the drive you want to use.
The lower part of the window is divided into two halves. On the left is the Read disc section which creates image files from real floppies and on the right is the Write disc section which writes image files to real discs.
Reading a disc
Place a BBC single-density disc in the drive and click on either the Side 0, Side 2 or Both buttons. This will read the selected side(s) of the disc.
As this relates to the program 'Side 0' would mean the primary side of the disc and 'Side 2' the secondary side. If you understand the BBC DFS system this will be instantly familiar.
At this point I need to include a brief note for people not overly familiar with the BBC DFS disc system. Most discs are double-sided and each side is treated as a separate drive with '0' being the primary drive and '2' the secondary drive. Why not 0 and 1? Well drives 1 and 3 are the drive numbers allocated to the second floppy drive (if one is fitted). This is for historical reasons. The original BBC disc drive was 40 track single sided. Hence if you had two drives the second drive would be drive 1, which made sense. However, with a double sided drive the secondary side had to be two numbers higher than the primary side. This sounds confusing but it's just something we all got used to. Most people thought of drives 0 and 1 as the 'top' sides of a 5.25" disc and drives 2 and 3 as the 'bottom' sides. In fact it's the other way about, but this doesn't matter much in practice.
Whichever you choose the disc will first be checked to make sure it's an appropriate type (see the notes at the end about 40 track discs) and the disc type and name will appear. The chosen side(s) will then be read. Note that if you have chosen Both then both sides must be in the same format, either 40 track or 80 track. If one side is 40 track and the other 80 track then they must be treated as two separate discs.
Don't be surprised if nothing appears in the Disc name field. BBC discs, unlike Archimedes discs, aren't automatically given a name when they're formatted, it has to be done manually later, so most 'home grown' discs don't actually have a name. Similarly you might see some weird characters with foreign accents. These will almost certainly be MODE 7 colour control characters which make the disc name stand out in pretty colours when the disc is catalogued on a BBC computer in MODE 7.
Saving an image file
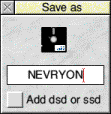
Now you've got your disc image you can save it to your computer's hard disc. Click on the Save image button and a small Save as window will open, as shown below.

As a default file name this will have the name given to the disc (if there is one) or, if not, 'BBCdisc'. If the button labelled Add dsd or ssd is ticked then the appropriate file extension will be added when the file is saved. This saves you adding the file extension manually if you are intending to transfer the files to a PC.
Just change the name if you wish and then drag the file icon to a suitable directory window to save it.
Loading an image file
To load a BBC disc image file from your hard drive just drag the file icon to either the !DFSdiscs icon on the iconbar or anywhere in the main window. It will be recognised as an image file either by its filetype, &B21 for a single sided image or &B22 for a double sided image, or if it has an /SSD or /DSD file extension
Once loaded a few basic checks will be carried out to make sure the file is a BBC disc image and the disc name and type will be shown as previously described. In addition the full filename will appear in the top field in the main window.
Writing an image file to disc
As well as creating SSD and DSD image files from a floppy disc !DFSdiscs can copy disc image files to a floppy disc for use on a 'real' BBC computer.
The program will write to either the standard 3.5" Acorn floppy drive or a 5.25" drive if you have one. You can use 3.5" DFS discs with any BBC computer but you will need an appropriate drive. Most modern hi-density drives aren't really suitable for the BBC or Master disc interface but the older double-density drives normally do work OK, that is, Acorn 800K drives as used on the A300, A400 and A3000 computers or PC 720MB drives.
At present before you can use the disc it will need to be formatted. This can by using the format option in !DFSDiscs, or on a BBC itself. I have found that a lot of hi-density 3.5" drives will work with a BBC computer if they are used only to read data and are never written to, which would make it possible to temporarily connect a hi-density 3.5" drive to transfer data to a 5.25" drive.
With the image you want to write loaded and an appropriate formatted disc in the drive click on the Write disc button. If the image file is single sided then you can choose whether to write to Side 0 or Side 2 of the disc by clicking on the appropriate radio button. This lets you write two single sided images to the two sides of a double sided disc. If it's a double sided disc image then these radio buttons will have no effect.
If the Verify button is ticked then the disc will be verified after writing.
When writing to a disc if there are unused tracks at the end of the image file these are not written or verified. This makes the writing and verifying process quicker which can save quite a bit of time as the structure of DFS discs makes them very slow compared with a modern ADFS disc.
Similarly when saving a disc image to your hard drive only the used portion of the disc image is saved. This reduces the file size. It follows that if you are intending to convert a DFS disc to an image file it is best to Compact it first if you still have access to a BBC computer and disc drive.
The main menu
If you click MENU over either the main window or the iconbar icon a menu will appear.
The first item is Info and this leads to the usual program info window.
Next is Name disc. This enables you to alter the disc name of an image file. If it is a double sided disc then the name of both sides can be changed. Just enter the name(s) and click on the Name disc button or press RETURN with the caret in the second writable icon and the name(s) will be changed.
Note that this only alters the names in the image file loaded into the program, not an image file stored on disc or the actual floppy disc.
The third item is Make 80 trk.
When writing an image file to a floppy disc the floppy disc must have the same format as the image file. If your disc image is only 40 track and your BBC computer uses 80 track drives then this would mean you would need to format a disc to only 40 tracks, which would be rather wasteful. As you might expect, if you select Make 80 trk. with a 40 track image file loaded it will be converted into an 80 track image. You can then write it to a disc formatted to 80 tracks, leaving half the disc empty so you can add more files later.
As the standard for SSD and DSD disc image files are 80 track if you are intending to use the image with an emulator it would probably be best to convert them to 80 track first.
The next item is Format which leads to a sub-menu. This will be described later.
The next item is Clear. This just removes the current disc image and clears the main window.
The final item is Quit, and this does exactly what you'd expect.
Formatting discs
The Format item on the main menu leads to the sub menu shown below.

This offers the option to format either Side 0, Side 2 or both sides of the current drive in 40 or 80 tracks. Selecting any of these will open the window shown below.

As you might expect clicking on Format will format the selected side(s) of the current drive.
If you click on Verify the disc will be verified. This would normally be done after formatting but you can use this function to check a disc before writing an image file to it. Verify operates using the number of tracks and sides chosen from the Format menu.
APDL and Foundation RISCWorld