

Computer Maintenance
Barry Thompson gives a RISC PC a spring clean
With the major improvements in reliability that have taken place since the dawn of the personal computer, many people do not expect a Risc PC to go wrong. They have proved to be hardier in many cases and to be more reliable than a PC based on the Windows operating system.
Many people may not really take care of their Risc PCs. This may be due to lack of understanding or being plain uninterested in the working of a Risc PC, as long as it keeps functioning. This could be asking for trouble. All right, todayís desktop computers are more reliable than those of 10 years ago - vastly more so than the mainframes and minicomputers of an earlier age - but this does not mean they can not go wrong. All electronic equipment can fail and desktop computers are no exception. Breakdowns can and do happen, with a corresponding loss in productivity and perhaps even loss of data. What is even more likely than a hardware failure is a software-related problem - maybe a corruption in RISC OS, a bug in a driver or some sort of incompatibility between different packages and even differences in the various versions of RISC OS. Again, this sort of thing can be very costly in time and productivity.
Arguably, the solution is to buy your Risc PC from a supplier with a good track record in customer service, think about purchasing a service contract and renew it when the warranty expires. It makes sense to ensure that your system is always covered by a service contract, but I would query the suggestion that this is all you need to do. You may be confident enough, like myself, to be able to carry out your own maintenance on the electromechanical components, only relying on people like Reflex Electronics(¹) to sort out more esoteric electronic faults at motherboard level.
However, those who need to rely on more expert help will find that a service engineer will not turn up on your doorstep the second you report a problem. Depending on your contract, you may wait a few hours to a few days and if your maintenance is on a return to manufacturer basis, you will be subject to even more delay. If you are a home user, having your Risc PC serviced on site may involve you taking time off work to be at home when the engineer calls. Finally, it is not uncommon for the hardware supplier to blame a fault on software and vice versa. If you insist that the problem is hardware related and demand a service call and if it then transpires that software was to blame, you might end up paying for that call-out.
Prevention is better than cure
There is a good argument for knowing enough to be able to sort out some of the simpler and more common problems yourself. If you are able to do this, it could save you time and inconvenience and maybe some money into the bargain.
In many instances whether or not you have a problem with your Risc PC could be the luck of the draw. However, there are things you can do to reduce both the likelihood of a mishap and the impact of a fault should the worst happen. Most people will agree that prevention is better than cure. So what could you do to keep your Risc PC from grinding to a halt and what can you do to ensure that losses are minimised if you do have a breakdown?
Equipment Required
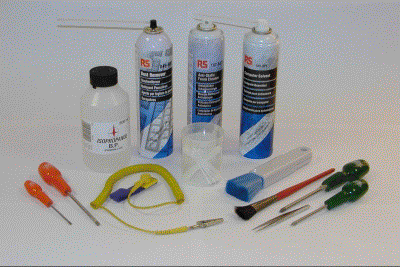
There are a few items of equipment that it would be useful to have to hand before commencing the cleaning of the Risc PC. Very few tools to disassemble the main components in the processor box, a medium flat blade and a medium cross head screwdriver are required. For cleaning of the various components within the case it would be useful to have a stiff brush and an antistatic brush for cleaning the static sensitive components such as the processor cards, motherboard and backplane. In addition it would be useful to have a vacuum cleaner with a narrow cleaning nozzle and aerosols of compressed inert gas, antistatic foam screen cleaner and some solvent, either an aerosol of computer solvent or a small bottle of Isopropal Alcohol (Isopropanol).

Tools and cleaning materials including antistatic foam cleaner, Isopropanal and computer solvent for degreasing, compressed gas, cotton buds, flat blade and cross head screw drivers, antistatic wrist strap, antistatic brush, narrow stiff brush and tweezers.
Power Supply
On the right hand side of your RiscPC is a power supply, which contains a fan that draws in air to keep the processor and other components cool. As we all know, air contains minute dust particles. Eventually, these will accumulate on the fan blades and end up inside the power supply case and be blown into the Risc PC's case, covering the motherboard, VRAM (Video Random Access Memory), DRAM (Dynamic Random Access Memory), floppy drive and expansion cards. If too much dirt builds up around the fan it will become partially blocked, with a consequential reduction in its efficiency. This could result in overheating and damage to some electronic components. Furthermore, dust can be conductive, so dirt inside the case could cause short circuits.
Airborne dust certainly is not the problem it was in the early days of computers and I would not want to overstate the risk. Still, because it is so easy to do, it makes sense to clean your Risc PC on a regular basis, perhaps on a twelve-month cycle. In most cases this once a year cleaning is probably adequate. However, if you have recently had some building work done, the amount of airborne dirt and dust will be much greater than normal and it would not be a bad thing to clean your Risc PC straightway. Stick a label on to the inside of the Risc PCís case, in a convenient place, write the date on it. Even better, install Chris Morisonís(²) Organizer software; make a note in Organizer when the cleaning / servicing was carried out. Also set an alarm for a future date to remind you to carry out the procedure again. (You can do the same thing with Acorns !Alarm - ED).

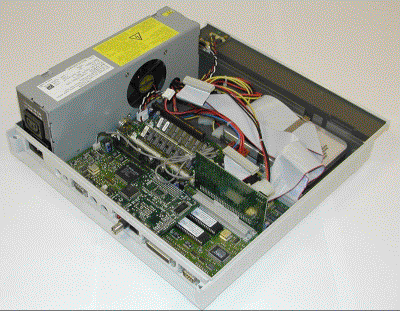
Risc PC with the case cover removed, viewed from the rear.

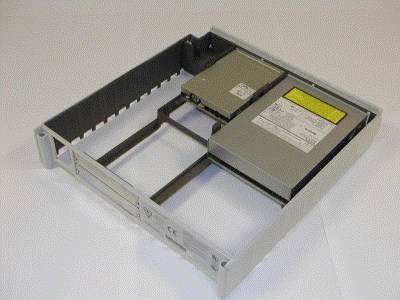
Risc PC first slice showing the floppy disc drive at the left and the CD-ROM drive at the right
There is very little risk associated with cleaning the inside of the Risc PC, but there is the possibility of static damage. Avoid touching the internal parts of the Risc PC with your fingers and regularly touch the case or, better still, a central heating radiator or bare water pipe to discharge yourself. For the ideal protection against static damage, wear an antistatic bracelet, which you can buy from an electronic component supplier.
Where to start
We will start off by looking at how to clean the inside of the Risc PCs base unit. It probably goes without saying that you should not use water for this purpose. Instead, we require a dry cleaning process. This means the use of a clean, dry brush - a half-inch paintbrush is ideal - and a handheld cleaner nozzle connected to a vacuum cleaner. Investing in an aerosol containing compressed inert gas would be a big help too. These are sold specifically for blowing dirt away from delicate equipment and can be obtained from electronic component suppliers such as Maplin and RS(³). They cost a few pounds.

Risc PC after the removal of the first slice which contains the floppy and CD-ROM drives, viewed from the rear
If you feel confident it would be useful to remove certain components so that the cleaning process can be more thorough. Switch off the power to the computer at the mains socket, if the mains cable is left attached it is a good earth path. Remove it if you feel at all nervous about the plug remaining in the socket.
Start by removing the top cover from the case, rotate the two locking pins at the rear, remove them by lifting vertically out of the case. The lid can then be lifted from the rear. Rotate the front locking pins, located internally, such that they can be removed.
Then remove any podules from the back of the computer, usually held with two small cross head screws. Remove the backplane into which the podules fit. Gently ease off the power and data cables from the CD-ROM and floppy disc drive, it should then be possible to remove the case section which will retain the CD-ROM and floppy disc drive.

Podule backplane removed from a Risc PC
The next part of the procedure would be to disconnect the power connector from the motherboard by squeezing the two sides of the plug and then gently pulling vertically up from the motherboard. Disconnect the power cables to the floppy and hard disc drive and the CD-ROM drive.
Before removing the power supply unit, gently ease off the power on / off button by inserting a medium size flat blade screwdriver between the button and the on / off switch post on the power supply unit. It is usually held onto the computer base with a single screw at the front. This is probably as much dismantling that is necessary.

View inside the case, the on / off switch and the power supply securing securing screw can be seen
WARNING - high voltages exist in certain components in a recently switched off power supply unit, take care not to touch any of these with naked fingers. Use whatever combination of brushing, blowing and sucking seems appropriate, concentrating on the components that have been in the direct line of the fanís airflow, these components are the VRAM, DRAM, the edge of the floppy drive, backplane and motherboard, taking great care with the more delicate-looking parts like the processor cards. I can thoroughly recommend the aerosol of compressed gas for cleaning out the dust from the power supply. It is beneficial for the cover of the power supply to be opened, remove two screws, the cover will then fold back through 90º. The wiring remains captured in the plastic grommet.
I would recommend carrying out this operation out of doors and also that of blowing dust off other components. You would be surprised how much dust can accumulate over just a short period of time. You do not want to upset the other occupants of the house with a self-created dust storm.

Risc PC power supply unit with cover folded open through 90º, not removed completely, showing the components, fan and wiring
Floppy disk drive
During its life this device has probably had many floppy discs inserted into it, a consequence of this action is to introduce dust and fluff into the disc drive mechanism. It is relatively simple to remove the floppy disc drive from the computer slice, especially as the slice is separated from the base unit for cleaning the various components in the base unit.Two screws secure the floppy drive to the case remove these, the drive can then be slid out of the case. The method of removing the top cover from the drive depending on the manufacturer of the drive. In most cases the cover is clipped into place, in others there may be a number of cross headed screws to be removed before the cover can be removed. Once the cover is separated it is a relatively simple matter to remove the debris by gently brushing, applying the vacuum cleaner nozzle and / or gently blowing using compressed gas.

Risc PC floppy disc drive with its top cover removed, viewed from the rear
Mouse
Many people clean their mouse regularly. If you have never done this, it would be a good idea to do so now. Cleaning is not done to make the mouse look nicer - similar to the computer base unit, a mouse will work better if its clean. Problems where the mouse pointer moves erratically can be usually cured using the following procedure.
 |
 |
|
|
The type of mouse supplied with the Risc PC
|
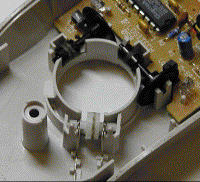
A view of a dismantled mouse case, showing the positioning rollers and the spring loaded pressure roller. | |
 |
 |
|
| This view shows debris adhering to the two mouse positioning and single pressure rollers. | In this close up view there is a small amount of fluffy debris adjacent to the mouse position rollers. |
The most common type of mouse contains a heavy rubber-coated ball, which rotates as the mouse is moved. As the ball moves, it drives two spindles at right angles to each other. There is a third pressure roller diagonally opposite the two mouse positioning rollers. The Risc PC monitors the rotation of these spindles. The mouse can easily pick up dirt and grease as its used, forming a deposit on the ball and spindles so the ball cannot drive the spindles consistently. Hairs and fibres can also be drawn into the mouse and these can become entwined around the spindles, once again hindering proper operation.
Turn the mouse upside down and you will see a circular plate that retains the ball. Rotate this in the direction indicated - you will find you can move it round about an eighth of a turn before it stops. Holding your hand underneath, turn the mouse the right way up. The circular retaining plate and the ball will fall out into your hand. Despite comments about water and PCs, these parts, the ball and its cover can be washed in warm soapy water; this is probably the best way to clean them. Make sure they are totally dry before you reassemble your mouse. Now clean the two spindles and pressure roller inside the mouse. Since there are electronic components within the mouse you can't use water or another solvent. Just use a tiny piece of dry cloth or, better still, a cotton swab. Rotate the spindles as you clean them to ensure they are clean all the way round.
Also check for any fibres or hairs that may have wound round the edges of the mouse positioning spindles. If there is any sign of contamination, use a pair of fine-nosed tweezers to remove the offending material. When you are sure you have removed as much as is practical and the parts you have washed are dry, reassemble the mouse back together. Turn it upside down, drop in the ball, replace the circular retaining plate and turn it until it stops. Do not forget, problems with the mouse could be caused by grease or dirt on the mouse pad - if the pad is dirty, your clean mouse will soon be in a sorry state again. When you have cleaned your mouse, do the same with the mouse pad or, if it is really beyond the pale, get a new one - they are not expensive. I can recommend the 3M Precise Mousing Surface.
Keyboard
If you are giving your PC a spring clean, you may decide the keyboard could do with some cleaning too. Only in the most extreme cases will dirt in the keyboard cause it to fail, so cleaning the keyboard is generally done for aesthetic reasons. Still, although a dirty keyboard will rarely cause your PC to fail, inexpert cleaning could.

Risc PC keyboard with 102 keys
Look at a keyboard and you will realise its a very effective dirt trap. All manner of nasties, ranging from ordinary household dust, through pet hairs and dandruff to biscuit crumbs, can fall between the keys and become lodged there. An obvious first line of attack is to hold the keyboard upside down and gently tap the case. If there is more dirt in there than this has managed to dislodge and if you want to clean the keycaps fully, then remove the caps.
Before you start, make sure you know which keycap goes where. Unless you have another keyboard to hand, or it is illustrated in the handbook, draw a diagram, take a digital photograph, or even place the keyboard on your scanner or photocopier and record the key positions in this way. Next, carefully remove the keycaps. A small screwdriver works well and is unlikely to cause any damage.
Insert the blade of the screwdriver under a keycap and lift it up. I suggest you only remove the ordinary sized keys. The space bar and the larger keys like Return and Enter often have wire mechanisms underneath that are hard to fit back into place. Having removed the keycaps, it is easier to remove the debris from the keyboard using a combination of handheld vacuum cleaner, brush and / or compressed-gas aerosol. You can also wash the keycaps, as long as you dry them fully.
Although the buildup of grime on the keycaps can be severe, stick with warm soapy water and a sponge. Do not be tempted to use an organic solvent or any cleaning agent stronger than soap and do not use a scourer. Organic solvents could dissolve the plastic of the keycaps and abrasive cleaning agents or scourers could remove the legends or scratch the keys, making them more susceptible to the accumulation of dirt in the future. Replacing the keycaps - once dry - involves nothing more complicated than pushing them down on to the appropriate switch mechanisms.
Monitor
Finally, a word on cleaning your monitor. A dirty monitor will not affect the performance of a computer but because, as with the keyboard, if you do not know what you are doing you could do some damage. Monitors are dust traps, but in a different way from keyboards. As electrons are fired at the front of the CRT to build up the picture, the front surface of the screen becomes charged with static electricity. This, in turn, causes opposite charged dirt to be attracted to the screen. Soon, the buildup of dirt causes the image to be dimmer than it should be. The easiest way to clean the screen is simply to use a duster.
However, this is not always as effective as you might expect. The action of rubbing the duster on the glass can cause further static buildup. A better solution is to use the cleaning pads made specifically for this purpose. These have an antistatic agent, which, in addition to cleaning the screen, will hinder the further buildup of dirt. RS(³) anti static screen cleaner is recommended (part number 197-5472). Under no circumstances should you use any other solvent or cleaning agent, as these could damage the anti-glare coating that is deposited on to the surface of many screens. To clean the monitorís case, do not be tempted to use anything other than a dry duster.
Also, do be careful with cups of tea and coffee and especially soft drinks containing sugar. Computers and water do not mix - so do not balance your mug on top of the Risc PC case or monitor. I would not expect you to abstain from drinking when you are seated at the Risc PC, but remember that a keyboard full of coffee is a dead keyboard, so do take extra care.
Appendix
| Reflex Electronics | Telephone: 01438 311 299 | http://www.reflexelectronics.co.uk/ |
| Chris Morison - Oganizer | http://www.organizer.ukgateway.net/ | |
| RS Components | Dust Remover / Screen Cleaner | http://rswww.com/ |
Barry Thompson