


Render Bender
Exclusive full version for every subscriber...
Illuminator
To run Illuminator double click on the !Illumin icon. This loads the Illuminator icon, a green sphere, onto the icon bar.
The icon bar menu
You access the icon bar menu by pressing MENU on the mouse with the pointer over the icon. This displays the icon bar menu:
- Info - Moving over the arrow displays information regarding the program version number and the author.
- Options - Ctrl-O - Moving over the arrow opens a window that enables you to set various global options.
- Clear scene - This option clears the current scene, prompting if you have not saved it.
- Quit - This quits the program, again prompting if a file has not been saved.
The Options window
This is accessed from the icon bar menu.
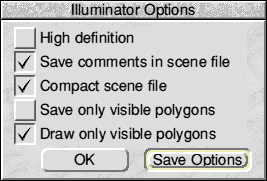
- High definition - Ctrl-H - If this box is selected all cone and tube objects are constructed from 20 polygons. If it is not selected (Ctrl-L) then only 10 polygons are used so the objects will not be as smooth. The disc has 4 polygons (10 points) in low definition and 10 polygons (20 points) in high definition. Note that high definition objects take longer to ray trace. You can change from high to low definition at any time so it is possible to mix high and low definition objects in the same scene.
- Save comments in Scene file - if this is selected then comments are saved with the scene file. Comments are things such as the names of grouped objects or sweeps. If you want to look at the file and understand what is going on then you should have this option on. This makes the Scene file larger.
- Compact scene file - this reduces the size of the file by using one or two characters instead of full names for things such as colour, eg :White is replaced by :W.
- Save only visible polygons - if selected this cuts down the size of the file. It is a little slower saving the scene file as it checks all frames to see if the polygons are visible in any frame and discards those that never appear. The only problem with this is if you are using mirrored objects. In this case some polygons may only have been visible as reflections in the mirrored objects but with this option selected they will not appear at all. If you are not using mirrored objects then this option is worth using as it makes the Scene file smaller and also speeds up ray tracing.
- Draw only visible polygons - this affects only the wire frame option and if selected the program will not draw polygons that face away from the viewing position.
Note: Polygons only have one side and if viewed from the other side they are invisible. This enables us to speed up the ray tracing by not tracing areas that are rarely seen. If you need a polygon visible from two sides than you should place two back to back.
- OK - actions the changes for this session with the program.
Save options - saves the settings to disc so that they are used whenever the program is run. It also saves the current status of the program such as which views are shown, which functions selected and so on.
Using Illuminator
To open the Illuminator window click on the icon on the icon bar. This opens a window onto which you create your scene. The title bar shows a filename, <Untitled> if you have not given a name. View direction. Frame number and whether high or low definition is used for the cone, tube and disc objects.
Toolbox
Attached to the left of the view window is a tool panel which provides objects for use in creating a scene. The first six are fairly self explanatory being sphere, cube, pyramid, disc, cone and tube. Try clicking on them and then banding a box in the window. The point that you click at is where the objects centre will be. If you want to move the centre of the object click or the new position with ADJUST Press SELECT to position the object; The objects look two dimensional at first because they are positioned in line with your viewing position. Try clicking on the solid cube icon to turn on the solid option instead of wire frame.
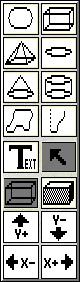
All objects except the sphere can be ungrouped down to their component par.-. For example a pyramid is constructed of four three sided polygons for the uprights and one four sided polygon for the base.
Moving and Rotating
To select an object click on the Select icon (the arrow) in the tool panel and click on one of the objects you have just placed to select it. The object turns grey. You can now drag the object around the screen. If you want to select more than one object click on subsequent objects with ADJUST. Moving one object then moves the others as well. To de-select an object click on it with SELECT whilst holding down the Shift key.
You can also select objects by holding down the mouse SELECT button and pulling the outline box over any objects that you want to select. This is called a select box. You do not need to fully enclose the object as the banded box only needs to intersect any pan of the object for it to be selected.
The two odd looking icons in the fourth row down are Outline and Sweep. These are both explained in detail later.
The next icon is Text and this enables you to enter text into a Scene using the fonts supplied with the package. This is also explained in detail later.
The next two icons let you toggle between Wireframe and Solid modes. In solid mode the objects are not always correctly sorted and in some cases the display will be incorrect, eg if one object penetrates another you may still be able to see all of the penetrating object. It was not considered appropriate to add lots of extra code to overcome this as it would have slowed down the display considerably. However, when ray traced all objects appear correctly.
The final group of four icons are Direction icons and they show the absolute directions in the current window. As you open up other View windows you will notice that the direction icons show different axis and different directions. These icons are not selectable they are simply a reminder of the absolute direction so that you can ensure that objects are correctly manipulated.
The Main Menu
To bring up the main menu press the MENU button of the mouse whilst the pointer is in the illuminator window. This pops up the following Menu.
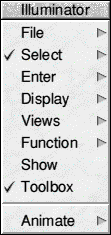
File
The File sub menu enables you to save an Illuminator file or a Render Bender Scene file. The About file item provides information about the file such as the number of objects. Note that most of the objects provided are groups of objects. For example adding a Pyramid adds five objects to the scene.
Select
This option is ticked in the main menu if you have chosen the Select icon in the Toolbox and leads to the following sub menu.
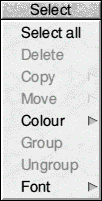
- Select all - Clicking on this option selects all objects in the current scene as if you had individually selected them using ADJUST. When they are all selected the objects are treated as a group and can be manipulated as a group.
- Delete - Ctrl-X - This option deletes the selected object or objects from the scene. You are not prompted and the delete cannot be undone. If no objects are selected this option is greyed out.
- Copy - Ctrl-C - This option enables you to copy selected objects. When you move over the arrow to the right of this option a window opens with parameters that you can set for copying the object or objects.
The first item, Copies, enables you to select the number of copies. Rotate allows you to set the number of degrees for X, Y and Z rotation. Scale allows you to scale the copies in either of the three directions X, Y and Z. You can also set an offset position from the original with the Move option. If no objects are selected this option is greyed out.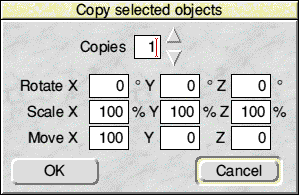
- Move - Ctrl-V - This option is similar to the above Copy option except that it moves the object to a new location and also rotates the object if you have requested it to. There is no option to select the number of copies as this is not relevant for a move.
The reasons for using this option instead of just dragging the object are varied. You may have a very complicated object that takes a long time to redraw as it passes over other objects. You can use this option to move instantly to the new location. For similar reasons you can use this option to rotate an object without it redrawing at all intermediate points. In this case do not set any values for the Move X, Y & Z. Finally you may want to use this option to accurately position or rotate objects.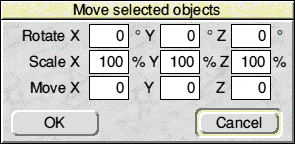
- Colour - The Colour submenu contains all the colours and attributes that Render Bender can handle. If an object is selected this sets its colour. Note that the ticks are on the defaults not the colour of the selected object. The colour you select in this submenu is then used for new objects as they arc created.
Most of the options above the dotted line are self explanatory except for Bulb. This creates an object that is brilliant white no matter what colour of light is falling on it. The options below the dotted line provide different textures for the object - try them out to see the different effects. You always need to have ticked, one option from above the dotted line and one from below.
Note: Only the colour options can be seen in Illuminator, the other effects are only visible once the image has been ray traced in Render Bender.
- Group - Ctrl-G - This option groups all selected objects together into one larger object. When you select this option a window pops up. Here you can assign a name to the group which is included in the Scene file for reference. You can also decide if rotation and scaling of the group is allowed. The centre of a group is calculated as the centre of all the objects in that group. If you want to have a different centre point use ADJUST to select the group at the point that you wish to be the centre. This is useful if you want to rotate around a particular point. The Show option is useful to see the way the centre point changes. Note that the SELECT button is still used to drag the group. If no objects are selected this option is greyed out.
- Ungroup - Ctrl-U - This enables you to ungroup a selection. If you have a group of objects which are themselves a group of objects then the ungroup can be performed to a progressively lower level until you cannot go any further. An example would be a series of pyramids grouped together. You can ungroup the pyramids and then ungroup the sides of each pyramid. This also applies to text where you can ungroup the words and then the individual letters.
Note: If you are going to use group or ungroup you should do so before adding any animation data. Although the animation will still work it is slowed considerably if you use group or ungroup after animation data has been added.
- Font - This menu enables you to choose the font that you wish to use. Using a font is described later. There are three fonts supplied with Illuminator.
Enter
This sub-menu duplicates the options supplied on the Toolbox panel. The ticked object is the one that is applied if you enter a new object. The first six objects, sphere, cube, pyramid, disc, cone and tube, have been dealt with earlier.
Outline - This option is a little complex but it is worth understanding at this stage. Click on the icon on the Toolbox and band a box on the scene window. When you press SELECT a designer window opens. You can now design a shape on the grid and select if you want to generate the Sides, Top surface (facing toward you) or Bottom surface (facing away from you). You can also enter the Width of the object and give it a name. The name has no meaning but it is included in the Scene file which makes it easier to understand and edit later.
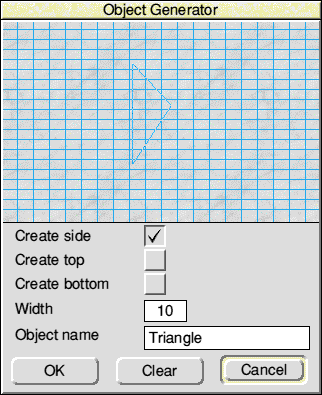
To draw an object click with SELECT to place the first point and a line follows the mouse pointer. You place subsequent points by clicking SELECT again. To finish an object press ADJUST - this links the last point to the first point automatically. To place the object in the Scene click on OK.
If you draw the object in a clockwise direction the surfaces facing away from the centre, or outward, are generated. However, if you draw the object counter clockwise then the surfaces facing inwards are generated. This is useful if you want to position the viewpoint inside an object. Remember, only one side of an object is drawn by default and in the case of Outlines this is either the inside or the outside.
Once an object has been drawn you can edit the points by clicking on them with ADJUST and dragging the point as required. Take care when creating objects with Top and Bottom surfaces as the program does not add points to the created object. If you have a shape that has 10 coordinates on top and just 2 coordinates on the bottom very strange results can occur.
Example 1: Try drawing a triangle by plotting the first, second and third points with SELECT and pressing ADJUST. This automatically closes the triangle by linking up to the first point. Leave the default options ticked so that it is showing Create side only.
Now look at your Front view window and you will see that a triangle has appeared. Go to the Function menu and click on Rotate Y. Now click on the Select option in the Toolbox and select the triangle by clicking on it. You can now drag the triangle and it is rotated around the Y axis. You may need to drag, let go and go back for another drag. You will notice that at some points the object disappears. You should also notice that what you have created is a strip that follows the path of the first two sides that you have drawn. The width of the strip is controlled by the Width option in the Outline designer.
Do the same thing again but this lime select just Create top - you de-select Create side by clicking on the option icon. This time you have a flat triangle, which can be rotated as before. It will also disappear at some points. Create bottom on its own produces a similar effect to Create top except that it is not visible unless you use the Hack view from the Views menu.
Try the same thing again but with Create side and Create top selected. When you rotate this about the Y axis you will note that at one extreme of rotation you appear to have a solid object but at the other you only have two sides of the triangle. This is because you have only specified sides and top and when the non existent bottom 'comes into view' there is nothing there.
Finally, do the same again but with all three option icons selected. This time the triangle appears solid whichever way you rotate it.
Width - this option controls the width of the sides used in the
Outline. The range is from 1 to 99.
When you have grasped the idea of this function try doing some more complex objects and see if you can follow the logic. This is a very powerful function and once understood it is very useful.
Sweep - This is another extremely useful option once understood. To place a Sweep object band a box as with the Outline and upon pressing SELECT a designer window appears. This time the grid only covers the right half of the window because Illuminator draws the other half automatically for you to ensure that the object is symmetrical. The rule for Sweeps is that if your design is drawn from top to bottom then the outside surface is generated. If the design is drawn bottom to top then the inside surface is generated. You can generate both surfaces by setting the Double sided option on.
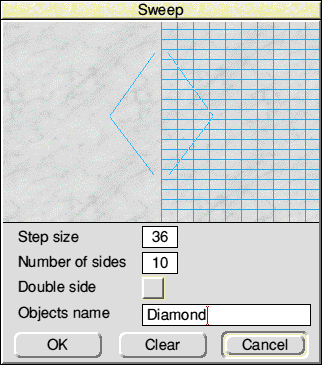
Example 2: Try banding our old friend the triangle starting and finishing on the leftmost grid line (the axis) - you use ADJUST to terminate a design. You will notice that another triangle is added to the left hand side. This shape looks pretty boring but once you have clicked on OK a pleasing diamond shape is drawn on screen.
What you have drawn is the shape of one side of the object. The Step size controls the size of each side in degrees and Number of sides controls how many sides are drawn. The default settings are 36 and 10. You will perhaps have already noticed that 36 * 10 equals 360 degrees so in this case the object has sides all around. However, if you change the Step size to something below 36 and leave the number of sides at 10 you will see that the object does not have sides all around. All of this is best seen from the Top view.
Try drawing a series of about 5 zig zag lines starting and ending on the axis line. You now see that complex shapes can be defined very easily. Next try the same shapes but not starting on the axis line. In these cases the top of the shape is open.
Double side - This option allows you to define the object so that it has an inside surface. If you define two open topped objects, one with Double side on and one without, and then rotate them about the X axis you will sec that one has an inside and the other doesn't - all you see is the background colour.
In a double sided object the inside is one group and the outside is another. This means that you can ungroup an object and select the inside and outside independently. This enables you to assign different attributes; for example a different colour for the inside,
Text - This option enables you to add text to a scene using the font selected in the Select.Font menu. The box that you band defines the size of the font. When you press SELECT an input window opens where you can type your text. The maximum number of characters is 254 but it would be silly to use this many as they would be very small and it will take a long time to redraw the screen. Remember that text can be progressively ungrouped until you have the individual components of the letters as separate objects.
Lights - The three bottom icons are only found in this menu and not on the Toolbox. They provide lighting for the Scene. You must have at least one light in each Scene otherwise it will not be accepted by Render Bender. The maximum number of lights in a Scene is four.
- Beamlight - To place a Beamlight select it and then click on the Scene window where you want to place the Beamlight source. A filled circle is placed at this point with a number to its right. The number indicates the light number. A smaller outline circle is placed near the filled circle. This is the target and should be moved to indicate where the light is to shine. This also has the same number attached.
- Spotlight - A spotlight and its target are placed in the same way as a Beamlight. It looks similar except for the two small lines protruding from the circle. This represents the aperture, which can be altered by selecting Height in the Function menu, then selecting the Spotlight and moving the mouse. You will note that the aperture lines move as the mouse moves. The aperture lines do not point in the direction of the target they simply show the width of the aperture or beam.
- Pointlight - This icon looks like a light bulb when placed. The main difference here is that there is no target object as the light always radiates in all directions.
Display
The first two entries on this sub menu duplicate the two entries in the Toolbox panel. Namely Wireframe and Solid.

- Background and Horizon - This option lets you select the colour of the Background and Horizon line for the display window. It does not effect the colours used in the scene when it is ray traced.
- Draw edge - This toggles on and off the edge which can be drawn around objects to show the edges of each facet of an object.
- Show Lights - This option lets you remove the lights from the display once they are correctly set. The lights remain active but are not displayed.
- Grid - This leads to a sub menu where you can set various options relating to a grid on the View screens. Show puts a grid on screen. Lock makes any objects created or moved lock on to the nearest grid point even if the grid is not on screen. Colour lets you choose the colour for the grid and Size lets you choose the size of the grid. The numbers are an arbitrary value but you will soon be able to judge the required sizes.
- Scale - This option is provided in case any users have old Render Bender scene files with very large numbers for the object sizes. Applying a Scale factor reduces all objects by the chosen scale factor. In Render Bender the size given to objects is irrelevant as it is the relative sizes of the objects, view position and lens that matter. In practice most users will never use this option.
- Update - This function disables the redraw in the various View windows. If you have a complicated scene it can take a long time to redraw the objects in the View windows. Using this option you can bring up the Render Bender View window, select an object in the other view windows and then move it around. The only window that is updated is the Render Bender View, so you can try things much more quickly. Only when the screen is forced to perform a redraw or you click on the Display.Update option are the objects updated in the other View windows. You can also disable the update in the Render Bender View but it is then not easy to see what is happening.
- Zoom- Zoom should not be confused with the Scale option. Zoom is purely a display option that enables you to zoom into or out from a scene. This enables you to work in detail on a small area.
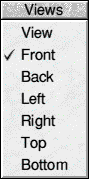
Views
This sub menu has seven options the first, View, being perhaps the most important. This shows the view of the scene as it will appear when ray traced in Render Bender using the appropriate lens setting. by default you are always shown the Front view but this can be changed to any of the views below it. Or used in conjunction with it. When you SELECT any of these options another window opens showing the scene from that viewpoint. You can use this window to add, move or edit objects as if you are using the Front view. This is extremely useful in positioning objects correctly, especially if your animation includes movement of the viewing position.
Note that each View has some of its own attributes so that you can have different zoom factors, wireframe or solid, Toolbox or not. Attributes that are specific to the view are:
- Wireframe/Solid
- Draw edge
- Grid
- Update
- Zoom
- Toolbox
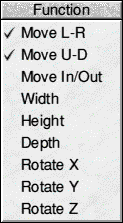
Function
This sub menu provides the tools for moving and rotating objects. The default option is Move L-R and Move U-D this enables you to move selected objects in the X & Y planes within the window i.e. left/right and up/down. Move In/Out lets you move the object on the Z axis in the current window. The quickest way to select both Move L-R and Move U-D is to click on the Select icon in the Toolbox.
This option must be used whilst taking note of the direction icons in the Toolbox. The selected directions apply to the movement in the window. Normally you will not use the Move In/Out function.. If you want to move an object further away from you, simply select the Top or Bottom View and move the selected object on the Y axis. The direction icons in the Top View show that Z+ is up and Z- down but you are only moving the mouse pointer in the Y direction - unfortunately mice only work in 2D.
Example 3: Place a small sphere in the middle of the Front view window. When selected you can move it in the X and Y directions indicated in the Toolbox. Now bring up the Top view and move the sphere as before. It appears to be doing exactly the same but you will notice that the direction icons now show the Z and X axis. You can see this more clearly if you have the Render Bender View window visible. Moving up and down in the Top view causes the sphere to move in and out of the View window. Similarly the Left and Right views have the Y and Z directions shown in the Toolbox.
Why then do we provide the function to Move In/Out ? In some instances it may not be convenient to use another view or the object may be obscured. It may even have zero thickness such as a tube or disc and cannot be selected from some angles. To overcome these problems you can use the Move In/Out function. In this case the object that you are moving does not appear to change in the operative window but it does in the Render Bender View window or in other views.
Example 4: Place a sphere as before and open the Render Bender View. Select the Move L-R and Move In/Out functions. Select the sphere on the Front view and move it left and right - it moves left and right in the Render Bender View window. However if you move the object up and down it doesn't move on the Front view but it gets larger or smaller on the Render Bender View. Note that you can repeatedly drag the sphere in the up or down direction, release it and drag again. This causes the sphere in the Render Bender View window to get progressively larger or smaller.
Width, Height & Depth - These three options enable you to alter the width, height and depth of an object. These relate to the X. Y & Z directions. All alterations are carried out by selecting the object, choosing what you want to alter and then dragging the mouse pointer up or down. All of these alterations are done by dragging the mouse in the Y direction only.
Rotate X, Y & Z - These three functions enable you to rotate an object or group about the specified axis.
Example 5: Clear Illuminator of any scenes by pressing MENU over the icon bar icon and clicking on Clear scene. Now choose and place a pyramid with its centre at the observer position and the base line on the horizon line. Click on the Select icon ^ and select the pyramid (it turns grey). Next choose Rotate X from the Function menu and drag any part of the pyramid in the X or Y direction. You will see the pyramid rotate about the X axis.
Now choose Rotate Y and do the same. This lime the pyramid appears to spin as if it was suspended from its apex by a piece of string. Try Rotate Z and you will will see that it rotates in a clockwise or anti clockwise direction. Try looking at some other views whilst doing these exercises.
Show
This option pops up a window containing information on the cursor position, the selected object position and the selected object size.
You can also use this option to accurately position an object in the scene. To do this Select the object from the Toolbox and then enter the X,Y,Z position and the X,Y,Z size of the object. When this is done click on the Add object button. Alternatively you can start an object off by selecting it and clicking on the scene with SELECT to position the object centre. If you then edit the X,Y,Z values for position and size you will see the object alter as you press Return to enter each value.
Toolbox
This option toggles the Toolbox at the side of the window on and off.
Animate
This sub menu is very important and you should take the time to understand the functions.
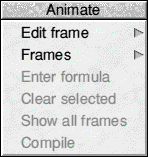
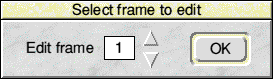
Edit frame - This option lets you choose which frame to edit. You can alter the frame number with the arrows or by typing the number in. You cannot edit a frame number higher than the number of frames that you have defined - see below.
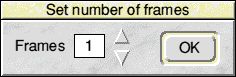
Frames - Set number of francs This option has a similar window to the above but this lets you choose how many frames are in your sequence or animation. When you click on OK the number of frames is changed in the title bar of the main window. This information also indicates the current frame using # in front of the number eg 'Frame #2 of 10'.
Enter formula - Click on this option to bring up a menu in which you can enter formulae. This innocent looking window provides you with an extremely powerful tool. The formulae are applied to whichever object or objects are selected. You can apply different formulae to different sets of objects. A typical formula might look like
300*COSRAD(FRAME*18).
The formula is an offset to the current data for the object and is applied from the first frame. This means that moving an object's position in Frame #1 results in the object being moved in all subsequent frames but if you move an object in say Frame #5 then only that frame is affected, all subsequent frames revert to the offset from Frame #1.
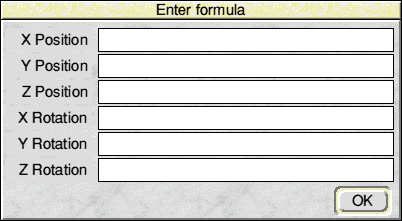
The formula can be applied to X,Y and Z position as well as X,Y and Z rotation. A reserved variable called FRAME is used to return the frame number from 0 to (number of frames -1). For example if you position a sphere at 0,0,0 and you want to move it in the X axis using 10 frames you can enter FRAME*100. This gives X positions of 0 for frame 1, 100 for frame 2 up to 900 for frame 10. The FRAME variable runs from 0 to (Frames-1) so that the first position is always as shown in the first frame. If you do not want this you can add 1 to the FRAME variable eg (FRAME+1)*100. Formulae can be created using the following:
COS, SIN, TAN, RAD and MOD
The first three require their parameters to be in Radians (RAD). You can do this by using a formula such as
SIN(RAD(FRAME*36))*500 or SINRAD(FRAME*36)*500
RAD can be used in conjunction with the other three functions to convert their arguments into radians.
Example 6: Clear any scene from Illuminator and position a sphere in the bottom left of the Front view window after opening the window to full size. Go to Animate.Frames and set the number of frames to 20. Click on the Select icon and select the sphere. Now go to the Animate.Enter formula menu and enter the following:
    X Position: -1800+FRAME*80
    Y Position: SINRAD(FRAME*36)*150
Now click on Show all frames and you will see the sphere follows a sine wave. See the explanation below for Show all frames.
Clear selected - This option is used to clear the animation data for objects. This allows you to clear formulae for example. It has two different uses. If you are in Frame #1 all the frames are cleared of animation data for the selected object(s). If you are in any other frame then only the animation data for that frame is cleared. This enables you to fine tune the position of objects in any frame.
Show all frames - This is an extremely useful option. It takes account of any Formula or Compilation and draws the animated positions of the selected object(s) all on one screen. For example if you are moving a sphere from the left of the window to the right in ten steps then ten spheres are drawn at the relative position for each frame. This enables you to accurately see the animation path that will be followed by the object(s). The window is redrawn normally as soon as you click into it.
Compile - This option provides an Inbetween function. It compiles animation data for frames that have none. For example you could move a sphere in ten steps by placing the sphere at the left in Frame #1 and at the right in Frame #10. Click on Compile and the program calculates the position for each frame. You can then view the movement by using the Show all frames option above.
As well as simple movements as detailed above you could for example position Frame #1 on the bottom left, Frame #5 at the top and middle and Frame #10 on the bottom right. Clicking on Compile creates the information required. Try this and look at the path shown when you select Show all frames.
Editing a scene
Most of the points below have already been covered but this section pulls ail the relevant material together so that you have a reference point for editing
To edit the scene you first have to change to Select mode, this can be done either by selecting the pointer in the Toolbox window or the Select entry in the main menu. When you have changed to Select mode you can select object(s) either by clicking with SELECT or by dragging a select box. If you click on an object it is selected, if there is more than one object at the point that you click the program chooses one object and selects it. If it wasn't the object that you wanted you can double-click with SELECT until the correct object is selected. If you want to select multiple objects click on subsequent objects with ADJUST. If you use a select box (press the SELECT button and move the mouse to band a box and then release SELECT) all objects that fall wholly or partly inside the select box are selected.
To edit an object first select the object you want to edit and then select what you want to do in the Function menu. To move an object(which may be a single object or a group of objects) you select Move L-R, Move U-D or Move In/Out and then drag it into position. Rotation and sizing is done in the same way. You point to a selected object and drag until you get the desired rotation or size.
These options must be used whilst taking note of the direction icons in the Toolbox.The selected directions apply to the movement in the window. Normally you will not use the Move In/Out function. If you want to move an object further away from you you simply select the Top or Bottom View and move the selected object on the Y axis. The direction icon in the Top View show that Z+ is up and Z- down but you are only moving the mouse pointer in the Y direction - unfortunately mice work only in the X and Y planes.
Example 7; Place a small sphere m the middle of the Front view window. When selected you can move it in the X and Y direction. indicated in the Toolbox. Now bring up the Top view and move the sphere as before. It appears to be doing exactly the same but you will notice that the direction icons now show the Z and X axis. You can see this more clearly if you have the Render Bender View window visible. Moving up and down in the Top view causes the sphere to move in and out of the View window. Similarly the Left and Right views have the Y and Z directions shown in the Toolbox.
Editing the lights
The lights are as follows:
- Beamlight - drawn as white filled circle with four lines around it.
- Spotlight - is drawn as a white filled circle with two lines that show the aperture of the light. Both the Beamlight and Spotlight have targets that control the direction the light shines in.
- Pointlight - is drawn as a white filled circle with a little box under it supposed to look like a light bulb.
If you add a Spotlight or a Beamlight you should notice a number to the lower right of the light and also a small circle beneath them which also has a number with it. The small circle is the target for the light direction and the number is there so you can see which light 'owns' which target. To change the direction the light shines in you just select and move the target just as any other object. You can also change the aperture of the spotlight using the Height option in the Function menu. The two lines below the light alter to show the aperture or beam of the spotlight. Note that the aperture does not point towards the Spotlight target, the lines simply show the width of the beam.
Editing the Observer position
There is one strange object which is always in the scene, it is a circle with an x in it. This is the Observers position. This can be selected, moved and/or animated just as any other object. The Observer position has its own target - a small circle like other targets but, instead of a number, it has a small 'o' (observer). The Observer target can be edited as any other object.
Whilst the Observer position can be seen in the front and back views by default you will need to use the Display.Zoom function to zoom out to 1:8 in order to see both the Observer position and Observer target in the other view windows.
It is worth spending some time experimenting with the observer position as it enables you to look at the scenes from different perspectives. You can move both the Observer position and the Observer target. To see the effect of moving the observer position you should have the Render Bender View window on screen. by moving the Observer position you can zoom into an object and even 'fly' around it.
Note: Lights, targets and the View position can not be Grouped.
Saving and Transferring scenes
Once a scene has been created, with or without animation data, you can save it either as an Illuminator file or as a Render Bender Scene file. Render Bender Scene files should only be saved when you are ready to ray trace the scene. Although you can re-load a Render Bender Scene file into Illuminator you lose all information regarding animation and grouped objects. Illuminator Files retain all of this information and can generate Scene files quickly. To preserve your disc space it is best to save just the Illuminator files and generate the Scene files as required.
Note: Illuminator files cannot be loaded into Render Bender directly.
You can drag Scene files directly from Illuminator into Render Bender if you have it loaded onto the icon bar.
RISCWorld