



Render Bender
Exclusive full version for every subscriber...
Render Bender
To run Render Bender catalogue the program disc and double click on the IRender icon. This loads the Render Bender icon, a red sphere, onto the icon bar.
The icon bar menu
You access the icon bar menu by pressing MENU on the mouse with the pointer over the icon. This displays the icon bar menu.
- Info - Moving over the arrow displays information regarding the program version number and the authors.
- Save setup - Click on this option to save the current settings as the default settings. This saves such things as picture size, shadows, mode etc. It saves everything except the values in First frame and Last frame.
- Quit - This quits the program, prompting if a file has not been saved.
Using Render Bender
To open the Render Bender window click on the icon on the icon bar. This opens a window containing various writable icons and two large action icons at the bottom. We will list what each of the icons in this window do.
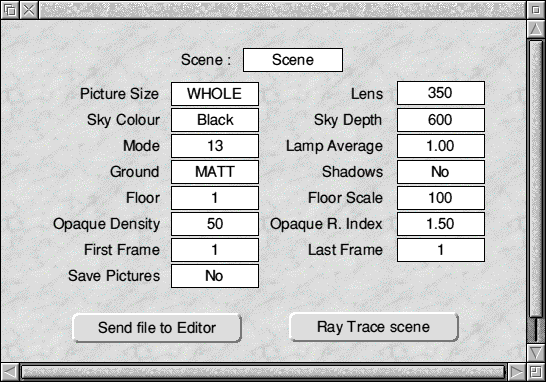
Scene
This is the name of the currently loaded Scene. This will either be the leaf name of the file loaded from disc or the name given to the file transferred direct from Illuminator. To alter the name click into the icon and edit as normal. Filenames must be a maximum of eight characters and the program strips any extra characters.
Picture Size - (Range 1/1024 to Whole)
This icon toggles through various sizes available for tracing, from whole down to l/1024th. The smaller sizes enable you to perform a quick test on a scene to see if it is what you expected. Using ADJUST steps backwards through the list whilst Select moves forward.
Lens - (Range 100 to 9999)
This icon enables you to change the focal length of the imaginary lens used to view the scene. It is like changing from a wide angle lens to a telephoto lens. To edit the value click into the icon. The larger the lens the closer to the scene you appear to be. Use of the lens means that you can define a scene and then zoom into a small part of that scene whilst still retaining all of the reflections and refractions from the whole scene.
Sky Colour
This icon also toggles through its various options. You can choose from fourteen colours which are then used as the colour of the sky. ADJUST again moves through the list in reverse order.
Sky Depth - (Range 1 to 9999)
This icon enables you to specify the rate at which the sky colour fades from the selected colour to black. The lower the value, the larger the area of initial sky colour. As you use higher values more colour changes are introduced until you end up with a small strip of the initial colour and a larger area of black. All colours fade to black with intermediate steps of progressively darker colours.
Even if the viewing position used in a scene does not make the sky visible it is still taken into account for reflections etc.
Mode
This is a writable icon and it is used to select what mode the pictures are drawn in. Note that you do not have to be in that mode at the time. When you click into the icon you can edit the Mode number. Enter the required mode and press <Return>. If the mode number is unrecognised or it is not a 256 colour mode then the program beeps and the previous value is written back.
You can use new modes defined in separate modules but the module must be present when you select the mode and also when you try to show the pictures in the new mode.
Lamp Average - (Range 0.01 to 3)
This icon is only of use when you are using more than one light source in a scene. The Lamp Average is used internally to calculate the light intensity.
The Lamp Average biases the exposure. This is useful if, for example, you have a scene with two spotlights whose beams do not interact - that is you have two pools of light.
              Intensity
    -----------------------------
    (Light_Sources * Lamp_Average
The way the program handles this internally is to add together the intensities of all the pixels in a scene and then divide the result by the figure arrived at by multiplying the lamp average by the number of light sources. This may be a little clearer from the formula:
Intensity has a range of 0 to 1 with 0 being black and 1 being brilliant white. Therefore to make full use of the available colours you should always try and get the above formula to give a value of 1.
With two light sources and a value of one for the Lamp Average the maximum intensity of each lamp is:
      1
    -----
    (2*1)
which is 0.5
Setting the Lamp Average to 0.5 in the formula results in:
       1
    -------
    (2*0.5)
which is 1.0
A result of 1 means that the picture takes full advantage of the available colours.
Ground
This icon toggles between Matt and Shiny ground. The effect of this option is quite subtle. If you have a light source shining onto a Matt ground the amount of light reflected from the ground is virtually nil. However, if you choose Shiny ground then much more light is reflected resulting in the light source being visible on the ground.
The best analogy is to think of a spotlight in a room shining onto a polished floor. In this case the light is visible on the floor but if you were to place a rug or mat on the floor you can no longer see the light reflected.
Do not confuse Shiny with Mirror which are both used within Render Bender. Mirror surfaces show reflections of objects around them whilst shiny objects only reflect light. This gives highlights to a scene and makes it more realistic.
Shadows
This icon enables you to specify whether you want shadows to be included in a scene or not. Clicking on the icon toggles between Yes and No. If you have shadows off the picture is traced faster and we recommend that you have shadows off when proofing a picture and only set shadows on when you are ready to do your final pictures.
Floor
This icon enables you to select a floor design. This icon simply toggles between the fourteen options from 1 to 14. To sec the design and colours you need to use the Floor option in the menu. This is described later.
You can also use a sprite as a floor pattern by dragging the sprite file into the Render Bender window. If the sprite file has more than one sprite then the first sprite is used. When toggling through the floors the word Sprite appears after floor 14. This is then used as the floor pattern.
Due to the way Render Bender works internally the sprite is convened to Mode 9 and uses the palette from Render Bender. As this is totally different from the Desktop palette you may find odd things happening to the colours. To assist you we provide a palette file called RRFloorPal. If you load this palette into Paint. Artisan 2 or any other art package prior to designing your sprite you can design the sprite in exactly the format that it will appear in on the ray traced picture.
Floor Scale - (Range 1 to 99999)
This icon is used to select the scale used to produce the floor of the picture. The floor is created using your selected pattern or sprite. The scale defines the repeat rate of the floor pattern. The smaller the number, the smaller the pattern will be and so the pattern will be repeated more often for a given floor area.
Opaque Density - (Range 1 to 99999)
This icon enables you to specify the degree to which glass objects transmit light. Although the term Opaque is used, a setting of one results in the objects being almost completely transparent whilst a setting of 99999 results in the object being completely opaque. The higher the Opaque Density, the less light the objects allow to pass through them.
Opaque R.Index - (Range 0.001 to 3)
This icon is an abbreviation for Opaque Refractive Index. It enables you to alter the refractive index of glass objects.
The refractive index indicates how the light is refracted or 'bent' as it passes through the object. A refractive index of 1 results in light passing straight through without any deviation. Glass has a refractive index of 1.5 and you should use this unless you want to achieve particular results.
Values for the refractive index that are less than 1 result in the light being reflected inwards towards the centre of the object whilst values greater than 1 result in the light being reflected outward.
Example 8: Load the supplied Scene file called GlassBall and ray trace the image using the settings in the file. Note how the ball appears ghostly but the pattern is hardly distorted at all.
Now alter the Opaque Refractive Index to 3 and ray trace the image again. You will now see that the floor is very distorted and that the floor pattern is shown very large in the ball. This is because the light has been bent outward.
Next change the Opaque Refractive Index to 0.5 and trace the scene again. Note how the floor pattern appears much smaller in the ball due to the distortion caused by the light being bent inwards. Finally try changing the value to 0.1 and tracing again
First Frame
If you have more than one frame defined this writable icon enables you to set the frame number that you want traced. Initially it is set to 1.
When ray tracing a new set of frames always enter the first and last screen, even if you do not think they will all fit on the disc. If they are not all saved to disc you can then insert a new disc and click on Ray Trace Scene again. The program automatically alters the value of First to be the next picture in the sequence. You continue this process until you have ray traced all of the pictures.
Last Frame
This is similar to First Frame except you are defining the last frame in a sequence to be ray traced. If you change First to a number other than 1 then Last is also changed to the same value unless the value in Last is higher than the value in First.
Save Pictures
This icon toggles between Yes and No. If it is set to No then no frames are saved to disc. If it is set to Yes then the frames arc saved to disc in the directory which is set using the Directory option in the main menu. The files take the name of the file shown in the Scene icon and each frame has a number added to it automatically.
Send File to Editor
Clicking on this icon sends the current Scene file to Edit as long as Edit has been seen by the system. If Edit has not been seen then an error informs you of this fact. You must then load Edit before clicking on this icon again. In fact any text editor can be used as Render Bender looks for whatever editor is normally invoked when you double click on a text file. If you have substituted another editor which uses this command then that editor is used instead. If the editor you are using does not have Edit in its filename you must change the RenderEdit variable in the !Run file inside !Render to the use the new name.
Ray Trace Scene
Clicking on this icon starts the ray tracing. First the file is compiled and then ray tracing begins. Using the main menu you can select whether ray tracing is done in multi tasking mode or in Fast mode. See details later.
If you have the Save Pictures option set to Yes then each image is saved to disc after it is traced. The program automatically moves on to the next frame, compiles the information and traces that frame. The full pathname for saving the picture is taken from the Directory.Pictures entry in the main menu.
If you are using floppy discs and your disc becomes full the tracing stops and the program changes the value in First Frame to the last completed frame. You can then insert a new disc and carry on from that frame. Do not forget to change the Directory name in the main menu otherwise the program will try to save to the original directory only to find that it is not present.
The Main Menu
To access the main menu press the middle mouse button (MENU) whilst the pointer is in the Render Bender window. This pops up the main menu
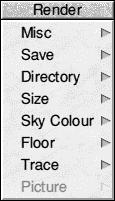
Miscellaneous (Misc)
This menu has two sub menus:
- Info - provides information about the program version and authors.
- File - provides information about the current file.
Save
This menu also has two sub menus:
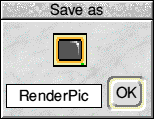
- Picture - enables you to save the current Render Bender picture in compressed format. Saving is achieved the same as for any RISC OS application by dragging the save icon into a directory display or by entering a full pathname and clicking on OK. Once saved the full pathname is shown in the Save dialogue box. If the pathname is different to that set up in the Directory option you are asked if you wish to make the new path name the default for pictures.
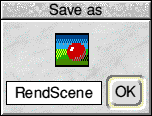
- Scene - enables you to save the current Render Bender Scene in the normal RISC OS manner.
Directory
This menu is similar to the Save menu and has two sub menus. In this case the sub menus enable you to set a directory path for both Picture files and Scene files. You can also have the relevant directory folders available on the icon bar by clicking on either Picture or Scene within the Directory sub menu. This places a tick against the menu item and places a directory folder on the icon bar. To open the directory display click on the folder on the icon bar.
When the directory folder is on the icon bar you can alter the directory path by dropping a new directory onto the old one on the icon bar. Alternatively you can enter a new pathname in the Directory sub menu and press Return or click on OK. If you do this the new directory path is stored and used next time you run the program. If you drag a new directory onto the folder on the icon bar this is only used for the current session unless you go into the Directory sub menu and click on OK. It is then made the default directory. The current directory is stored as the default if you use the Save setup option.
Note; You should always use different directories for Scene files and Picture files. The suggested names are Scenes and Pictures. Picture files always take the Scene name and have a number attached e.g. Scene1, Scene2 etc. When you use Animator later the animation file takes the Picture names without the number i.e. it has the same name as the Scene file. If they are both in the same directory the Scene file will be overwritten. If you change the name of a Picture file remember that you must also change all other pictures in the sequence to the same name plus the relevant number.
Picture - enables you to set a directory path for saving pictures. This path is used when saving a sequence of screens to disc after setting the Save Pictures option to Yes.

Scene - enables you to set a directory path for scenes. This is used when the Scenes directory is displayed on the icon bar.

Size
This function duplicates the Picture Size option on the main window. The current setting is shown by a tick.
Sky Colour
This duplicates the option in the main window except that the colours are presented as a list. The selected option is ticked. To choose another colour simply click on it.
Floor
This function is also duplicated on the main window but the menu item provides additional information and functions. The floor number can be altered using the up and down arrows. The main area shows the selected floor pattern, which is not editable.
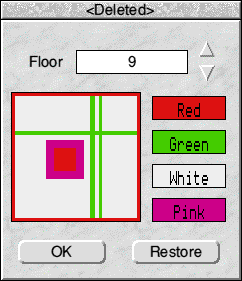
You can use a sprite as a floor pattern by dragging it into the Render Bender window. The sprite then shows after floor fourteen. Due to the way Render Bender works internally the sprite is converted to Mode 9 and uses the palette from Render Bender. As this is totally different from the Desktop palette you may find odd things happening to the colours. To assist you, we provide a palette file called RHFIoorPal. If you load this palette into Paint or your art package prior to designing your sprite you can design the sprite in exactly the format that it will appear in on the ray traced picture.
To the right of the pattern are four boxes which show the current colours assigned to the pattern. In some cases the third and fourth boxes show a series of lines. This means that they have no colour assigned in this pattern. You can change the colours by clicking on them to toggle the colours. Any changes take immediate effect in the pattern. You cannot change the colours in a sprite File.
Click on OK to finish your editing and enter the current design as the floor pattern. If you want to return to the original colours click on Restore.
Trace
This menu has two options Normal and Fast. Normal causes the screens to be ray traced in a multi tasking window and in the background. To cancel tracing click on the Cancel button in the small tracing window.
Fast takes over the whole computer and switches to a special mode. Whilst tracing, a figure is shown which indicates the number of lines that have been traced. If you are tracing a series of frames the time taken for the last frame is also displayed. The Fast mode is considerably faster and if you are leaving the computer to trace a series of pictures then this is the mode that you should use.
The Num Lock light on the numeric keypad flashes at the end of each line to indicate that something is happening. This means that you can turn off you monitor when images are going to take a long time to trace. To abort tracing in fast mode hold down the Num Lock key until the desktop returns. You may have to hold the key down for some time if you are tracing a complex image in a high resolution mode as the key is only checked at the end of each line.
Picture
This menu has two options. Show and Clear. If there is no current picture this option is greyed out. Show shows the current picture in a window. If you have not traced a full screen then part of the window may appear black as the size of the window is controlled by Picture Size. Clear simply clears the current image, prompting before doing so.
Helpful Hints
Always store your Scenes and Pictures in their own directories and store animation files in the Pictures directory.
When testing a scene use a small screen size sufficient to see the detail that you require and if possible use Fast mode. Also leave Shadows off and use Mode 13. When you are achieving the required effect set Picture Size to Whole, Shadows to Yes and set the required Mode. If you are creating an animation it may be worth creating it in a smaller size before trying it out full size.
If you have a 1 megabyte computer you need to be careful if you want to use multi sync modes. You will have to save the files from Illuminator to disc, quit Illuminator, load Render Bender and then load your scene file. All of these provisos are subject to the si/e and complexity of your scene file.
Hint: If Render Bender will draw the screen at 111024th of a screen then it will be able to draw the full screen image as well.
RISCWorld