

Illusionist
Another RISCWorld exclusive...
The Edit window
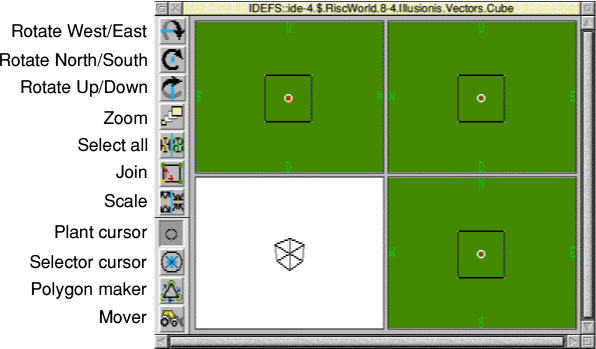
The edit window consists of four panes. The green panes are the Design area and from lop left are: side view, front view and top view. The white pane is a Preview pane which shows your scene in wireframe format, taking account of the Sens o-server position and target position. The Preview pane is not updated until you click into it.

Down the left hand side of the window is a set of icons that are used to control and manipulate the outline objects or vectors as they are referred to in Illusionist. These are referred to as the Toolbox.
You should now open up the Vectors directory on your disc and double click on the file Cube. This is loaded and the window opened if it is not already open. If a dialogue box appears on screen click on the Replace option. You now have a cube on screen in the green panes. Click into the white pane to see the outline object as it will appear.
The icons in the Toolbox are explained below. You might like to try out each function as you read about it. The Cube file that you have loaded has the vector co-ordinate points already selected for this purpose. It is important to remember that before you can do anything with an object you must first select it. Selected points are indicated by the point turning white instead of a light green. Note the white dots at the comers of the cube.
Rotate about West/East axis
This icon rotates the selected points around the WE axis as indicated by the icon. Click on the icon with the Cube file loaded and note how the points rotate but not the object itself. This is for speed so that the screen is not slow in updating. Click in the white preview pane to see the result of the rotation.
SELECT rotates clockwise in the top left pane and ADJUST rotates anti-clockwise. The number of degrees of rotation can be altered in the Misc.Rot degrees menu.
To update the green design panes you can click on any of the Toolbox icons except the rotate arrows and the scale option. The preferred method is to click on the Plant icon which is the eighth icon down in the Toolbox or to press the <Space> bar.
Note: Rotation is always about the cursor position and not the centre of the selected objects.
Rotate about North/South axis
This icon rotates the selected points about the NS axis as indicated by the icon. The details are the same as for the rotation about the WE axis above. SELECT rotates clockwise in the top right pane and ADJUST rotates anti-clockwise.
Rotate about Up/Down axis
This icon rotates the selected points around the UD axis as indicated by the icon. The details are the same as for the rotation about the WE axis above.
SELECT rotates clockwise in the bottom right pane and ADJUST rotates anti-clockwise.
Zoom
Click on this icon with SELECT to zoom into the scene or with ADJUST to zoom out from the scene. Zoom does not alter the size of the objects it just alters your view of them. Zoom applies to the whole scene and not selected objects. The cursor is taken as a reference point and the zoom action first centres the cursor and then zooms in on that point.
Select all
Click on this icon with the mouse SELECT button to select all points in a scene. Clicking with ADJUST de-selects all points in a scene. There is only one icon but the two objects are there to remind you that you can select and de-select with the one icon.
Join
Clicking on this icon causes all facets touching a selected point to also become selected. For example if only one point on the cube is selected and you click on this icon then all points connected by facet edges, ie all of them, are also selected.
Note: All points in the same position as the selected point(s) are also selected. For example. place two cubes one on top of the other, de-select them and then select a point on the bottom of the bottom cube. Now click on Join and all points on the bottom cube are selected. If you now click on Join again the top cube is also selected as the points where the cubes meet were selected when you first clicked on Join
Scale
This icon scales the currently selected objects. SELECT enlarges the objects and ADJUST reduces them. The scaling takes place around the centre of the selected objects. In the case of the cube this is about the centre of the cube.
The scale factor can be set in the Misc.Scale fact menu. The default value is 1.25. A value of one results in no scaling taking place. Any value entered below one is rounded up to one. The smallest practical scale factor is 1.0001.
The Misc menu also has three other options dealing with scaling. These enable you to limit the direction of scaling so that objects can be uniformly distorted. Their use is covered in more detail later.
Plant cursor
The Plant or cursor is used to provide a point about which objects are rotated as well as the position that any new objects are placed at. If this icon is selected then the cursor is in its normal state, which has no effect.
Selector cursor
Clicking on this icon enlarges the cursor circle and switches it to point select mode. When the cursor is moved, any points that it passes over are selected and they turn white.
Note: The Selector cursor must be over the same position in all three views and it must move to select points. Points already under the cursor are not selected until you move the cursor. Remember this when you are using a large grid.
You can use the Zoom to zoom out thus enabling the Selector cursor to cover more points at a time.
This is a frequently used tool and you should familiarise yourself with its use.
Polygon maker
This function enables you to make polygons with up to 32 sides. First clear the scene by clicking on Clear all on the icon bar menu. Next select the normal Plant cursor. Move the cursor to your first point in the top left pane and whilst holding down the SELECT button press the ADJUST button. This plots a point on the screen. Repeat this to plot additional points - we suggest a triangle for your first attempt. Now click on the Polygon maker icon and the cursor changes to a square. Position the square over your first point and whilst holding down the SELECT button press the ADJUST button. A number 1 appears repeat this for the other points but moving in an anti clockwise direction from point 1. When you have completed all your points return to point 1 and click again with ADJUST whilst holding down SELECT. Your polygon then appears in the green panes. Click in the white preview pane to draw the outline there.
Note: If there is more than one point inside the square cursor then the point nearest the centre is taken as being the point required.
You do not have to plot the points anti clockwise but if you try the same exercise by plotting the points clockwise you will not be able to see the object in the white preview pane as clockwise instructs the program to draw the side of the polygon facing away from you, which is invisible until you rotate it around so that the polygon face is facing you. The rule is therefore; plotting points anti clockwise plots the polygon face so that it faces you but plotting clockwise plots the polygon face so that it is facing away from you. (Refer back to the Introduction and also see Double faced later).
Note: The above is a simplified explanation but it does not always follow that the points will be seen to go clockwise on the screen. This depends upon the direction the polygon is facing in the edit windows.
These rules apply for plotting in all three design panes. Remember that the image seen in the preview pane depends upon the Observer and Target positions. You may need to zoom out to see these positions. The yellow x is the Observer position and the red + is the Target position.
Note: You do not have to plot the points in a strictly clockwise or anti clockwise direction. You can also plot the points and numbers in an irregular fashion to design different shapes. Each number is connected to the next sequential number so you can design quite complex polygon shapes. Also see Sweep described later.
Mover
This icon is used to move the selected points. When you select this icon the cursor changes to a blue spot in a white circle. Any selected points can then be moved simply by moving the Move cursor into the required location either by dragging or clicking at the new cursor location.
This function is a lot more useful than it first appears because it can be used to change the shape of selected objects. For example by selecting just the points on one facet of a cube you can pull the cube into a rectangular shape. If you select just two points on a facet you can create a wedge shape.
Now imagine doing similar things with some of the other objects such as cone, pyramid, surface or torus. You can see just what a powerful tool this option is.
Panning
You can pan around the edit panes by clicking with ADJUST near the edge of the pane that you wish to pan. Panning causes the objects to move in a direction opposite to the point that you are clicking at. You can also pan diagonally by clicking in the comers.
RISCWorld