

Illusionist
Another RISCWorld exclusive...
World menu
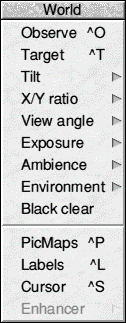
The World menu deals with settings that control the imaginary world in which the pictures are plotted. All World settings are saved with any vector file.

Observer (Ctrl O)
Clicking on this item or pressing Ctrl O causes the Observer position to be moved to the cursor position. The Observer position is where the scene is viewed from and is best thought of as a camera position.
Target (Ctrl T)
Clicking on this item or pressing Ctrl T causes the Target position to be moved to the cursor position. This is best thought of as the position that the camera is looking at.
Tilt
This item has a writable icon where you can specify the tilt of the camera (Z axis rotation). The value is entered in degrees.
X/Y Ratio
This is another writable icon which controls the X to Y ratio of the whole scene. It is not dependant on objects being selected. A value of 100 means that the ratio is normal. A value of 50 reduces the X ratio and a value of 150 increases the X ratio. Note that the only place you see this effect is in the wireframe View pane and when rendering the picture. The design panes do not show any distortion.
This function is useful if you are using modes which cause the image to appear out of shape.
View angle
This menu enables you to select the viewing angle from the Observer position that is used when rendering the scene. The angles shown in the menu equate to the following camera lens size; 75 equals a 28mm wide angle lens; 47 equals a standard 50mm lens and 18 equals a 135mm telephoto lens. The final entry enables you to enter your own custom setting.
Exposure
Exposure controls the brightness of a scene. Exposure levels in the scene are adjusted automatically depending upon the number of lamps in a scene. In some cases, especially when using spotlights, the scene may be too dark. This function can be used to brighten the overall image. The normal setting is 256 so to double the brightness of the scene change the value to 512.
Ambience
Ambience is the setting for ambient light. This is the background light that is reflected off objects in the scene. In real life sunlight may only be shining on the floor of a room but it is reflected off the walls and objects in the room. The light combines to light up the whole room and this is ambient light.
When a real object is lit from one side the other side is not black because it is lit by ambient light, unless it is in deep space. This function provides your scenes with the same ambient light. The default setting is 65 but it can be altered if you wish.
Environment
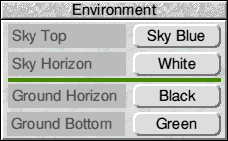
This window enables you to set the colours used in the world's environment. The colours can be selected by clicking on the icons to toggle through the available colours.

Sky Top is the colour of the sky at its highest point whereas Sky Horizon is the colour of the sky from the horizon line. The two colours gradually merge from one to the other. The amount that you see depends upon the viewing position and angle.
Ground Horizon and Ground Bottom are similar to the above but are colours for the ground.
Note that the Environment is only drawn if the Render.Environment option is ticked. Also the Enviro slider in the Edit.Material menu is used to control the amount of reflection of the environment onto objects. It is this setting that adds realism to a scene. You can achieve some nice effects by making the Sky and Ground horizon colours the same.
The environment mapping isn't just filling in black areas. It also works with the anti-aliasing routines used in the program.
Black clear
When this option is selected any black on a picture map becomes clear, showing the background through it. This is useful for showing inside an object.
PicMaps (Ctrl P)
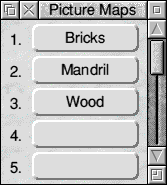
Clicking on this icon or pressing CtrI P opens a window listing any loaded picture maps.

A picture map is any Mode 12 or 13 full screen sprite. Picture maps can only be loaded when this window is on screen. To load a map simply drag it onto the list. Its name then appears in the list with a map number against it. For details on the use of maps see the Edit.Material section earlier in this manual. Utilities such as ChangeFSI or Translator can be used to convert images into Mode 12 or 13 screens.
Labels (Ctrl L)
Clicking on this item or pressing Ctrl L opens a labels window listing any assigned object labels. A label is created by selecting the object or objects that you want to group so that their points are selected. Then press Ctrl L to open the labels window. Next press MENU with the pointer in the Label window and using the New label option enter a name. The name then appears in the list.
If you press MENU over a label name the other two menu items become available. Rename enables you to rename an object and Delete deletes that object.
Objects can be selected and de-selected by clicking on the object name in the list using SELECT or ADJUST respectively. This function is particularly useful when merging vector files together as the object labels are also merged. Try to get into the habit of labelling all your objects as it makes life a lot easier later.
Cursor (Ctrl S)
Click on this item or press CtrI S to open the Cursor position window. This window has three entries for North/South, West/East and Up/Down. As you move the cursor the values are updated. If you want to enter a specific position click over the relevant entry in the Cursor window with MENU to gain access to an input box. Enter the required value and press Return.

As objects are placed and moved with the various cursors this feature enables you to position objects with great accuracy.
Enhancer
This item is greyed out unless you have a PCATS Graphics enhancer card fitted. If it is fitted then this item can be accessed. It simply allows you to set a Threshold level for the Enhancer board so that you gain the maximum benefit. The threshold level is the level above which new palette colours are selected. When rendering Illusionist finds the closest colour fit for the current palette. The weighted colour distance measured is then compared to the threshold value. If it is larger than the threshold value a new palette colour is created.
A value of zero results in a new colour being created for every colour required. With only 256 colours available at once you will soon run out of palette spaces when rendering complex scenes with lots of different coloured objects.
If you set the value too high, say 1000, you will not use enough of the palette space therefore using the Enhancer inefficiently. The number of palette colours used is displayed when you click on See picture.Full screen.
A value of about 250 is a good starting point for most pictures but a little experimentation is needed especially when using lower resolution modes.
When you save a picture either as a compressed picture or as a Clear file the Enhancer palette is also saved with it
The Closest fit option is overridden when an Enhancer is fitted.
RISCWorld