



Tiled Shapes
Richard Ashbury
Introduction
Some time ago an exceptional graphic illustrator, Henk Huinen, wrote graphic articles for RISC OS users. One of the articles described how the talented and famous Dutch graphic artist.... M.C. Escher might have created his wonderful and enigmatic artwork. The artwork in question is tessellation where an object fits together to form a symmetrical pattern with its replicated neighbours. No gaps or overlaps exist between the objects giving the work unbroken continuity. Figure 1 shows a simplified illustration of Eschers clever technique. His many designs were done with pen and ink, lithography and woodblock printing and not a computer in sight.

Fig 1
I've long been fascinated by these graphic patterns and decided to have a go at trying to create my own. For simplicity I chose a three cornered design. Once the initial object is drawn and coloured it is repeatedly cloned/re-positioned to form a vertical column down the left hand side of the page. The complete column is cloned again and then flipped horizontally and aligned with its neighbour to create a solid column. This procedure can then be repeated to create the arch. Figure 2 shows the final picture.

Fig 2
Creating the Object
The picture starts life as a simple three cornered outline shown in figure 3. Follow the procedure below to create it accurately.
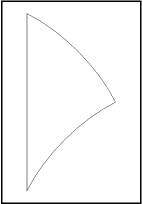
Fig 3
- Switch on grid and grid lock.
- With the curve tool drag out a 5 x 5 cm diagonal line as shown in diagram A of figure 4.
- Move control points as shown in diagram B.
- Clone the curved section.
- Use the Scale tool to flip the cloned section by clicking the X icon (diagram C).
- CTRL-drag the new cloned and flipped section (shown dotted) below the original curve to produce the curve line sections illustrated in diagram D.
- Link the free ends with a vertical line (diagram E).
- None of the lines are linked - until this is done no colour fill can be applied to this newly formed object.
- Lets identify the corner points as 1, 2 and 3. Select the curved section 1-2. Zoom the image on point 1 (use a zoom of 2000-4000).
- Switch off the grid and drag point 1 until it snaps to the vertical line section 1-3. Do the same for points 2 and 3.
- Fill the new shape with the colour red. Eliminate the outline colour (black by default) by clicking Adjust button over the colour None.
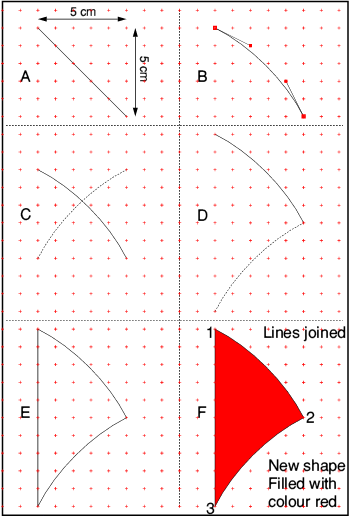
Fig 4
Object Colouring With the Intersect Facility
My idea was to apply a rainbow effect to the segment before tessellating it. In my last article I described a clever technique for segmenting an object and applying different colours to each segment. This is achieved using ArtWorks powerful Intersect tool. In my finished picture I used 9 other colours in addition to the base colour of red. In the example below only 4 default colours (yellow, green, blue and magenta) are used + the base colour (red).
Procedure
- Ensure the grid-lock is on.
- Clone the new shape.
- Resize the clone by 1.5 and colour it yellow.
- Perform the operation in figure 5 below. This "synchronises" all the clones to coincide with grid lock.
- Drag the yellow clone to bottom-left-hand-corner of page.
- Clone the yellow shape, colour it green and drag it to the right.
- Repeat above for the other colours - blue and magenta (figure 6).
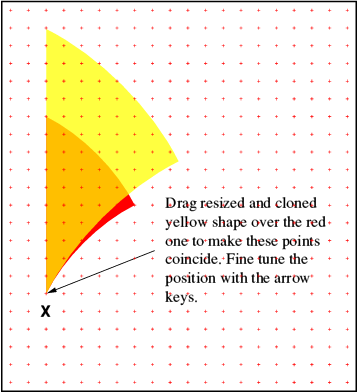
Fig 5
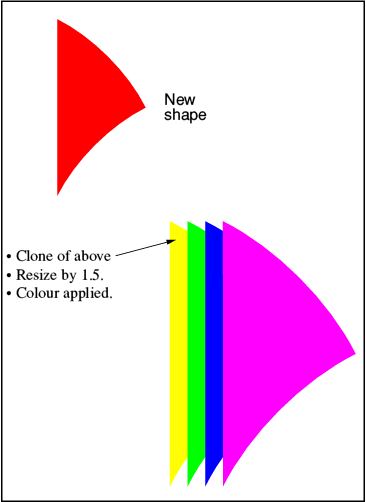
Fig 6
Applying the Intersect
- The intersect tool needs two objects for it to work. In this example it needs applying 4 times therefore 8 objects are required.
- Select the base object (red shape) and clone it 4 times.
- Drag a selection outline over all the red clones and press CTRL-B.
- Drag the yellow shape over the existing red shapes to align with point X as shown in figure 5 above.
- Click the Rotate tool.
- Adjust-click over point X to set the rotation reference.
- Type 5 in the Rotate by box.
- Adjust-click on the red shape to select it.
- Press CTRL-W to apply the Intersect tool.
- Repeat steps 4-10 with the green, blue and magenta shapes rotating each by 15, 25 and 35 degrees (the animated sequence, figure 8 shows the final result).
- The final magenta shape may need a small modification - figure 7 shows why this correction is made.
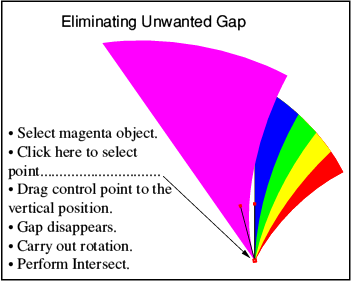
Fig 7 Reshaping the Magenta Object

Fig 8 Colour animation sequence
Using the Coloured Intersect to Form a Tiled Pattern
- Ensure the "Lock-to-grid" option is set.
- Drag the coloured Intersected shape to near the top left-hand side of a new AW page.
- Clone the shape and drag it to position shown (figure 9).
- Repeat until about four or five shapes are linked together. Select and group all (figure 9).
- Clone the group and flip horizontally (X-flip using the Scale tool).
- Align by dragging into place. Don't forget to select and regroup to form the pattern shown in figure 10.
- Clone the pattern and horizontally flip around the axis X-Y (figure 11). Remember to select and re-group.
- A single arch pattern has now been created. This can once again be cloned and dragged along side its neighbour as many times as necessary to construct the complete picture (the example shown in figure 12 shows 3 arch patterns). Select all and group.
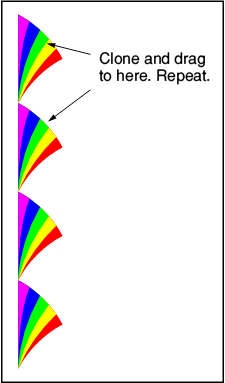
Fig 9 Pattern Sequence
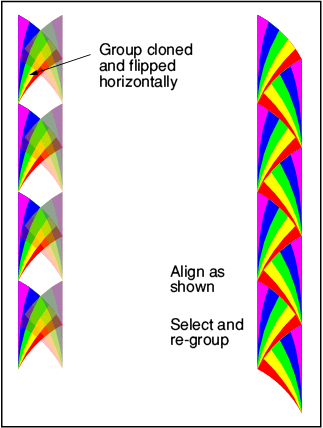
Fig 10
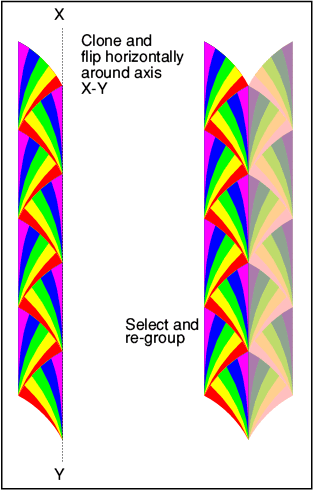
Fig 11
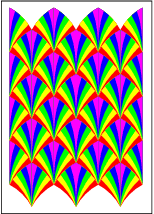
Fig 12
Putting the Finishing Touches to the Picture
Once again ArtWorks comes to our rescue by using a little known tool called Intersect with top (CTRL-Shift-W). This will be used to crop the picture eliminating those unwanted white areas at the top and bottom of the picture. As with most ArtWorks tools it is very easy to use.
- Drag a filled rectangle over the pattern and position it as shown (figure 13).
- Adjust-click on the pattern itself.
- Hit CTRL-Shift-W and voila you have a beautifully clipped image.
- It is essential to group (CTRL-G) all segments before saving the 'masterpiece' to a filer window.
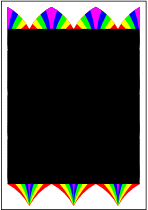
Fig 13
Finally
I am planning an exhibition illustrating some of my art work to be shown in Mansfield at the end of April. Hopefully an advertisement will appear in the CD magazine with details. This take considerable organising but I am hoping to be able to free-up enough time to maintain this series.
References
Huge repository of his life and work:
http://en.wikipedia.org/wiki/M._C._Escher
Official M.C. Escher website - extensive picture gallery.
http://www.mcescher.com/Gallery/gallery.htm
Richard Ashbury