Back to Contents Previous Next
Printing and Print preview
Apart from the fact that the calendar design being printed must be loaded as the displayed calendar, printing is independent of the display. In particular, pictures are handled in totally different way.
A design which is un-saved i.e. has an asterisk in the display title bar, can be printed but - as already seen - the Start printing button (and similar buttons in the printing preview window) will be disabled if changes have been made to the design and the Update button has not subsequently been clicked.
Printing is controlled from the ‘Printing set-up & options’ window accessible by pressing Print set-up ... at the bottom of the main Toolpane.
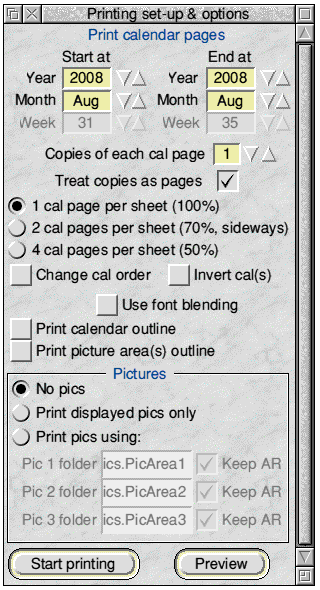
The first set of icons at the top of the window allow the user to pick a range of calendar pages to be printed. The values initially shown for the start and end of the printing range will be set by the displayed year/month/week to (hopefully) something sensible. The user can then alter them as required - and there are checks to ensure that the end of the range cannot be earlier than the start of the range.
In most formats there is one-month-per-page and a typical print run would be for the 12 pages from January to December of one year (not necessarily the displayed year/month). However, in Formats 7, 8 & 10 which have one-year-per-page, perhaps only one year would be printed but perhaps several copies. And finally, Format 6 would require 52 (or 53) pages to cover one year.
Whichever format is active the year/month/week choices are enabled/disabled to match the need.
Beneath them is a set of icons to choose the number of copies and below that is a single option choice to Treat copies as pages - which needs to be interpreted in relation to the following three radio icons offering 1,2 or 4 pages per sheet.
In most cases it is expected that the user will wish to print the designed calendar full size i.e. one calendar page per sheet of ‘configured printer paper’ - where a calendar ‘page’ is exactly what is seen on the main calendar display. In such cases there is nothing more to be said: each page will be printed singly with as many copies as required, and the state of the Treat copies as pages option is immaterial.
However, through the good graces of the Dr Wimp package, !Calibre offers two additional options of printing the designed ‘pages’ at reduced sizes on each sheet of the ‘configured printer paper’, either 2-pages-per-sheet at 70% size (sideways) or 4-pages-per-sheet at 50% (upright). If either of these options is chosen the Treat copies as pages option can be significant.
If the user chooses to print 2 calendar ‘pages’ at 4-pages-per-sheet with 2 copies of each, then with the Treat copies as pages option unticked the printed output will appear as two identical sheets of paper each containing just 2 ‘calendar pages’ on each sheet i.e. half of each sheet will be empty. If the exercise is repeated with the Treat copies as pages ticked the output will be just one sheet with two copies of each ‘calendar page’ on it - because each copy is then treated by the print processing as if it is a new calendar page.
This trivial example illustrates the point but it becomes more important as the number of pages and the number of copies increases. In general, it is best to keep the Treat copies as pages option ticked at all times.
When using the 2 or 4 pages-per-sheet choices please be aware that it is the whole designed page which is reduced but the paper print margins on the output sheets are still the real ones. This means that effective reduction needs ‘made-to-be-reduced’ designs if parts are not to be lost in the print margins. Having said that, the options are most useful for producing small calendars without too much paper wastage. (In addition, it can save some time by previewing a print run at, say, 4-pages-per-sheet even though the actual printing will be at 1-page-per-sheet. For example, the actual picture sequence can be more quickly checked this way.)
Beneath these are two option icons altering the appearance on the sheet. When using 2 or 4-pages-per-sheet, Change cal order rotates the positions of the individual calendar ‘pages’ on the sheet. With 2-pages-per-sheet this merely swaps the two calendar positions. With 4-pages-per-sheet the effect is to rotate the positions anti-clockwise once (only once): the result is that, particularly with sideways designs, the calendars can be made to appear in a more natural sequence on the sheet.
The Invert cal(s) option inverts the calendars individually in their respective positions on the sheet. Care may need to be taken if the printing paper margins are not symmetrical, otherwise the printed version may clip areas when inverted.
The use of both the above two options gives considerable extra printing flexibility.
Beneath this are three option icons which need little extra comment. Font blending is a process which is not supported by all printer/printer driver combinations. When it is supported it improves the appearance of text superimposed on graphics. However, if this option is ticked when Font blending is not supported then some very unwanted effects can occur - including invisible text and changed colours.
The Print calendar outline and Print picture area(s) outline options are offered because some users may find them useful on occasions, but normally they would be unticked.
The bottom framed area controls if and how pictures are chosen for printing.
For the three radio icons:
No pics is obvious.
Print displayed pics only does exactly what it says and if you choose a range of pages to print then each one will have the same picture(s) - and AR option choices - as those currently showing on the main display.
The Print pics using: choice enables three writable icons showing the full directory path of directories from which pictures will be extracted automatically in a simple but flexible way.
Essentially, for each picture area independently, the application looks in the appropriate named directory for drawfiles or JPEG files and takes them one at a time (in alphabetical order) for each calendar page for as many pages chosen by the printing range.
If there are more pages than filed pictures then the process repeats from the first picture again - and this proceeds independently for each active picture area. Thus, for example, if the range chosen in Format 1 is January to December for one year and there are Picture Areas 1 and 2 active, the picture directory for Picture Area 1 might have 12 pictures in it
(say, a different scene for each month)
and the directory for Picture Area 2 might have only 1 picture in it
(say, company logo)
. The printed output would then have Picture 1 different on each calendar page but Picture 2 the same on each calendar page. Clearly there is considerable flexibility here.
The three
Keep AR
options have the same effect as already described in the main display Toolpane. However, in this present window the options apply independently to the printed output only, irrespective of the display Toolpane settings,
The directory names shown by default are already created as sub-directories in the UserRes.Pics directory and it is easiest to put your pictures there as needed. However, to use other directories just drag them to the writable icons as required - or edit the icons in the usual way.
If you wish, printing of the whole selected range and copies can be started immediately by clicking the Start printing button at the bottom of the window.
There is, however, a further facility reached via the Preview button. This opens the ‘Printing preview’ window which has a small toolpane attached, as in the following screen-shot.
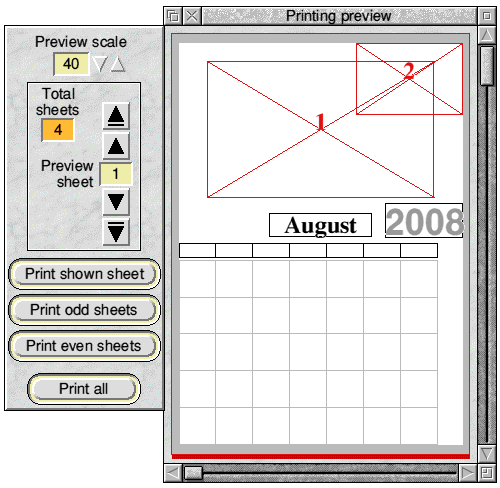
This window previews one printed sheet at a time. Depending on your choices in the Printing set-up window, one printed sheet may contain 1 calendar page at 100% print scale; or up to 2 calendar pages at 70% print scale; or up to 4 calendar pages at 50% print scale. The Orange icon shows the total number of sheets to be printed for the current settings in the previous ‘Print set-up & options’ window.
The first sheet, as you would expect, will always show (at least) the first calendar page of the chosen range to be printed.
The preview does not reproduce the full-colour calendar page(s) shown in the main display window. Rather it concentrates on depicting accurately, in solely Black on White, the positions of the various elements on the printed paper by the use of outline grids - plus the correct year and month of each calendar page and. (importantly, if used) the correct picture(s) for the particular page(s) on the sheet.
Please note that the outline grids for all elements will be shown on the preview even if the actual design has chosen ‘None’ for the grid outline colour. This reinforces the concept of concentrating on the positions.
No RLD information, nor moon phases etc. are shown in the preview.
Calendar and/or picture area outlines will be shown if selected in the Printing set-up window.
As stated above, the toolpane to the left of the window shows the total number of sheets required for the chosen print range and copies - and the user can step through each sheet using the nudger icons.
To better appreciate the preview process the following screen-shot may assist.
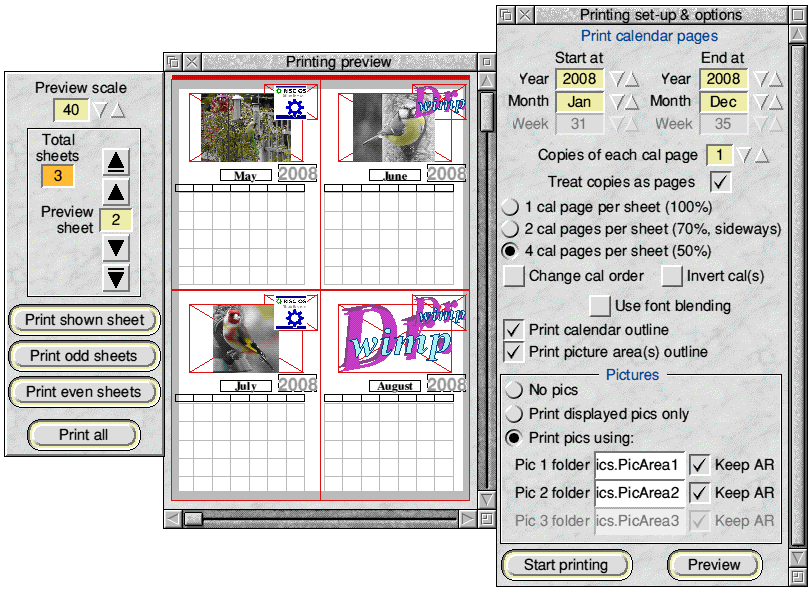
It shows the preview window for Sheet 2 of the print options selected in the Printing set-up window on its Right. Here, a complete year of a Format 1 calendar has been chosen i.e. from Jan 2008 to December 2008, with 1 copy of each page and the calendar and picture area outlines are to be shown.
4-pages-per-sheet has been chosen, giving a print run of 3 sheets. Pictures from stored folders are to be used and there happens to be only 5 pictures in the folder for Picture Area 1 and 2 pictures in the folder for Picture Area 2.
As Sheet 2 is the current selection, calendar pages for the months of May-August are correctly shown - with May showing the 5th picture from the Picture Area 1 folder and the 1st picture from the Picture Area 2 folder (following the picture cycling rationale expalined a little earlier).
Note also that the scale of the preview display can be changed from the icons at the top of the small toolpane. This is of particular benefit for checking accurately that, say, the calendar outline is within the print margins when 2 or 4-pages-per-sheet is being used. (Deliberately to prove the point, the calendar outlines are not wholly within the printable area in the above screen-shot, so you might need to check it at a higher preview scale and then adjust things in the main design.)
If you are using Format 6 then the Week number and the dates also appear in the calendar page previews, to ensure that different pages can be distinguished in this format.
The preview facility also easily shows the effect of the Treat copies as pages option by stepping through the sheets - and also sometimes by the different number of sheets needed if 2 or 4-pages-per-sheet is chosen.
It is important to note that the preview sheet will always automatically orient itself so that the calendars are shown upright, even when sideways and/or inverted printing will occur. Therefore, to make it clear exactly what the printer will present, the preview sheet will always show a Red stripe indicating the top of the paper sheet from the printer’s viewpoint i.e. the first edge of the paper feeding into the machine.
The screen-shots below give examples with the Red stripe along the Right edge and also the Bottom edge - with the calendars viewed in an upright position. Compare all the following with the layout of the previous screen-shot and note the relative positions of the first and last months on the sheets for different selections indicated.
Sideways design, Change cal order unticked, Invert cal(s) unticked:
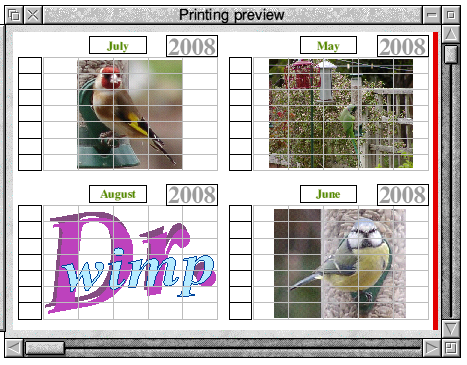
Sideways design, Change cal order ticked, Invert cal(s) unticked:
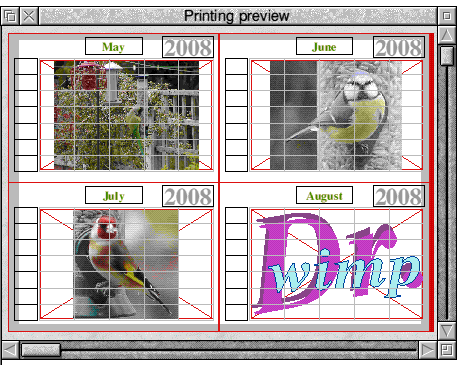
Sideways design, Change cal order ticked, Invert cal(s) ticked:
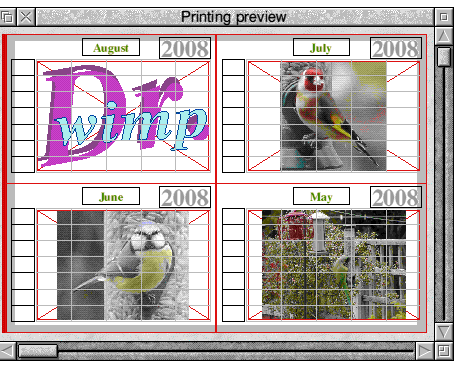
Upright design, Change cal order unticked, Invert cal(s) ticked:
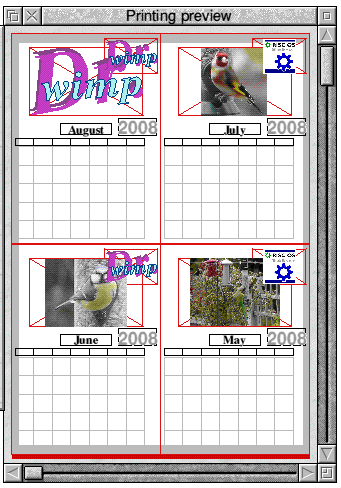
Before committing to printing it is always worthwhile using the preview to step through the whole print run to check that each page is as you expect e.g. to check the picture sequence, or that the size of the year and month boxes are OK for the longest text needed, as has already been mentioned.
The Preview window also offers the opportunity to print just the shown single sheet, or all the odd-numbered sheets, or all the even-numbered sheets - as well as, as with the Print set-up window, all sheets.
In summary, the print preview window is intended to show, sheet by sheet, which calendar page will appear on which printed sheet and which picture(s) will accompany it. Sufficient year/month/week identification for each page is provided and the accurate printed positions of the various elements is shown. However, the full detail to be printed is shown only on the main design display - which itself can always be stepped to a specific page for examination.
If you choose to print the whole print run - either by clicking Print all in the Preview window or Start printing in the Printing set-up window - the Printing progress window opens, as below.
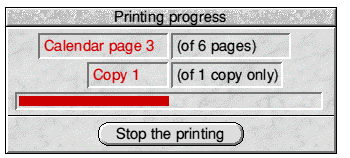
This window is fairly self-explanatory: it offers a guide to where the printing is at. Note that if 2 or 4 pages-per-sheet is chosen and the Treat copies as pages option is ticked, there will be no ‘copies’ recorded in the lower pair of icons.
The bottom button allows the printing to be aborted before it is complete. As usual, this action will not stop any printing of data already sent to the printer.
If, from the Preview window, you click on Print sheet, Print odd sheets or Print even sheets the Printing progress window will not open.
Finally, it is worth noting that at the end of a print run the main design display is (necessarily) re-drawn if that window is open. In Formats 7, 8 &10 - which are very ‘busy’ from a display viewpoint - it can sometimes be helpful to close the main display window before starting to print. thereby making it a little quicker for the user to regain control.
Top of page Back to Contents Previous Next


