



Using Photodesk to Create a Kaleidoscope
Richard Ashbery
Introduction
A simple kaleidoscope can be constructed in Photodesk. Many unusual and striking designs can be created by following the steps in this article. The tutorial only covers the basic kaleidoscope (figure 1) but embellishments are easily added once the principles are understood. All procedures in this tutorial refer to Photodesk's cutting mode (often referred to as Montage mode in the manual).
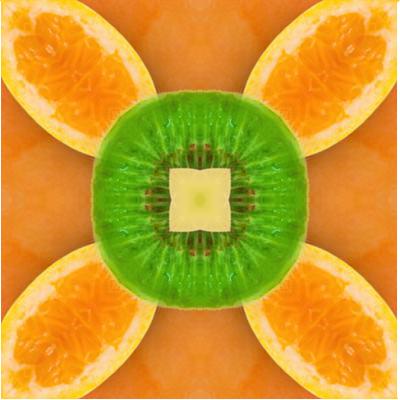
Fig 1 Kaleidoscope Image

Fig 2 Photodesk's Cutting Mode
Making a Start
Crop a jpeg to a perfect square with the dimensions 200 x 200 pixels as shown in figure 3.
Method
- Select Cutting mode by clicking on the 'scissors' icon.
- Click Crop/Extend icon.
- Drag out a rough rectangle over the area required to be cropped.
- Precise measurements are difficult to achieve unless the image is magnified.
- Magnify the image by about 3 times....... click 'Menu' button over canvas and drag pointer over...... Magnify. Change magnification to the ratio 3:1. Adjust the vertical measurement by dragging the middle horizontal handle until the vertical figure is 200.
- Do the same for the horizontal measurement, again until the figure is 200.
- Drag the square guide over the area to be cropped.
- Click tick icon to crop the image. Click Space bar to save the changes. Save the image to a filer window to use as a backup.

Fig 3 Original image (cropped to 200 x 200 pixels)
Creating a Segment From the Original Cropped Image
- Click on Channels tool and then click the Layers button (figure 4).
- Click on Copy tool and the Drawing tools (figure 4).
- Click on the 'Filled line-segments' tool as shown in figure 4.
- Referring to figure 5, click 'Select button' once at point 1. Move pointer to point 2 and click again. Move to point 3 and click again. Finally move to point 4 and double-click to join all the points. The segment is now selected as indicated by "marching ants". Important - it is quite acceptable to draw selection lines - points 2-4 outside the image area (green border).
- Click on Paste into new layer button (figure 4).
- Click "Menu button" over canvas and select Magnify...... Rational to return to original magnification (1:1).
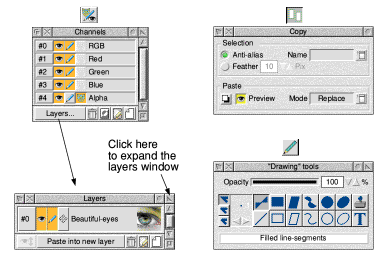
Fig 4 Layers, Copy and Drawing tools windows with associated icons
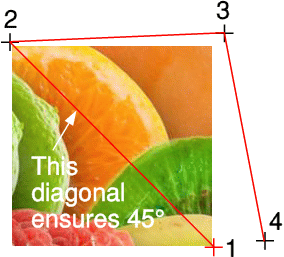
Fig 5
Create a Blank
Click on the image clipboard and create a blank canvas with a new name (template for example)......... 400 x 400 pixels.
Starting the Kaleidoscope - Building the Twin Template
- Click on the green border of the 200 x 200 segment.
- Expand the Layers window and click on #1 (image should appear as shown in figure 6).
- Select the layer by pressing CTRL-A (indicated by marching ants).
- Drag the segment over the new canvas and drop in the top-left-hand-corner shown in figure 7A.
- Use the keyboard arrow keys for precise positioning.
- Click blue "tick icon" on tool-bar to fix in position (This step is very important).
- Return to the layers segment by clicking on its green canvas border.
- Flip the image horizontally......... "Menu button" > Image > X flip.
- Repeat steps 3-6 this time positioning the segment in the top-right-hand-corner.
- Finally remember to permanently fix the work by pressing the keyboard SPACE bar and saving the image to a filer window.
- The twin segments image (figure 7B) will now be referred to as a template.
- The window containing the single segment has now done its job and can be closed.
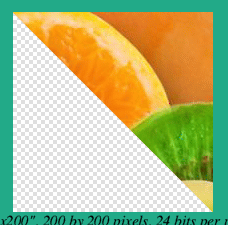
Fig 6 Single segment as rendered in Layers
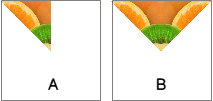
Fig 7A/7B Constructing the template (twin-segments)
Putting it all Together
- Sorry but another blank canvas is required - identical to the one above....... 400 x 400 pixels. Remember to name it (for example Kal_final).
- Click on the green border area of the template just constructed.
- Select the "Magic wand" tool icon (figure 8).
- Set Limits to 100% and click on the white area of the canvas. A selection like this is useless because the white area now includes part of the picture.
- Click on blue cross icon to cancel it.
- Lower the Limits to say 60% and again click on the white area. Chances are that this will still be too high. So lower it again - try and find a point at which none of the picture area is covered with selection marks. This process of lowering the Limits, clicking on the white area and clicking the blue cross icon can be carried out as long as it takes to find this threshold. It is critical - if not correct a white line will appear along the diagonals whenever the templates are butted up to each other. For this example the Limits were set to 46% but this depends on the colour density of the image. Generally the lighter the image the lower the Limits.
- In the Copy window click on the menu next to the writable Name box. Select Edit..... Invert. Observe only the template is selected with 'marching ants'.
- Click on Paste into new layer.
- Expand the layers window and click on layer #1.
- Drag the selection over the new blank canvas and use the keyboard arrow keys to position it accurately.
- Click the blue tick icon to set (solid line outlines the selection to show this has been fixed to the canvas).
- Activate the template by clicking over its canvas border.
- Flip the image vertically by clicking Menu button and selecting Image > Y-flip.
- Press CTRL-A to select the flipped image and drag over the new canvas - position as shown (Illustration.... B in figure 9).
- Click on the blue 'tick' icon.
- Re-select the template. Rotate the image by pressing CTRL-R keys. Type 90 in Arbitrary writable box and click on Rotate button icon.
- Click on the template canvas border and press CTRL-A. Drag rotated image over new canvas and position as shown in illustration C in figure 9.
- Click on the blue 'tick' icon.
- Click again on the template canvas border. Click the Menu button over the canvas and select Image > X-flip.
- Press CTRL-A and drag the selected image over the new canvas and position it as shown in illustration D, figure 9.
- Click on the blue 'tick' icon.
- Remember to press 'SPACE' bar to permanently fix the image prior to saving it to a filer window.
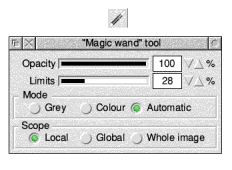
Fig 8 Magic-wand tool window
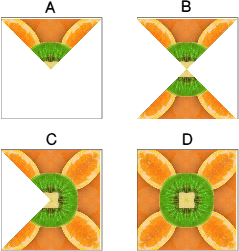
Fig 9 Kaleidoscope sequence
Important Photodesk Notes
- All Photodesk canvas windows (those the image appears on) have a default green border. To activate the window click on this border. Clicking inside the image area may unintentionally change the image.
- After performing a specific process (drag a selection for example) fixing and saving an image in the manner used in this article is always a 2-stage process:
- Fix specific process (click blue tick icon)
- Save entire process (press SPACE bar)
- Steps 4-6 in the paragraph "Putting it all Together" need careful attention.
- Remember to name every new object created. If not you can end up with a jungle of images on the 'Image-clipboard'. Clicking the 'Menu button' over it and choosing File gives access to a rename option.
- Layers requires all images to be the same size - if your master image is 400 x 400 pixels any subsequent images placed in the layers windows must also be 400 x 400. No image re-sizing is therefore possible in Layers. However layers enables different images to be mixed in a multitude of ways:
- Rotated
- Mirrored - X and Y flipped
- Replace*, Add*, Subtract*, Multiply*, Screen*, Difference*, Lighter*, Darker*
* Layers Mode effects. At its most basic, Layers will contain an original image and at least one other image. To see the result of each Mode click on.......................................... ![]() . Adjust-click on each mode in turn whilst varying the Opacity setting.
. Adjust-click on each mode in turn whilst varying the Opacity setting.
Embellishments
This is a tricky one - there are so many unusual effects and variations that can be applied to the basic Kaleidoscope it would be impossible to describe them all. Let me suggest some ideas the artist might like to try to complete the finished work.
- Rotate a duplicated copy of the image by 45° to give additional corner detail.
- Reduce the original image by 50% and repeat the whole procedure above selecting a different area for the 200 x 200 crop.
- Using Layers and applying different Modes as described in the Notes section combine two individual images - vary the Opacity to change the effect on the final image. One of my favourites is the Layers....... Difference option illustrated in Figure 10.
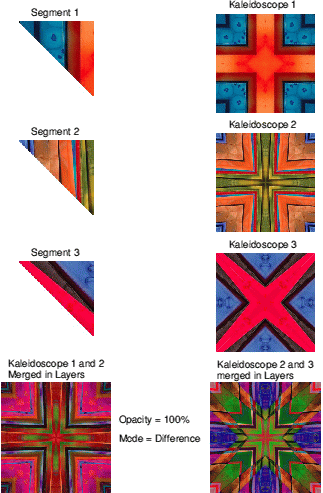
Fig 10 Complex and attractive patterns can be constructed
Richard Ashbury