


Render Bender
Exclusive full version for every subscriber...
Animator
This is the third program in the suite and it enables you to create animations from a numbered sequence of Render Bender images. You can also use it to create animations with numbered sprite files, ProArtisan files and Illusionist files. The new Render Bender picture files are filetype &DE2, which is the same as ProArtisan and Illusionist. The ProArtisan files are an old format of &DE2 but they are still understood.
To run Animator double click on the !Animator icon. This loads the Animator icon onto the icon bar.
Note; Animator uses shared resources with Render Bender and so Render Bender must have been seen by the system in order to run Animator. If Render Bender hasn't been seen Animator reports an error and asks where Render Bender is. You do not have to run Render Bender just catalogue a disc or directory with it on.
The icon bar menu
You access the icon bar menu by pressing MENU on the mouse with the pointer over the icon. This displays the icon bar menu:
- Info - Moving over the arrow displays information regarding the program version number and the author.
- Quit - This quits the program, prompting if a file has not been saved.
Using Animator
To open the Animator window click on the icon on the icon bar. To create an animation from Render Bender files open the Pictures directory display and drag just one of the files into the Animator window. Animator then finds all scenes with the same name and displays their numbers in the small Animate Files window. The window title bar shows the name of the current picture files minus the numbers.
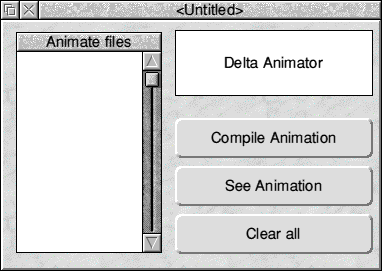
The Animate Files window shows just the number of the picture files that it knows about. These numbers can be edited to add or delete numbers or to put them in a different order. The Insert key can be used to insert additional numbers into a list.
Animator always adds the lowest frame to the end of the list as this ensures a smooth return to the starting point. In many cases you may also want to re-trace the steps. For example if you have a pendulum swinging from left to right and back again there is no point in ray tracing the swing from right to left as this is just the reverse of left to right. In this case you add the numbers to the originals but in reverse order e.g. 1231 would become 123321. Note that frame 3 is repeated in this case. This pauses the image slightly at the top of the swing and matches the pause caused by frame 1 wrapping around at the end to join the first frame again.
Compile Animation
When you have set up the required sequence of numbers click on Compile Animation. The main window closes and a small window titled Delta Compressing opens and shows the progress of the compaction. The resulting file is a compressed animation file.
Once an animation has been compiled clicking on this icon again causes the new frames to be added to the animation. If you want to replace the original animation you must use the Clear animation option first. This feature is useful where you have too many files to fit on a floppy disc or in one disc directory.
For example you might have a fifty frame animation but can only fit 26 frames on each disc. You would first load the frames off Disc A and then remove the number 1 from the end of the list in the Animate files window. You would then compile the animation for the first 26 frames. Once this is done you would copy Frame 1 onto Disc B and load the files as normal. Clicking on Compile Animation will add the new frames to the existing animation. Clicking on See Animation will show the complete 50 frame animation.
See Animation
Click on this button to see the animation. When viewing an animation you can press and hold the Select button on the mouse to speed up the animation. Adjust does the opposite and slows the animation. To abort a full screen animation press the MENU button on the mouse.
Clear All
Clicking on this button clears the current animation from memory - prompting you if the file has not been saved. You must use this option if you have an animation in memory and you want to load new files.
The Main menu
To bring up the main menu press MENU on the mouse whilst the pointer is over the Animator window.
- Info - This provides information on the application version number and author.
- Save - This option is a standard save box and enables you to save the animation file. This file must always be stored with File 1 of any animation. For example if your pictures are called Scene1, Scene2, Scene3 etc. then when you save your animation file Scene it must be in the same directory as Scene1. The animation file automatically takes its path name from the pictures.
If you change the name of the animation file you must also change the name of Scene one. For example if you change the name of your animation to Demo instead of Scene then you must change Scene1 to Demo1. This is necessary because the animation file only contains changes from the first picture and does not contain full pictures itself. Any areas of the picture that are the same in the current frame and the previous frame are not saved. This is how the program achieves such good compaction.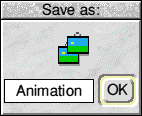
- Directory - This is the same as the Directory option in Render Bender. If you click on the Directory entry in the menu a tick appears and a directory folder appears on the icon bar. Clicking on this folder opens the relevant directory. The path name of the directory can be changed either by typing in a new name in the Directory sub menu and clicking on OK or by dragging a new directory onto the folder on the icon bar.
If you click on OK in the Directory sub menu the new directory path is stored and used next time you run the program. If you drag a new directory onto the folder on the icon bar this is only used for the current session unless you go into the Directory sub menu and click on OK. It is then made the default directory.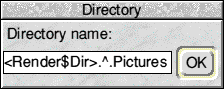
- Show - This option has two choices Window and Full screen. Window shows the animation in a window whilst Full screen takes over the whole screen. Animations will always run faster in Full screen mode. To abort a Full screen animation press the MENU button on the mouse. Don't forget that you can use Select to speed up an animation and ADJUST to slow it down.
- Save application - This option has two sub menus. Window saves the current animation as a stand alone application that runs in a window on the desktop. Full screen saves the current animation as a stand alone application that will take over the whole screen. To run the animation just double click on it as if it was a normal application. As long as you have enough memory and the relevant screen mode is available for the Full screen option then the animation will run.
Viewing Animations
To view previously saved animations drop the Animate file into Animator and click on See Animation. Ensure that the first frame of the animation is in the same directory as the animation file.
Animating other files
Animator recognises Render Bender files. Sprites, ProArtisan files and Illusionist files.
To animate files you must first number the files in sequence. The files are then treated in exactly the same way as Render Bender files. Your files must appear as Pic1, Pic2, Pic3 etc.
Note; All files in an animation must be the same screen mode otherwise you can expect problems. It is also possible to mix sprite and compressed files from ProArtisan, Render Bender and Illusionist as long as they are all the same mode. All files must be created with the new compression module if you wish to create stand alone animations. A utility is supplied on disc to convert old format files and sprites into the new format suitable for use with Animator.
RISCWorld